 |
|
 07-04-2020, 02:02 PM
|
#181
|
|
Bus Geek
Join Date: Sep 2015
Posts: 3,856
Year: 2002
Coachwork: Thomas Built Bus
Chassis: Freightliner FS65
Engine: Caterpillar 3126E Diesel
Rated Cap: 71 Passenger- 30,000 lbs.
|
Good luck with your trip ... let us know how well the air conditioner performed on the road and on-site.
|

|

|
|
07-04-2020, 07:21 PM
|
#182
|
|
Bus Nut
Join Date: Apr 2018
Posts: 421
|
Well I am quite pleased! While driving, we had the air conditioner running at max blast, plus the refrigerator, and we still had an excess of electricity charging the batteries! We were getting 500-700 watts from the solar panels. Unfortunately the AC is just strong enough to cool the cabin slightly less than opening windows, so it certainly isn’t an icebox or comparable to a car. It was still warm for sure. But that’s okay, we’re going to add a few insulating window covers and I think that will be sufficient. I’m very happy with how it turns out!
|
|
|
|
|
07-05-2020, 11:45 AM
|
#183
|
|
Bus Nut
Join Date: Apr 2018
Posts: 421
|
And now, at 9:00AM, we have it running again, the solar panels are working well but were still losing 10-60W from the battery bank. This will only increase of course as the sun rises, but it has turned the cabin to a very comfortable temperature.
A few thoughts now for others considering their solar system:
- if I was just looking to recharge the battery bank, then one panel would be plenty (for my electrical needs)
- I purchased the renogy curved z bracket mounts, which are designed to install on a curved surface like my roof, and they were easy to install. I used 4 1/4 bolts that go through the roof, insulation, and 5/8 thick ship lap ceiling on the inside. I only installed them with washers/locking washers/ nuts, no special metal backing plates
- bus insulation as a whole is awful thanks to how much glass there is. We absolutely need some sort of reflective insulating window covers for everything, including the windshield. And sunroof.
- I kind of wish I had just left the bus roof in along with the stock AC in the backthat thing worked GREAT but obviously requires the engine to run, and in hindsight I shouldve just left that there for driving and then used the current window unit up front while stationary
- my batteries are pretty much fully charged throughout the day, thanks to just how strong the panels are. I couldve gotten away with a smaller bank
- the panels on the roof look pretty sick, and while we were stealth camping last night in the marina parking lot, we had no issues even though its pretty obvious what was going on (the park rangers do patrols at night)
Ill make a proper write up soon for the panels but all in all, Im super happy I put them in and they exceed my expectations and Im not even sure if Ill be plugging it in my driveway anymore!
|
|
|
|
|
07-05-2020, 11:47 AM
|
#184
|
|
Bus Nut
Join Date: Apr 2018
Posts: 421
|
Also I wish I wouldve gotten all renogy products; as it stands, I have AIMS mppt and inverter and Victorian battery monitor and diy batteries
|
|
|
|
|
07-27-2020, 10:03 AM
|
#185
|
|
Bus Nut
Join Date: Apr 2018
Posts: 421
|
The solar panels are working great, I installed kitchen cabinets and shelving, and replaced the shitty ceiling lights with LED strips on crown molding. I'll make a write up on all of them soon, but the problem is finding time to do that with a 3 month old infant... until then, here Argo is in all her glory! I used to have a boat in that marina, and sold it to buy the bus, but I still have the marina keys--meaning we had full access to showers/bathrooms, and did a little boat tour (and reminisced around my old sailboat).
Although it's a national park, and the rangers typically do the rounds at night, we camped overnight in that parking lot and had absolutely no trouble or even interacted with anyone. The worst part about it is the fisherman arrived around 6:00 am, and a Coast Guard helicopter was doing some extensive night training... but that was it.

|
|
|
|
|
08-04-2020, 10:00 PM
|
#186
|
|
Bus Nut
Join Date: Apr 2018
Posts: 421
|
Turns out the brakes themselves were fine, but the front left wheel bearing/race was rusted through, thus causing the metal grinding sound and smoking brakes.
I also got myself an EGT gauge installed. How am I going to use this? I'm not sure yet, but I think if I use it in conjunction with the RPMs, I can really shack the optimum usage to prolong engine life. Now if only I could get fuel flow, I'd be a truly happy man.

|
|
|
|
|
08-04-2020, 10:24 PM
|
#187
|
|
Bus Geek
Join Date: May 2009
Location: Columbus Ohio
Posts: 18,846
Year: 1991
Coachwork: Carpenter
Chassis: International 3800
Engine: DTA360 / MT643
Rated Cap: 7 Row Handicap
|
Where did you install the sender? How you use the gauge varies greatly with the sending unit location .. I tapped mine right into the exhaust manifold as between the last cylinder on the driver side and before the up pipe flange.. that should be about the hottest point to read from .. I keep mine 1200 and below.. my engine is turned up.. I can surely haul ass if I choose to but have to keep the pistons a solid and not a liquid
|
|
|
|
|
09-10-2020, 04:47 PM
|
#188
|
|
Mini-Skoolie
Join Date: Jul 2020
Location: TX
Posts: 28
Year: 1999
Coachwork: Thomas
Chassis: E-350
Engine: 7.3 L Powerstroke
|
Just want to thank you for this thread. I recently got a 1999 E350 very similar and will be using many of your ideas ! Working on the demo now.
|
|
|
|
|
10-03-2020, 01:43 PM
|
#189
|
|
Bus Nut
Join Date: Apr 2018
Posts: 421
|
How to Install Solar Panels on a Skoolie
How to Size a Skoolie Solar Power System
The system on Argo was designed with two things in mind: I am not an electrical engineer, and thus I want to keep it as simple as possible; and the solar panels will primarily be used to power the air conditioner while driving, meaning they will be in full sunlight when used the most. Optimizing for those conditions (full sunlight and no shade to power a 500W air conditioner) drove my design process.
For instance, my battery bank is 3.6kWh and my electrical needs are very small. Before I had these panels installed, I went on a three day trip with a fully charged bank (and no way to charge while out in the woods) and came back with 45% capacity remaining. That tells me that I really don't have to worry about draining my battery bank over night, and then needing to fully charge it the following day. This is important because Argo is primarily parked in shade under the lovely Sierra Nevada pine trees in Tahoe National Forest, so no matter what the design the panels will only be capable of trickle charging the system once I'm at my destination.
What I really want is to power that air conditioner (see my previous post here) since Argo has no dash air or heater. I've ops tested it before and, using my battery monitor (see this post for an overview of my electrical system), saw that even though it's rated for 450W, the air conditioner actually draws 470-480W, which makes sense because inverting the electricity from the DC battery to AC has a slight inefficiency (about 6% in my case). Let's just round that up to 500W to be safe.
So that's the requirement that's driving my solar system design: I need 500W of electricity during the daytime. But I can't just get 500W of solar panels and expect to get 500W because that rating is only for specific conditions--in fact, they're called Standard Testing Conditions, or STC. Those conditions are typically 1000W of sunlight per square meter (thus simulating the sun directly overhead with no cloud cover) and an ambient air temperature just above freezing (but the cells themselves will be 25C/77F). These conditions are quite rare out in the real world. The sun will rarely be overhead; there will likely be some haze or clouds (or, in Northern California, wood ash); and the ambient air is usually 80-100F, not 32F (efficiency goes down as heat goes up). The higher the efficiency, the less panels you'll need.
We can't really change the ambient temperature (although there will be a slight cooling effect from the wind while driving), but we can change the sun angle. Some people will prop their panels up at an angle to capture more sunlight, and there's even this nifty Smart Flower residential solution that actively follows the sun across the sky.
 SeanF's build SeanF's build
But, like I said earlier, these panels need to be optimized for driving down the road. I can't really tilt them while driving, and honestly I wouldn't bother tilting them while parked anyway.
Why? Well, it's just not worth it to me. Check out this assessment of solar panels in Portland, OR, and Phoenix, AZ. In Phoenix, if you tilt your panels up to the optimum angle pointing directly at the sun, you get a 15% increase in energy compared to a panel that is totally flat. In Portland, that number is 18%. Let's just round up to 20% tops. Is getting an extra 20% of current coming down from the solar panels worth the hassle of installing hinges, parking in the correct direction, and then climbing up on the roof to tilt them (and doing so again prior to leaving)? Not for me. I'll go ahead and take a 20% decrease in electricity if it makes installing them simpler and no work once I'm at my destination.

Basically, I think it's safe to plan on a 20% loss of efficiency if you keep the panels flat.
And since I need 500W of electricity to power my air conditioner, I simply multiply 500 by 1.2 to figure out how big of an array I'll need. And that comes out to 600W of panels.
But WAIT! All those numbers are simply based on the max output when the sun is highest in the sky! That's only at one point in time during the day. If I'm driving at 10:00AM, the sun will be much lower in the sky and I won't be producing anywhere near 600W of electricity. So I'm going to need more than that if I want to power the AC before and after solar noon.
There are so many ways to do this, but I'm just going to keep it simple and say that, at solar noon (when the sun is highest in the sky) during the equinoxes (March and September), I want to produce 500W of power. This means that during the summer months between those two dates, there will be quite a few hours during the day that I will be producing at least 500W, since the sun will be higher than it is on the equinoxes.
Going back to the California solar calculator website, I see that in March I could produce 22 kWh and in September it would be 26 kWh. Let's use the lower one of 22 kWh. To figure out the inefficiency, I'm going to take 22 divided by 36 (from the max power in Jul) and I get about a 60% inefficiency, or a 40% loss.
My goal is 500W. So I add the inefficiency of keeping the panel flat (20%), and I get 600W. Then I add the inefficiency of having the sun lower in the sky (40%) and I get 840W.
This tells me that if I have at least 840W of solar panels, I will be able to produce 500W of power at solar noon on the equinoxes, and for at least a few hours during the summer days (with a maximum on June 20th, the summer solstice).
None of this actually matters. I know this isn't how you actually size a solar system, and there's more to it than just that random chart I found on the internet. I hardly have room on my roof for solar panels, so it's not like I'm going to be able to use this information. But it's fun to try and factor it all in.
Well, it just so happens that Renogy makes 24V 300W panels, and I have room on my roof for exactly three of them, so I can get 900W of solar panels--slightly more than what I need.
How to Wire Solar Panels in Series and Parallel
Now that I know I'll have three 300W panels, I have to decide how to wire them. Panels in parallel will will increase their amperage/current, while panels in series will increase their voltage (it's very similar to battery wiring). My panels are 24V 300W panels, implying that their current is 12.5 amps. But I don't have to do these calculations; I just need to refer to the panels' specifications:
What I'm really seeing here is that, in general, the panels will push out 9 amps at 32V. So if I wire them in parallel, I'll get 27 amps at 32V; in series, I'll get 9 amps at 96V. Which one should I choose?
In favor of parallel:
- Losing a panel due to a flying rock or old age won't affect the other panels' ability to charge
- Shade covering one panel won't affect the other panels' ability to charge
In favor of series:
- Lower current means smaller wires, thus saving money and weight
- Higher voltage means you can charge with less sunlight than parallel would require--meaning earlier in the morning/later in the evening. This is because the voltage required to charge a 24V battery has to be at least 28V--and with the panels in series, the whole thing will reach 96V at solar noon but that also means it will hit 28V pretty soon after the sun comes up.
The most common reason to do it in parallel is the shading issue. If your panels are wired in series (the positive of one panel is connected to the negative of another panel), then the whole system requires all panels to work in unison. If one panel is covered by the shadow of a tree, the whole system now acts as though it's shaded by a tree.
For me, though, I don't really care: I'm planning on parking in the shade of many trees, and the panels will be primarily used while driving down the road, where there is NO shade at all. This was a no brainer for me--I went with series.
How to Mount Solar Panels to the Roof of a Skoolie
One of the most infuriorating things about converting school buses is that every surface is curved (it's one of the benefits too), including the roof. So how do you mount a flat panel to a curved roof? Renogy makes z-brackets just for this purpose. Keep in mind that I'm doing this after I have already installed the ceiling inside and painted the exterior of the bus, which I recommend everyone do too.
I put the z-brackets on the panel first and then placed it just forward of the skylight, giving the skylight enough room to open up. Letting the panel rest on the roof (as in, the middle part of the panel was resting on the center of the roof, and it could see-saw back and forth), I centered it and applied copious amounts of seam sealer underneath the Z-bracket. Thus, the seam sealer sort of "glued" the bracket in place.
With the z-brackets lightly glued in place, I drilled one of the mounting holes through the metal skin of the roof, the insulation, and the shiplap ceiling inside. I then put a bolt in, just to hold it in place, and drilled the rest of the holes. These holes were not exactly straight; I thought about using a sort of portable drill press to try and keep them as straight as possible, but decided it wasn't worth it. So on the inside, the holes are kind of zig zaggy and not evenly spaced. But who cares? It still works.
With the panels still "glued" in place, and the holes now present, I put the bolts through with the head on the inside, using washers, locking washers, and nuts as appropriate. Tightening them was a two person job, with one on the inside holding the bolt head, and the other outside tightening the nut. I simply tightened until the locking washer was engaged (as in, it was flat instead of "flexed"). I checked the inside to make sure the shiplap wasn't cracking or if it was still loose, tightening the bolt as necessary.
I repeated this with all three panels, putting about a quarter of an inch of spacing between them to allow for thermal expansion. They ended up fitting perfectly on the roof.

How to Wire Solar Panels on a Skoolie
With a curved roof, there was enough of a gap between the side of the panel and the roof to fit the cable entry housing. This is probably overkill, as simply sticking the wires through the roof might work, but the entry housing prevents water from creeping in. It also locks the wires in place, so they can't slide out.
I picked a good location inside the bus for where the wires should enter, and drilled two holes just big enough to fit the two wires. Since I'm wiring them up in series, the positive wire of the first panel goes into the bus, and the negative wire of that panel connects to the positive wire on the next panel, and then to the next panel... and finally the negative wire of the last panel goes all the way up to the front and into the bus.
Wiring it up is kind of tricky, only because you have to prerun the locking glands of the cable entry housing on the wires first, then run them through the roof. The housing comes with instructions, just follow them. As far as securing the entry housing to the roof, I simply used a lot of seam sealer to seal the edges, and stuffed a few rags on top to hold it down while it dried.
With the two wires now running into the ceiling of the bus, I secured them using clamps and ran them down the wall. But I need a master cutoff switch for the panels, so I ran the negative wire behind a makeshift panel and hooked it up to a simple on-off master battery cutoff switch (leaving it off). Then I ran the wires down the wall and into the electrical panel, and finally into the MPPT controller.
The MPPT controller has an input for the solar panels, an output for the batteries, and an output for the DC load. So I simply connected the batteries to their hookups, and then connected the DC load output to the electrical panel.
 My MPPT is located in my electrical control panel My MPPT is located in my electrical control panel
At this point, my batteries are powering the MPPT and the DC system, but the MPPT says there's no solar current coming in. Duh. The master cutoff switch is off, and the panels aren't even wired together yet. So I connected the panels wires in series, then gave everything a quick one-over to make sure it wouldn't blow up, and turned the cutoff switch on.
It took a few moments to fire up, and then the MPPT said I had a few hundred watts of solar power coming down.
I now have 900W of solar panels successfully installed and charging my electrical system. (In this picture, it's 88W in full shade at 4:00PM)
How to Protect and Care for your Solar Panels
At a bare minimum, you should have a cutoff switch along your negative cable such that you can easily disconnect the panels from the MPPT. Some MPPTs, such as mine, require you to disconnect the solar panels first before disconnecting the battery, and the manual advises that you should never have just the solar panels (with no battery) connected at any time.
You should also have an appropriately sized fuse along the positive cable such that if there's a short up in the panels, it will protect the entire circuit by disconnected the positive line. My MPPT has a built in short circuit protection, which I don't think I actually trust, so at some future point I'll be adding a 15 amp inline ANL fuse like I have for my battery setup.
You'll need more than just electrical protection too. As you're cruising down the highway at 65 miles per hour, the force of the wind hitting the leading edge of the solar panel is approximately 54 Newtons, or 12 pounds of force pushing back on the solar panels. This force then transfers to the bolts I'm using to hold the panels down. With four bolts per bracket, and four brackets per panel, that's 16 bolts total and less than a pound of force per bolt. I'm not worried about those, but what about the other bolt on the Z-bracket (the one that connects it to the panel itself)? There's only one per bracket, or four per panel, or 3 pounds of force per bolt. Again, I'm not worried about a steel bolt failing under 3 pounds of force.
But the primary concern here isn't bolt failure, it's bolt loosening. Even though I'm using locking washers, the bus vibrates any time it moves, and as an added precaution, I sprayed all bolts/locking washers/nuts with Loctite spray adhesive. It gives me a warm fuzzy feeling that I've covered all potential safety issues.
(Yes, I know that the wind may be turbulent coming down the highway, and it may hit the panels with some lift force. But the lift is actually pushing the panels down--the cross section of air that rides up the hood and windshield and then runs under the panels will be moving faster than the air on top, thus it will have a lower pressure, and thus the direction of lift will be toward the bus).
The last piece of protection we need is for storage. The primary means of charging my batteries when parked at home, which is where the bus spends the vast majority of its time, is through shore power. When I'm parked in my driveway, I disconnect the solar panels using the cutoff switch since I don't need them. The other issue is that my driveway is completely shaded (see top photo) with an oak and a pine tree. The oak drops leaves and acorns, which could dent and scratch the panels, and the pine tree drips sap and pollen, which will glue itself to the panels. (Also, apparently ash from the wildfires is an issue here in Northern California).

Common Gotchas
- Sizing the panels. In my personal opinion, it would be better to spend more money on a bigger battery bank (lithium always) than it would be to spend more money on more/bigger solar panels. Just make sure it matches what your electrical needs are.
- Installation of the panels. You don't have to through-bolt them to the ribs. The amount of force needed to rip a panel off the roof is enormous and, although it is possible, I think the threat is overblown. A friend of mine simply glued his solar panel to the roof of his Sprinter conversion four years ago and it's worked great for him. Disclaimer: I'm a random dude on the internet so take what I say with a grain of salt.
- Appropriate protection, both mechanical and electrical. There should always be a master cutoff switch inline with the solar panels, as well as a fuse. A little spray adhesive should help the bolts from wiggling loose, and a tarp keeps them protected when parked.
|
|
|
|
|
10-22-2020, 10:53 AM
|
#190
|
|
Bus Nut
Join Date: Apr 2018
Posts: 421
|
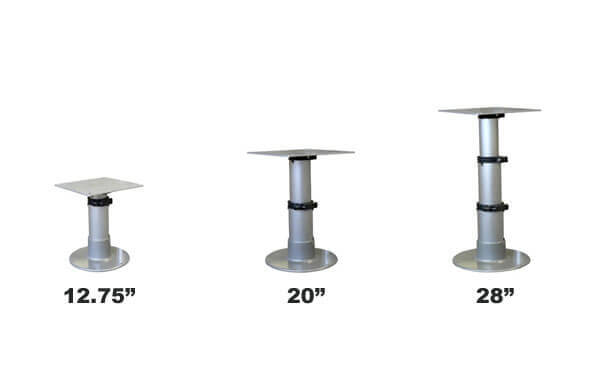
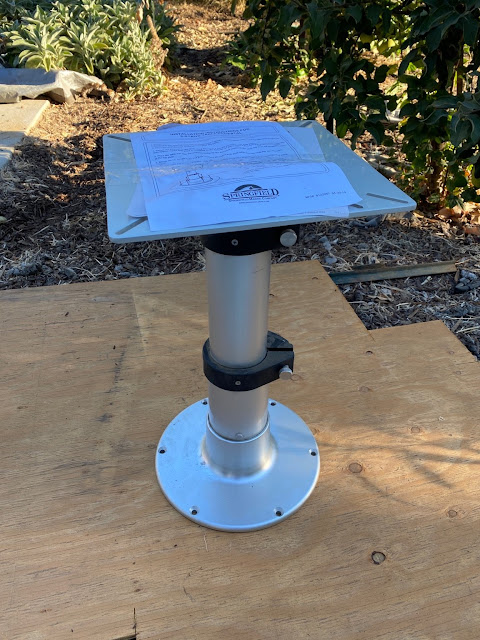
Selling a new gas powered table pedestal
I bought this exact item here ( https://shop4seats.com/rv-furniture/...-pedestal.html) but, after finishing the conversion, realized that the table won't work as I had planned. I never even installed the pedestal. It retails for $269, so I'm willing to part with it for $120 with free shipping. Let me know if you want it!
|
|
|
|
|
10-22-2020, 10:57 AM
|
#191
|
|
Bus Nut
Join Date: May 2018
Location: Wamego Ks
Posts: 617
Year: 2007
Chassis: Collins
Engine: 6.6L LMM Duramax
|
Quote:
Originally Posted by TheArgobus

I bought this exact item here ( https://shop4seats.com/rv-furniture/...-pedestal.html) but, after finishing the conversion, realized that the table won't work as I had planned. I never even installed the pedestal. It retails for $269, so I'm willing to part with it for $120 with free shipping. Let me know if you want it!
|
Well shoot... Buying that from you would have been way easier than making the contraption I made for my dinette table. I didn't know they made such a thing...
|
|
|
|
|
10-23-2020, 11:11 AM
|
#192
|
|
Bus Nut
Join Date: Apr 2018
Posts: 421
|
Yeah... it wouldve been sweet... but I didnt realize that if I had a dinette table in the back, there would be no way to get into one of the bench seats because I am a dumbass more often than not. It would be pretty damn sweet tho if I had one!
|
|
|
|
|
10-23-2020, 11:45 AM
|
#193
|
|
Bus Nut
Join Date: Jan 2015
Location: Brazoria County, Texas
Posts: 819
Year: 1997
Coachwork: Carpenter
Chassis: International
Engine: T444E
Rated Cap: 32 Passenger
|
Quote:
Originally Posted by TheArgobus
Yeah... it wouldve been sweet... but I didnt realize that if I had a dinette table in the back, there would be no way to get into one of the bench seats because I am a dumbass more often than not. It would be pretty damn sweet tho if I had one!
|
Hey Argobus, how do you like your seats from shop4seats? Are they comfortable on long trips?
|
|
|
|
|
10-24-2020, 09:24 AM
|
#194
|
|
Bus Nut
Join Date: Apr 2018
Posts: 421
|
Quote:
Originally Posted by Phatman
Hey Argobus, how do you like your seats from shop4seats? Are they comfortable on long trips?
|
I ended up only buying a captain's chair to replace the original driver's seat. That chair is top notch and super comfortable, far superior to my car. I added the inflatable lumbar support too which is totally worth it on longer drives.
I considered buying their dinette seat/bed kits (like this one here: https://shop4seats.com/rv-furniture/...r-dinette.html) but I ended up not getting it for the following reasons. The dimensions would sort of work, but they wouldn't exactly fit in my shorty, so I would've had to make a custom table to fit (hence the pedestal). But the real reason is that I asked how easy it would be to modify these seats, and they said that they are simply made of plywood and are DOT tested/approved. Most people just screw the plywood down into the floor, which was unacceptable to me since these seats are also where my passengers sit while driving. Given that they are simply plywood seats at preset dimensions, I just made my own seats out of 2x4s, shiplap, and plywood (see my post here: https://theargobus.blogspot.com/2019...n-skoolie.html). I then added cushions from foamorder.com, which I need to post about, because these cushions are AWESOME, although expensive. In any case, if you are handy, I'd probably just make your own seats instead of buying these, but if you are short on time, then their kits would probably make sense.
|
|
|
|
|
10-24-2020, 10:08 AM
|
#195
|
|
Bus Nut
Join Date: Jan 2015
Location: Brazoria County, Texas
Posts: 819
Year: 1997
Coachwork: Carpenter
Chassis: International
Engine: T444E
Rated Cap: 32 Passenger
|
 I was just curious on their long drive comfort. I bought two captains chairs for my table setup already. One of them is my wifes passenger seat. We have not taken her out yet. My daughter had a Blazer a few years back and the seats seemed comfortable unti I took trip in the truck. Most uncomfortable seat I had ever rode in.
|
|
|
|
|
11-28-2020, 12:11 PM
|
#196
|
|
Bus Nut
Join Date: Apr 2018
Posts: 421
|
How to Install a Diesel Heater on a Skoolie
How to Choose a Heater for a Skoolie
If space isn't an issue, then a log-burning fireplace would be super awesome. These require much more space because the fireplace itself, and the chimney, need to be installed in a location that has nothing else except a metal protective backing (you don't want to scorch your wall from the heat, after all). But the ambience and sound and smell of a wood stove is unbeatable--and you get a cooking surface, too!

Unfortunately for me, Argo is far too small to get one of these. I have a pretty robust electrical system that's designed to run an air conditioner in conjunction with solar panels, but if it's cold out, why not use it to run a nice space heater? There's two primary types of electric heaters: the kind that heats air and blows this hot air around; and the kind that emit infrared radiation as a sort of "spot" warmer (this is the same as feeling the heat from a campfire even if the air is cold). But the major drawback of electric space heaters is, well, the draw--event the smallest space heaters still pull 750W, meaning if I want to heat Argo through the night (with no solar), I'd kill my battery bank in five hours.
How about propane? Propane is an excellent choice because most skoolies already have a propane system, and they're pretty efficient too. There are portable types of propane space heaters that have their own bottles, too (like a camping stove), which would be convenient because you could leave it at home during the warmer months. The major drawback to propane, however, is its two by-products: water, and carbon monoxide. Carbon monoxide is a known killer, especially from propane powered space heaters. Water sucks because the ambient temperature is usually pretty cold (why else would you be using a heater?), which means the bus skin, windows, and frame are also going to be cold, and water condenses out of air onto cold surfaces--meaning if you make it really humid in the cabin by burning propane, everything is going to get really damp. And worse, rust.
That leaves the diesel powered heaters. They suck air in the combustion air intake (which usually leads outside), burn diesel fuel in the combustion chamber, and pumps the hot exhaust over a heater exchanger and then out a metal exhaust pipe. Meanwhile, a fan sucks air in from the cabin (different than the other air intake), passes this cabin air over the heat exchanger, and then pumps it back into the cabin. The exhaust from the combustion goes outside the bus, and it uses fuel as lubrication.
There's a niche industry right now that's lovingly called "cheap Chinese diesel heaters" and they may or may not be from China (or Russia?), but they do seem to work reliably. The most difficult part is trying to decipher the poorly-translated instruction manual on how to install them. Fortunately, I've done the dirty work here so you can see what I did to install my cheap Chinese diesel heater.
How to Install a HappyBuy Diesel Heater
There's a few key points when considering where to install the heater: it needs to have four air vents (two intakes, two exhausts), and ideally it would be located as low as possible, since hot air rises. The other consideration is the fuel source--some of these heaters come with their own tanks, which can be installed anywhere, so long as the fuel line and pump are installed correctly. Some people just plumb it directly into the bus's fuel tank, but that's a little too difficult for me to access, so I'll get to the fuel supply in a little bit.
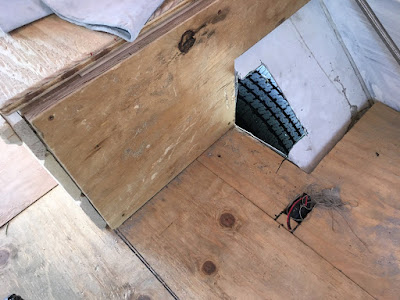
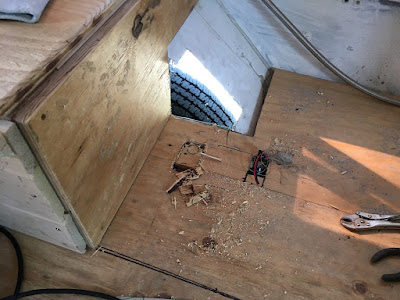
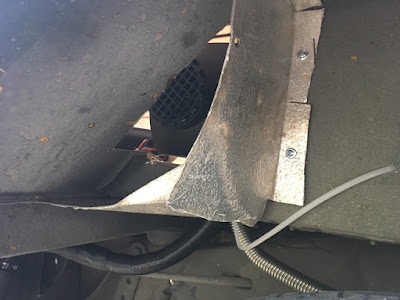
There was an unused space under the planned kitchenette, adjacent to the wheel well. The heater unit happened to fit perfectly in this space, with a few inches to spare, so I installed it here. The two combustion air lines (that are used only for burning diesel) would come up through the floor, directly underneath the unit, and then exhaust back down and back through the wheel well; the air intake for heating would actually come from the outside of the bus, pass through the heater, then pump straight inside the bus.
Why wouldn't I suck air in from the cabin to be reheated? Well, at 5000W, this is the smallest 24V diesel heater I could find. That's not how much electricity it uses, that's it's heating rating. How many watts or BTUs do you need per square foot? A good rule of thumb is 10 watts per square foot. Meaning a 5000W unit (like mine) will sufficiently heat a 500 square foot room. Argo isn't even 100 square feet. So even if I have it heating cold ambient air all the time, it will still only run partially as it's ridiculously oversized for my space.
The other, main reason, however, is that I didn't want to sacrifice kitchen storage area for an air intake hose. One drawback I see with this method, however, is typically cold winter air is quite dry, and if I were recirculating interior air, at least it would get a little more humid with our breath and whatnot.
Anyway, I started by cutting part of the wheel well for the air intake. Once I got that sized appropriately, I marked down where the mounting holes were, as I'd have to cut a hole in the floor in between them for the combustion lines. See the pics for better info.

It's worth noting that the fuel line also runs underneath, and goes to the back of the bus where I have the future fuel tank planned. I'll get to the fuel in a moment.
Just like with propane, combusting diesel produces water, so the exhaust line needs to be angled downward in order to drain properly. It also comes with a muffler at the end of the metal line, all of which will get exceedingly hot. They need to be installed in such a way that they don't burn anything nearby.

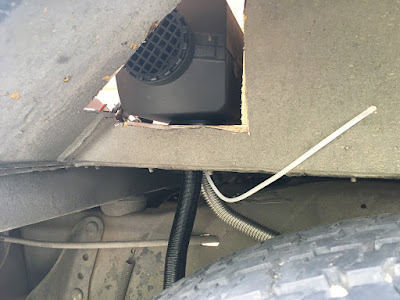


The last part here that's worth mentioning is the combustion intake. It comes with an air filter device that protects the combustion chamber from fine particulates, and a long hose to position it away from the exhaust. It must be installed away from the exhaust, because if the air intake sucks in already combusted air, it risks damaging the unit (because the exhaust is already super hot) and also stalls the fire (there's less oxygen in the already-burned exhaust). It's also important to install it in such a way that it can suck in air while the vehicle is moving and to avoid ingesting road debris. For me, I ran it forward and ziptied it to my holding tank, which is forward of the axle, in such a way that it points sideways and is protected from road debris.
Just like with the combustion air intake, the air to be warmed intake needs to be protected too. As you see, the air intake is simply sucking air in from the wheel well, but this could be a problem if it's wet and muddy out. The tire might fling up dust and debris, which, if fine enough, could be sucked into the air intake. Not to mention the kinetic damage that could result from this. So the air intake needs to be protected. Fortunately, I have some left over sheet metal from the demolition phase, which works perfectly here.


The entire chamber that the heater is located in is isolated from the rest of the bus by plywood framing, meaning that cold air coming in from this open wheel well will only surround the heater unit, but won't be able to intrude on the cabin. Same thing with moisture that happens to find its way in, but that seems extremely unlikely due to the sheet metal protection.
The control head is installed on the bulkhead above the unit, and it's simply wired to its own circuit that comes from the conduit seen in the photos. The refrigerator sits above this conduit opening, but I preran everything before I installed it to make sure it got power as planned.
Where to Put the Fuel Tank for a Diesel Heater
I originally planned on running the fuel line through the bus tank inlet's cap, and ran the fuel line in such a way that this would've worked. Because the heater is mounted on the floor, the fuel line has to run out the floor too (along with the combustion air intake and exhaust). I then ran the fuel line back inside the bus, coming in through the wheel well and into the compartment under the aft left settee. Here, I installed the fuel pump and filter, then ran the line back out and into the bus fuel tank cap.

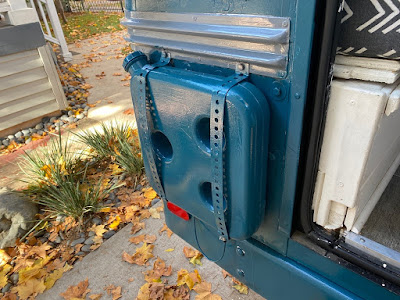
And quickly discovered it wasn't going to work. The fuel inlet "gooseneck" ran too far, and the heater's fuel line couldn't make it all the way through and into the tank. So, I ended up using the provided 10 liter/2.6 gallon tank. To get the outlet nozzle installed on the tank, I drilled in the appropriately sized hole at the right location, and ran a string through the nozzle with plenty of slack. I then put the string into the tank, fished it out through the hole I just drilled, and pulled the nozzle out and it fit snugly. I used the provided O-rings on the inside and outside, but I also slathered some petroleum jelly to make an even better seal. I tightened the nut and voila, now my fuel tank was ready to be mounted.
I mounted it using slotted metal to the aft side of the bus. I didn't do anything fancy here; I simply used big enough hex screws, sealed with seam sealer, that went into the sheet metal trim and one of the ribs. I also used long screws to secure the three "dimples" of the tank, and then painted over it with the same color as the rest of the bus.
Since I had already installed the fuel pump inside the bus, I drilled another hole coming out of the compartment and ran the line out through there, then attached it to the tank's nozzle. I know it looks tacky, and it could've been done much more efficiently, but I had mounted everything for the bus's fuel tank, not this one.
In any case, the fuel lines were all attached now, and everything was mounted correctly. I powered it up and followed the first time start up procedures:
- Press the "Settings" button to set the time (24-hour time; use the arrows to set the digit, then "OK" to move to the next digit). The other settings are two timers and a setup pin; ignore these.
- Get out of the Settings by hitting the settings button or letting it timeout
- Prime the pump by hitting the OK button and the arrow down button at the same time. You can hear the pump pulsing and it will run for a few minutes. I just let it run until it stopped on its own, and checked the filter (which is mounted just prior to the pump) and saw that there was fuel in it, so I called it good.
- Now you can turn it on simply by pressing the power button on the control head or the remote. It has its own warm up sequence, and it'll take a while for it heat up
- To turn it off, hold the power button (or press OFF on the remote) and it will run through a cool down sequence.
- DO NOT SIMPLY CUT POWER TO TURN IT OFF. Wait until the fan actually stops before cutting power.
Common Gotchas
- Hot air rises, so it makes sense to install this as low as possible. If you use an air intake, try to install that elsewhere but also low so that it sucks in the cooler air of your cabin
- Fuel tank installation; I would hate to have it inside the cabin, where diesel fuel could spill when filling the tank, or if a leak developed. Also, I have it installed in such a way that it gravity feeds to the pump.
- Double check that there's no way for the exhaust to get sucked back into the combustion air intake
|
|
|
|
|
12-04-2020, 05:51 PM
|
#197
|
|
Bus Nut
Join Date: Apr 2018
Posts: 421
|
Just like the back springs, I got the front ones done up and its a super smooth ride now. The bus is also much more level too, so Im not driving dragging my nose in the road.
My commuter car got totaled this summer, and so Ive been relying on my wifes suv for going to and from work. We just moved to a rural spot in mountains meaning she will need it in case of emergency with the baby, so now guess whats my daily driver?
Thats right, my Skoolie. It gets 10 mpg, which is probably marginally worse than a truck (what I want next), so if I spend $15k on a reliable commuter that gets better gas mileage than Argo, it would take me YEARS to recoup that cost. So for the time being Im driving her to and from work.
And then whenever the Tesla truck comes out Ill pick that up as my next vehicle.
|
|
|
|
|
12-05-2020, 04:23 AM
|
#198
|
|
Bus Geek
Join Date: May 2009
Location: Columbus Ohio
Posts: 18,846
Year: 1991
Coachwork: Carpenter
Chassis: International 3800
Engine: DTA360 / MT643
Rated Cap: 7 Row Handicap
|
I been driving my busses as daily drivers for a long time. I have a truck and a commuter car. I got the car to drive to my trendy office in downtown but since the CoVID and the protests ruined downtown I cancelled the office.. that car is almost 2 years old with 7K miles.. I like driving my busses better anyway ( sorry tree huggers).
I wish the cyber truck would look as radical as the prototypes do I might be inclined to get one just because it isn’t the same ole same ole. I got a jeep truck on lease when they first came out just because it look at least a little off the norm but they are everywhere now.. another reason for using a skoolie as a daily
|
|
|
|
|
12-06-2020, 08:54 PM
|
#199
|
|
Skoolie
Join Date: Nov 2020
Location: Long Island, NY
Posts: 167
Year: 2009
Coachwork: Girardin
Chassis: Chevy
Engine: 6.6 turbo diesel
Rated Cap: ?
|
Hi there. I am new to this skoolie stuff. And not nearly as talented/knowledged as you. But i know that i could handle this table pedestal install into my shorty. If it is still available i would be interested. Thank you, Liz. Btw...thank you for all of your posts. Very impressive and helpful.
|
|
|
|
|
12-23-2020, 10:32 PM
|
#200
|
|
New Member
Join Date: Dec 2020
Posts: 1
|
Any updates on this project?
|
|
|
|
|
|
 Posting Rules
|
You may not post new threads
You may not post replies
You may not post attachments
You may not edit your posts
HTML code is Off
|
|
|
|
 » Recent Threads
 |
|
|
|
|
|
|
|
|
|
|
|
|
|
|
|
|
|
|
|
|
|
|
|
|
|
|
|
|
|
|
|
|
|
|
|
|
|


 Linear Mode

