 |
|
 04-28-2019, 03:02 PM
|
#41
|
|
Mini-Skoolie
Join Date: Apr 2019
Posts: 66
|
Wow!!! Amazing job!!! I have been doing reasearch for the last 4 months on converting a shortbus specifically a 4 window because I like that it will fit in "some" standard parking spots and will fit in my yard, and to tow my utv (instead of getting a diesel truck just to tow my toys. I can get a bus for a fraction of the price of a diesel truck.
Wanting to see if anyone has done a setup this small with a shower and composting toilet. (Wet or dry bath)
I really liked D_Bus_life build on youtube (5 window). If I cant get a shower inside the bus I will have one outside (i like the idea of not having to fill up my grey tank too especially on a wet bath)
Subscribed!
|

|

|
|
05-01-2019, 03:17 PM
|
#42
|
|
Bus Nut
Join Date: Apr 2018
Posts: 421
|
Thanks! You have the right idea, a shorter shortie is so much nicer to drive around. The length means parking is no problem in parking lots, although I have to mindful of the width so to speak. But I'd take this easy handling over having an extra two feet inside.
|
|
|
|
|
05-01-2019, 03:23 PM
|
#43
|
|
Bus Nut
Join Date: Apr 2018
Posts: 421
|
Transmission getting rebuilt
When driving Argo uphill, I noticed the transmission would slip when shifting, and even downshift instead of up. The overdrive OFF light would start blinking on the handle, which I now know is the transmission's version of a check engine light.
In the past year, I've put maybe 1000 miles on it. When I brought it in for an oil change, they checked my transmission and said I was burning fluid real bad. So I had them service the transmission too.
The problem persisted, and thanks to this forum, I found out the meaning of the blinking OFF light so I brought it back in to check it out. It had been one month and maybe 150 miles since they serviced the transmission, and the fluid was real burned and plenty of metal shavings in the pan. They inspected the converter and found that it was shot. I'm not a mechanic, so I'm not sure what the right language is, but it explained why it was slipping and running hot.
Turns out it isn't the stock transmission and is an aftermarket job, and they couldn't find any of the right converters anywhere, so I am the lucky winner of getting the transmission rebuilt.
I'm okay with that, since I really want the mechanical side of things to be squared away when I'm out and about, and I decided to add in a heavy duty kit that'll be more reliable and also make towing much easier on the thing. It'll end up being about $3200, which is $1200 more than what I paid for the whole bus. That's a painful fix, but like I said... I'm okay with forking out cash for a reliable bus.
|
|
|
|
|
05-07-2019, 05:40 AM
|
#44
|
|
Mini-Skoolie
Join Date: Apr 2019
Posts: 66
|
That sucks about the trans! At least you know it will be good to go after...
Just fyi the engine may go for a million miles not most of the rubber hoses and such, I would do a radiator flush and change out the hoses.
Since I'm going to only use it a few times a year I want to make sure a busted hose does not ruin the trip. Just a thought if you haven't looked into it.
How tall I'd your bus? I wonder if it's under 10ft?! My carport is 9'6" tall I believe would be awesome if I can get a bus style/height in it!
|
|
|
|
|
05-07-2019, 05:27 PM
|
#45
|
|
Almost There
Join Date: Jun 2018
Location: Colorado
Posts: 93
Year: 2006
Coachwork: Collins
Chassis: Chevrolet
Engine: 6.6 LLY Duramax
Rated Cap: 15
|
I hear you on the repair costs vs purchase price. To get road worthy was $3100 for me and I paid $4600. Perhaps I should have hired you instead!
How long is your 4 window? Mine, the more ubiquitous 5, is 23 feet. It turns out to be the same as a full size 4 door long bed truck. Yeah the width is, at times, a true issue.
|
|
|
|
|
05-07-2019, 09:25 PM
|
#46
|
|
Mini-Skoolie
Join Date: Apr 2019
Posts: 66
|
Good info. Ps I'll look into az bus sales since I'm in la.
|
|
|
|
|
05-13-2019, 09:17 AM
|
#47
|
|
Mini-Skoolie
Join Date: Apr 2019
Posts: 66
|
Have you test driven it with a full water tank yet? Curious if it bus sags or if can you feel the weight on the corner?
Are u planning to fill it up at home and drive it camping or finding a close spot to fill up?
|
|
|
|
|
05-13-2019, 11:41 AM
|
#48
|
|
Bus Geek
Join Date: May 2009
Location: Columbus Ohio
Posts: 18,835
Year: 1991
Coachwork: Carpenter
Chassis: International 3800
Engine: DTA360 / MT643
Rated Cap: 7 Row Handicap
|
the transmission is the weak link in those busses.. hopefully the rebuild is not just an ole stock replacement off a shelf and has all of the recommended updates and procedures performed to it which then makes it a pretty decent transmission.. hopefully a real transmission shop and not a ford deasler doing the work...
-Christopher
|
|
|
|
|
07-27-2019, 12:28 PM
|
#49
|
|
Bus Nut
Join Date: Apr 2018
Posts: 421
|
Quote:
Originally Posted by Bpjr07

That sucks about the trans! At least you know it will be good to go after...
Just fyi the engine may go for a million miles not most of the rubber hoses and such, I would do a radiator flush and change out the hoses.
Since I'm going to only use it a few times a year I want to make sure a busted hose does not ruin the trip. Just a thought if you haven't looked into it.
How tall I'd your bus? I wonder if it's under 10ft?! My carport is 9'6" tall I believe would be awesome if I can get a bus style/height in it!
|
Thanks for the suggestion, I'll get that done at the next oil change.
Exterior dimensions:
- Length: 19.5 feet bumper to bumper
- Length (between axles): 11.5 feet
- Width: 6.5 feet (7.5 feet with the mirrors)
- Height: 8 feet
The rest are located here: https://theargobus.blogspot.com/p/blog-page.html
|
|
|
|
|
07-27-2019, 12:29 PM
|
#50
|
|
Bus Nut
Join Date: Apr 2018
Posts: 421
|
Quote:
Originally Posted by Epomethius
I hear you on the repair costs vs purchase price. To get road worthy was $3100 for me and I paid $4600. Perhaps I should have hired you instead!
How long is your 4 window? Mine, the more ubiquitous 5, is 23 feet. It turns out to be the same as a full size 4 door long bed truck. Yeah the width is, at times, a true issue.
|
Should've included you in the reply too!
- Length: 19.5 feet bumper to bumper
- Length (between axles): 11.5 feet
- Width: 6.5 feet (7.5 feet with the mirrors)
- Height: 8 feet
The rest of the dimensions are here: https://theargobus.blogspot.com/p/blog-page.html
|
|
|
|
|
07-27-2019, 12:50 PM
|
#51
|
|
Bus Nut
Join Date: Apr 2018
Posts: 421
|
Quote:
Originally Posted by Bpjr07
Have you test driven it with a full water tank yet? Curious if it bus sags or if can you feel the weight on the corner?
Are u planning to fill it up at home and drive it camping or finding a close spot to fill up?
|
I have. I loaded up the fresh tank to capacity (40 gallons) and drove it about 100 miles to ops test it, and here's what I noticed:
- Fully loaded, the sides bulge out. I have to retroactively install support sheet metal on all the sides to protect the tanks from abrasion against the bus frame. I also have to do this to block light from entering the tanks and encouraging algae growth. I wish I had just done this when I built the supports, but oh well.
- After driving fifty miles, I stopped and inspected the tanks. Other than the sides bulging, they hadn't changed at all. I gave the corners a good shake, and the whole bus moved! The tanks/brackets didn't move at all, they just transferred the motion to the bus. I over engineered it to make sure this happened.
- The bus doesn't sag at all, but I do want to get it weighed eventually to see if there's a significant lateral imbalance. 40 gallons of water on the right side (~350 pounds) could potentially be noticeable since the GVWR is 9600 pounds. I chose the right side because I wanted to put all the pumps/plumbing under the stairs.
- We do plan on filling it up at home and driving to our destination with a full tank. However, we plan on filling the grey tank as we stay, but then we plan on draining the grey tank before we leave so I didn't reinforce the grey tank as much as the fresh.
- This is a good fuckup. I made the tanks level with the bus frame, but the bus frame isn't level itself! It leans forward, so the drains I put on the aft end of the tanks don't actually drain the tanks all the way, I have to park on an incline backwards to get them to drain. Further, I wish I had put the output to the pump on the bottom face instead of the side. Originally, I wanted to avoid this to prevent sediment from getting in, but now I realize I should've done so and also incorporated the drain there.
- I fucked up the placement of the holes drilled in the floor for the support carriage bolts, and now they angle inward a little bit. I'm sure it was right the first time, but now that I've driven it and it has settled in, the tank is in the right position but the carriage bolts aren't. I'm going to leave it as is, because it would take damn near two days to remove the tanks and reposition the carriage bolts, and because their shear strength at 5/16" is at least 2500 pounds--with a fully loaded tank (forty gallons of water is 334 pounds, plus the weight of the enclosure of 20 pounds, plus a 30% safety factor for g-forces gives me a grand total of 460 pounds worst case scenario) spread out between sixteen carriage bolts gives me 28 pounds per bolt--or, worst case scenario, each bolt could be exposed to 1% of its minimum shear load. Even better, the fresh tank is also supported in the front by the strut for the stairs, and in the rear by another strut, so this prevents any forward/aft movement, meaning the shear load of each bolt is minimal. The grey tank doesn't have this benefit, but I don't think I'll ever be driving with a load in there, as we'll just be draining before we leave our campsite (logging roads at Tahoe National Forest).
|
|
|
|
|
07-27-2019, 12:53 PM
|
#52
|
|
Bus Nut
Join Date: Apr 2018
Posts: 421
|
Quote:
Originally Posted by cadillackid
the transmission is the weak link in those busses.. hopefully the rebuild is not just an ole stock replacement off a shelf and has all of the recommended updates and procedures performed to it which then makes it a pretty decent transmission.. hopefully a real transmission shop and not a ford deasler doing the work...
-Christopher
|
Correct. I went to a family owned shop and got as many upgrades as I could, including an upgrade that will enhance towing capabilities. What's another $200 on a $2000 bill? 
|
|
|
|
|
07-27-2019, 01:23 PM
|
#53
|
|
Bus Nut
Join Date: Apr 2018
Posts: 421
|
Well that sucks
While working on my new bus last May, my knee developed a dull ache that didn't go away. It was probably just a strained tendon or ligament, and now that I was getting old, I had to take it easy and baby it so it could heal. So I stopped running (I couldn't anyways because of the pain), and while deployed I swam to stay fit. Looking back, I should've never deployed with a knee so bad that I was physically incapable of running, as I couldn't run away from a burning jet, and landing after an ejection would've snapped my leg in half. But, due to the massive egos that typically go with my career field, I wasn't about to voluntarily go home and stop flying missions--if I had, however, it would've saved me a world of hurt.
After getting home, I had the flight doc look at it, and he bent my knee every which way, asking if it hurt, which it didn't of course. But I still couldn't run. In fact, it had gotten worse. He misdiagnosed it as tendonitis, the same conclusion I had reached, and prescribed me daily ice, motrin, and stretches. I did this religiously for months, but rather than improve, my knee got worse.
At my annual flight physical in March, almost a year after the initial ache appeared, I brought up the issue again. The doctor started stretching my knee and asking if it hurt (like the last appointment), so I stopped him right there and demanded something more substantial than just "twisting my knee to see if it hurts." Obviously it wasn't that, because the PT did nothing. So he ordered an x-ray to rule a few things out, and a few hours later I got voicemails, texts, and emails with the ominous message "Call me ASAP."
Giant Cell Tumor of the Bone is a benign--but aggressive--tumor that almost always forms in the upper tibia. It rapidly eats away healthy bone tissue and replaces it with soft giant cells that can potentially metastasize to the lungs. Most people discover the tumor when they break their leg while going down stairs or even just walking. The reason why I couldn't run was because I had half a shin bone in my right leg.
Fortunately, the Air Force has no orthopedic oncologists in my area (military medicine is notoriously unreliable for surgeries), and so I was sent off base to the largest and finest hospital in this part of the state. There was only one guy who could do the surgery, and everyone kept saying I was in a good hands--which was quite the welcome change from Air Force medicine.
They put me under, opened my leg up, and, using something that resembled a tiny ice cream scoop, scraped the tumor out and stuck donor bone scaffolding in the remaining void to allow my bone to grow back. By this time, the tumor had grown significantly, and required a multi-day stay in the hospital because holy mother of sweet baby 6 pound 5 ounce Jesus it was painful. It turns out bone pain is a whole category of its own. It was as though my shin was a dry oak branch that someone had tried to crack over their knee, only to fail, leaving a splintered piece of wood behind.
The surgery was in May. And I'm finally off crutches in a week or two, meaning I can start working on Argo again. It sucks because I see her in the driveway, just waiting to be finished, to be driven up into the mountains on a quest for the golden fleece. This summer has completely passed without a single excursion on the bus, which sucks because I just had everything rebuilt this spring (the transmission and differential rebuilt cost TWICE as much as what I paid for the bus). But it's given me plenty of time to finish the plans and order everything that needs to be done, and so now I'm just emerging from my couch and ready to finish this build.
|
|
|
|
|
07-27-2019, 01:45 PM
|
#54
|
|
Bus Nut
Join Date: Apr 2018
Posts: 421
|
So the latest situation with Argo is this:
- I had the transmission rebuilt with a few choice upgrades ($3217)
- While they were test driving it, they noticed a loud sound coming from the rear axle and checked the differential, which was completely shredded
- So I also had the differential rebuilt ($2084)
- Mind you the bus itself cost $2500
- There's STILL an issue with the overdrive OFF light flashing and the transmission disengaging, but now it's throwing the P0500 code, and upon further inspection, the wiring for the vehicle speed sensor on the aft differential is damaged and needs to be replaced (this is most likely the source of all the problems)
- However, there's still the issue of plugging in the OBD2 sensor. I've never gotten it to work, but the shop has and sometimes it kills the engine. Maybe there's a fault or a ground in there, who knows. But I removed the instrument cluster and dropped it off to get inspected/repaired, because the transmission issue could be caused by that too
- We are opting not to remove and reseal the windows, because they look like their good and it doesn't rain very much out californiway anyway
- Next up, I'm going to fiberglass all the holes in the floors/walls to make it water tight, and then start putting down insulation and go from there!
|
|
|
|
|
07-27-2019, 02:05 PM
|
#55
|
|
Bus Geek
Join Date: May 2016
Location: Eastern WA
Posts: 6,401
Year: 2002
Coachwork: Bluebird
Chassis: All American RE (A3RE)
Engine: Cummins ISC (8.3)
Rated Cap: 72
|
Quote:
Originally Posted by TheArgobus
While working on my new bus last May, my knee developed a dull ache that didn't go away. It was probably just a strained tendon or ligament, and now that I was getting old, I had to take it easy and baby it so it could heal. So I stopped running (I couldn't anyways because of the pain), and while deployed I swam to stay fit. Looking back, I should've never deployed with a knee so bad that I was physically incapable of running, as I couldn't run away from a burning jet, and landing after an ejection would've snapped my leg in half. But, due to the massive egos that typically go with my career field, I wasn't about to voluntarily go home and stop flying missions--if I had, however, it would've saved me a world of hurt.
After getting home, I had the flight doc look at it, and he bent my knee every which way, asking if it hurt, which it didn't of course. But I still couldn't run. In fact, it had gotten worse. He misdiagnosed it as tendonitis, the same conclusion I had reached, and prescribed me daily ice, motrin, and stretches. I did this religiously for months, but rather than improve, my knee got worse.
At my annual flight physical in March, almost a year after the initial ache appeared, I brought up the issue again. The doctor started stretching my knee and asking if it hurt (like the last appointment), so I stopped him right there and demanded something more substantial than just "twisting my knee to see if it hurts." Obviously it wasn't that, because the PT did nothing. So he ordered an x-ray to rule a few things out, and a few hours later I got voicemails, texts, and emails with the ominous message "Call me ASAP."
Giant Cell Tumor of the Bone is a benign--but aggressive--tumor that almost always forms in the upper tibia. It rapidly eats away healthy bone tissue and replaces it with soft giant cells that can potentially metastasize to the lungs. Most people discover the tumor when they break their leg while going down stairs or even just walking. The reason why I couldn't run was because I had half a shin bone in my right leg.
Fortunately, the Air Force has no orthopedic oncologists in my area (military medicine is notoriously unreliable for surgeries), and so I was sent off base to the largest and finest hospital in this part of the state. There was only one guy who could do the surgery, and everyone kept saying I was in a good hands--which was quite the welcome change from Air Force medicine.
They put me under, opened my leg up, and, using something that resembled a tiny ice cream scoop, scraped the tumor out and stuck donor bone scaffolding in the remaining void to allow my bone to grow back. By this time, the tumor had grown significantly, and required a multi-day stay in the hospital because holy mother of sweet baby 6 pound 5 ounce Jesus it was painful. It turns out bone pain is a whole category of its own. It was as though my shin was a dry oak branch that someone had tried to crack over their knee, only to fail, leaving a splintered piece of wood behind.
The surgery was in May. And I'm finally off crutches in a week or two, meaning I can start working on Argo again. It sucks because I see her in the driveway, just waiting to be finished, to be driven up into the mountains on a quest for the golden fleece. This summer has completely passed without a single excursion on the bus, which sucks because I just had everything rebuilt this spring (the transmission and differential rebuilt cost TWICE as much as what I paid for the bus). But it's given me plenty of time to finish the plans and order everything that needs to be done, and so now I'm just emerging from my couch and ready to finish this build. |
I wish you a speedy recovery!
I understand the frustration of looking out at a project that you dearly want to be out working on but the body just won't cooperate.
|
|
|
|
|
07-27-2019, 09:08 PM
|
#56
|
|
Mini-Skoolie
Join Date: Apr 2019
Posts: 66
|
Sorry to hear all the problems you have gone through physically! Fukk the bus you come first, hope you have a speedy recovery.
Glad to hear that your bus could handle the 40 gal tank!
And as for your **** ups. Honestly I keep telling myself once I get my bus I need to be ready to build it and redo everything 2 times lol.
|
|
|
|
|
08-17-2019, 10:23 PM
|
#57
|
|
Bus Nut
Join Date: Apr 2018
Posts: 421
|
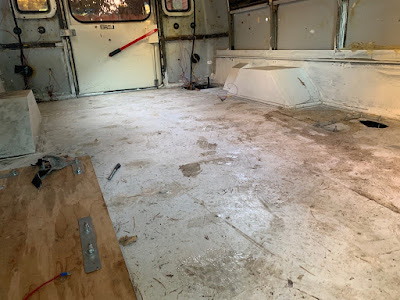
Preparing for the Floor
I'm just about done replacing all the lights (marker, running, blinker, brake, reverse, tail, everything except for the headlights), and I've patched every single hole in the floor walls and ceiling with fiberglass. Which means I'm just about ready to put the insulation in.
My bus is fortunately fiberglass with an aluminum floor, which is already painted with rustoleum, so I'm going to forego a vapor barrier and just go right into insulation. My plan:
- 1" thick insulation on the floor, no adhesive
- 2x2 pine framing up at the front where the stairs/drivers seat are
- 3/4" plywood (not OSB) on top of the insulation, with a few through-bolts through the floor (probably just one at each corner of the plywood sheets)
- Hold off on painting this plywood until I get the rest done
- 1" thick insulation on the walls/ceiling, which fits perfectly in the frame
- Cover the walls/ceiling with 9/16" preprimed shiplap like this
- Finally enjoy the bus
Am I missing anything? How do I ensure the insulation boards stay put on the walls/ceiling while I put the shiplap in? Some sort of glue/adhesive? Or just ductape?
|
|
|
|
|
08-17-2019, 10:28 PM
|
#58
|
|
Bus Nut
Join Date: Apr 2018
Posts: 421
|
Also, how the heck do I do the wiring for the embedded lights? Just use a router along one of the shiplap boards to make a line for the wires to sit in?
|
|
|
|
|
08-18-2019, 11:43 AM
|
#59
|
|
Bus Nut
Join Date: Apr 2018
Posts: 421
|
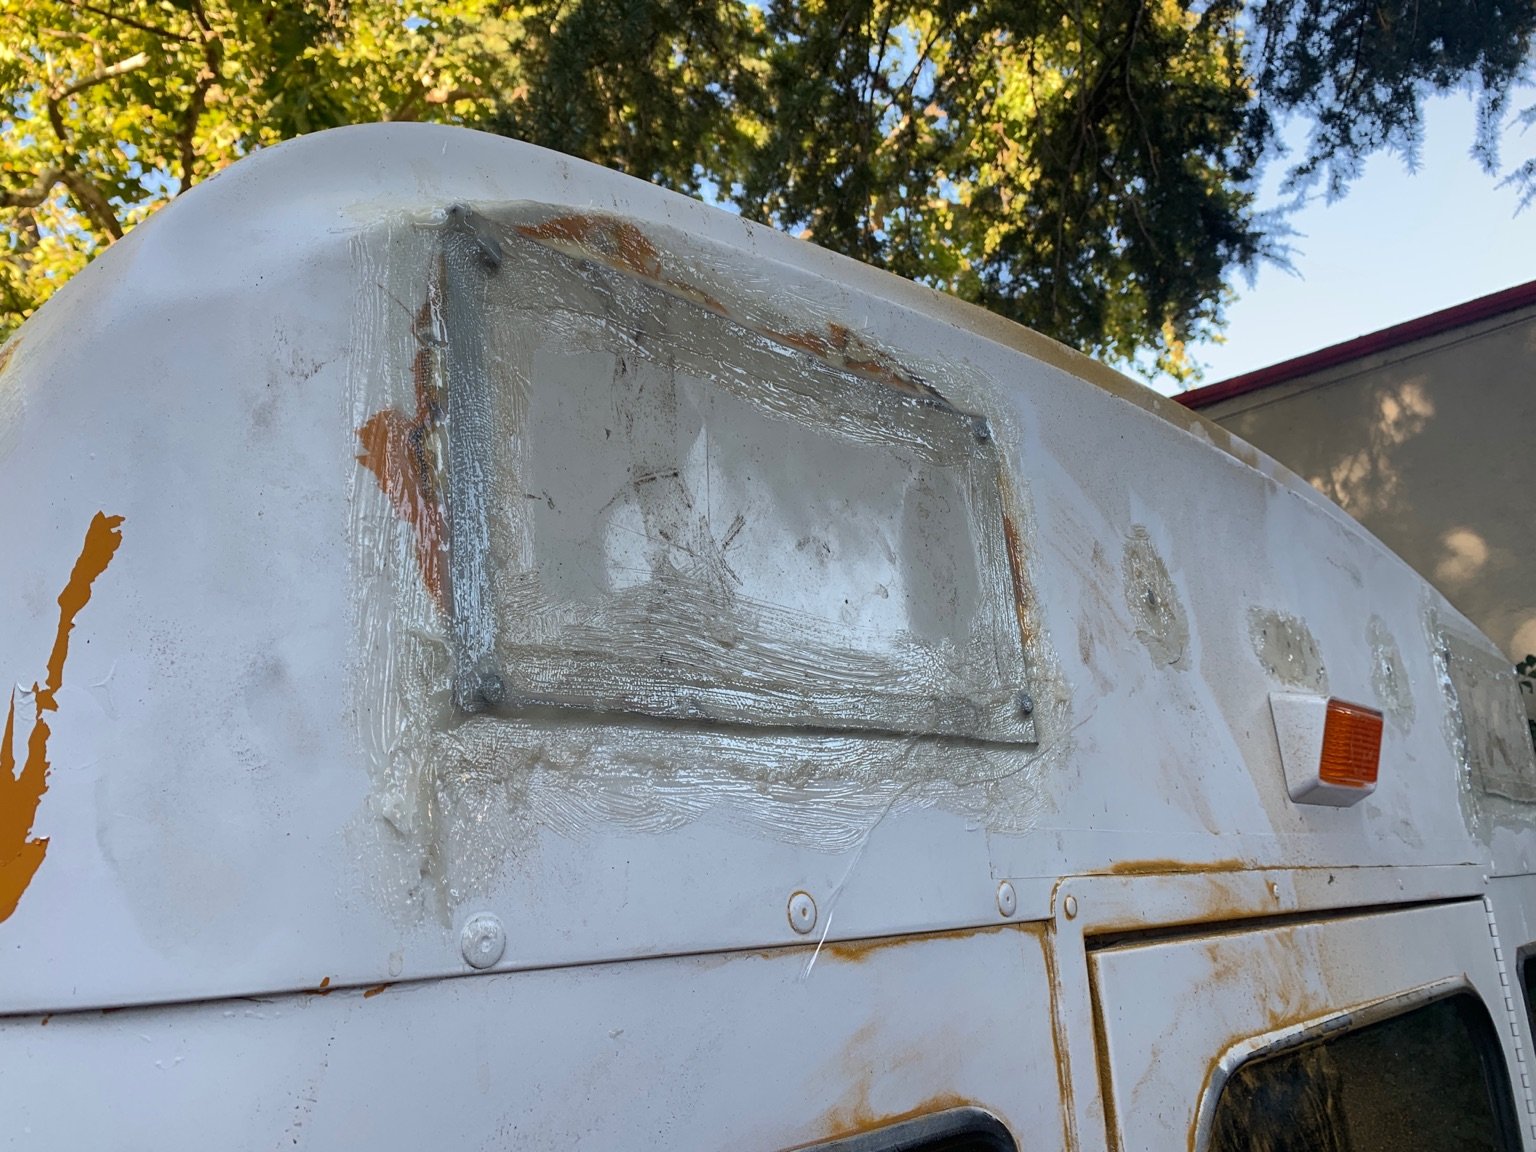
How to Patch Holes in a Skoolie Floor Wall Ceiling or Roof
I'm not saying this is the right way, I'm just saying this is how I did it.
How to Patch Holes in a Skoolie Floor, Wall, Ceiling, or Roof
Removing the seats left some massive holes in the floor. If left in place, they'd allow water splashing up from the road to get stuck between the vapor barrier under the floor's insulation and the aluminum floor itself. I know it's aluminum, and thus less likely to corrode, but still... it's more important to do it right.
On top of that, I had to remove most of the running and bus lights from Argo, because they were old incandescent bulbs that didn't work and also leaked. This left not just screw-sized holes, but also four inch circle-shaped-holes for the lights that required a metal plate to patch. The bus stop sign also left holes in the wall, which would let water get in there and definitely cause corrosion.
So there were probably almost a hundred different spots that needed to be patched on Argo.
What Material to Use to Patch Holes in Metal?
Some people recommend using JB Weld (a type of two-part epoxy), epoxy pennies over the holes, and bondo fiberglass. The general consensus seems that epoxy is the best way to do it, but what about the larger holes like those left from the seats? The epoxy would just drip right down to the undercarriage. So I decided the best way to patch the floor holes, as well as pretty much anything that needs a waterproof seal, is to use fiberglass.
The general idea for fiberglass is to apply epoxy (which consists of a resin, a hardener, and usually a filler) with a brush to the area that needs to be patched, then apply a piece of fiberglass cloth on top of the epoxy, and finally soak the cloth with more epoxy on top. Wait a day, and now you've got a rock solid, structural, and water-proof bond that can easily be sanded and painted.
How to Make Fiberglass with Epoxy
It's best to work in small batches, as the epoxy will begin curing the moment you mix the resin and the hardener. The specifications are written on the back of the hardener; for me, my pot life was about thirty minutes. However, because I'm working in the sweltering heat of a Central Valley summer, that was reduced to about fifteen minutes. This stuff gets hot as it cures.
Put the pump on both the resin and the hardener, and apply three to four pumps of each to your mixing bucket (remember, smaller batches is better, and make sure you use the same number of pumps for the resin and hardener). Using a stir stick, mix this for about a minute, then add colloidal silica in appoximately half-cup increments, mixing as you go, until the mixture has the consistency of pancake batter. This filler (the colloidal silica) may be unnecessary, but I prefer to add it because it strengthens the epoxy bond but more importantly it makes it less runny, and thus doesn't drip through the holes I'm patching.
Once it's mixed, thoroughly, you now have about fifteen minutes to use it before it hardens in the bucket.
How to Patch Small- to Medium-Sized Holes
Small holes are great because you can just slather some thickened epoxy over them. But many of my holes were larger than a quarter, so I had to use the fiberglass.
It's a good idea to cut your fiberglass cloth into the appropriately sized pieces before you mix the epoxy. First, slather some epoxy around the hole to be patched, then apply the piece of fiberglass cloth, then slather more epoxy on top. You don't need much--just enough to fill the gaps between the threads, and to hold it in place. Once it cures, it'll be waterproof.
Repeat as necessary.
How to Patch Large Holes
This is why I saved the sheet metal from the walls and ceiling. Using a grinder, I cut patches of this metal to fit the holes left behind when I removed the bus lights. Then I applied a layer of silicone sealant around the edges (just be sure it's water proof), and applied the metal patch over the hole using bolts to secure it in place. This by itself would probably be fine, but not for me.
I then applied epoxy around the edges, and layered some fiberglass cloth on top, and then applied more epoxy, such that the edges of the patch were completely sealed and secure.
The inside, post-patching
Once It's Cured...
I think it's a good idea to give it a good sanding with a random orbital sander to smooth out the rough edges, particularly if you used fiberglass cloth. It's gonna look a little wonky, but that's why we paint our busses after we finish patching everything.
Common Gotchas
- Mixing too much epoxy at once, and having it cure in the pot before getting around to using it
- It is essential to thoroughly clean the area in which epoxy will be applied--use acetone or some other solvent to wipe it down
- Applying too much epoxy, allowing it to drip where it shouldn't--you must clean it up immediately, before it cures, with acetone or (preferably) xylene. Once it cures, good luck removing it.
|
|
|
|
|
08-18-2019, 01:49 PM
|
#60
|
|
Bus Crazy
Join Date: Nov 2018
Location: south east BC, close to the Canadian/US border
Posts: 2,265
Year: 1975
Coachwork: Chevy
Chassis: 8 window
Engine: 454 LS7
Rated Cap: 24,500
|
Quote:
Originally Posted by TheArgobus
I'm not saying this is the right way, I'm just saying this is how I did it.
How to Patch Holes in a Skoolie Floor, Wall, Ceiling, or Roof
Removing the seats left some massive holes in the floor. If left in place, they'd allow water splashing up from the road to get stuck between the vapor barrier under the floor's insulation and the aluminum floor itself. I know it's aluminum, and thus less likely to corrode, but still... it's more important to do it right.
On top of that, I had to remove most of the running and bus lights from Argo, because they were old incandescent bulbs that didn't work and also leaked. This left not just screw-sized holes, but also four inch circle-shaped-holes for the lights that required a metal plate to patch. The bus stop sign also left holes in the wall, which would let water get in there and definitely cause corrosion.
So there were probably almost a hundred different spots that needed to be patched on Argo.
What Material to Use to Patch Holes in Metal?
Some people recommend using JB Weld (a type of two-part epoxy), epoxy pennies over the holes, and bondo fiberglass. The general consensus seems that epoxy is the best way to do it, but what about the larger holes like those left from the seats? The epoxy would just drip right down to the undercarriage. So I decided the best way to patch the floor holes, as well as pretty much anything that needs a waterproof seal, is to use fiberglass.
The general idea for fiberglass is to apply epoxy (which consists of a resin, a hardener, and usually a filler) with a brush to the area that needs to be patched, then apply a piece of fiberglass cloth on top of the epoxy, and finally soak the cloth with more epoxy on top. Wait a day, and now you've got a rock solid, structural, and water-proof bond that can easily be sanded and painted.
How to Make Fiberglass with Epoxy
It's best to work in small batches, as the epoxy will begin curing the moment you mix the resin and the hardener. The specifications are written on the back of the hardener; for me, my pot life was about thirty minutes. However, because I'm working in the sweltering heat of a Central Valley summer, that was reduced to about fifteen minutes. This stuff gets hot as it cures.
Put the pump on both the resin and the hardener, and apply three to four pumps of each to your mixing bucket (remember, smaller batches is better, and make sure you use the same number of pumps for the resin and hardener). Using a stir stick, mix this for about a minute, then add colloidal silica in appoximately half-cup increments, mixing as you go, until the mixture has the consistency of pancake batter. This filler (the colloidal silica) may be unnecessary, but I prefer to add it because it strengthens the epoxy bond but more importantly it makes it less runny, and thus doesn't drip through the holes I'm patching.
Once it's mixed, thoroughly, you now have about fifteen minutes to use it before it hardens in the bucket.
How to Patch Small- to Medium-Sized Holes
Small holes are great because you can just slather some thickened epoxy over them. But many of my holes were larger than a quarter, so I had to use the fiberglass.
It's a good idea to cut your fiberglass cloth into the appropriately sized pieces before you mix the epoxy. First, slather some epoxy around the hole to be patched, then apply the piece of fiberglass cloth, then slather more epoxy on top. You don't need much--just enough to fill the gaps between the threads, and to hold it in place. Once it cures, it'll be waterproof.
Repeat as necessary.
How to Patch Large Holes
This is why I saved the sheet metal from the walls and ceiling. Using a grinder, I cut patches of this metal to fit the holes left behind when I removed the bus lights. Then I applied a layer of silicone sealant around the edges (just be sure it's water proof), and applied the metal patch over the hole using bolts to secure it in place. This by itself would probably be fine, but not for me.
I then applied epoxy around the edges, and layered some fiberglass cloth on top, and then applied more epoxy, such that the edges of the patch were completely sealed and secure.
The inside, post-patching
Once It's Cured...
I think it's a good idea to give it a good sanding with a random orbital sander to smooth out the rough edges, particularly if you used fiberglass cloth. It's gonna look a little wonky, but that's why we paint our busses after we finish patching everything.
Common Gotchas
- Mixing too much epoxy at once, and having it cure in the pot before getting around to using it
- It is essential to thoroughly clean the area in which epoxy will be applied--use acetone or some other solvent to wipe it down
- Applying too much epoxy, allowing it to drip where it shouldn't--you must clean it up immediately, before it cures, with acetone or (preferably) xylene. Once it cures, good luck removing it.
|
I've used 'Gorilla Hair Filler' ( bondo with fibre glass premixed in the bondo ) many times to fill large rust holes in old vehicles with good success - a few spray can coats of flat black or other colour, as long as it's flat, and it looks fine and holds up for years - a bit of copper screen as backing on the larger holes, or even news sprint wadded up to give something to give some sort of backing when first spreading the bondo saves losing too much bondo in the hole - a bit of fresh chrome here and there, and it looks really good - I've done that when I've found a great running vehicle that had a rusted out body, and was able to drive them for years with next to no investment - holes in the floor from where the seats were would be an ideal candidate for a dob of gorilla hair filler
https://www.canadiantire.ca/en/pdp/b...-0475635p.html
|
|
|
|
|
|
 Posting Rules
|
You may not post new threads
You may not post replies
You may not post attachments
You may not edit your posts
HTML code is Off
|
|
|
|
 » Recent Threads
 |
|
|
|
|
|
|
|
|
|
|
|
|
|
|
|
|
|
|
|
|
|
|
|
|
|
|
|
|
|
|
|
|
|
|
|
|
|


 Linear Mode

