|
|
 11-09-2019, 10:26 AM
|
#81
|
|
Bus Geek
Join Date: May 2009
Location: Columbus Ohio
Posts: 18,827
Year: 1991
Coachwork: Carpenter
Chassis: International 3800
Engine: DTA360 / MT643
Rated Cap: 7 Row Handicap
|
that interior is shapiong up really nicely.. I like the wood and the big windows that bus has
|

|

|
|
11-09-2019, 09:19 PM
|
#82
|
|
Bus Nut
Join Date: May 2018
Location: Wamego Ks
Posts: 617
Year: 2007
Chassis: Collins
Engine: 6.6L LMM Duramax
|
Your interior is looking good. I had the same problem with many different self tapping screws. I ended up finding some really good self tapping screws that were countersunk and fit flush into wood. I screwed in furring strips with those screws to the metal roof ribs and a few other applications.
|
|
|
|
|
11-16-2019, 11:28 AM
|
#83
|
|
Bus Nut
Join Date: Apr 2018
Posts: 421
|
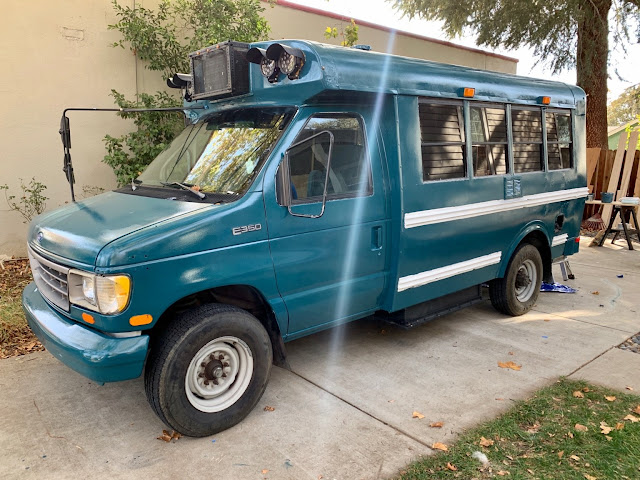
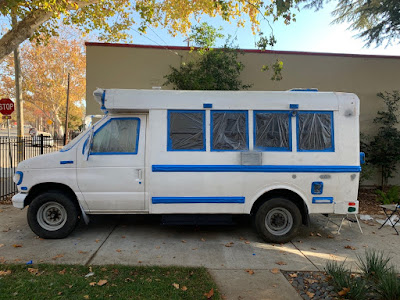
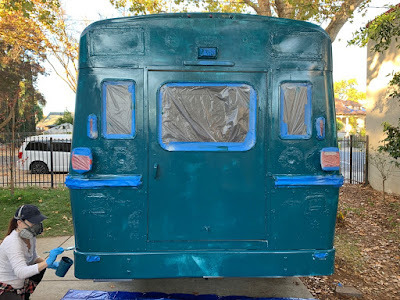
Finally got around to giving Argo the final paint job. We settled on Rustoleum Performance Enamel, with 3 quarts Gloss Royal Blue and 1 quart Gloss Hunter Green. We really wanted a matte flat finish, but they only had Hunter Green in matte, and I personally couldn't stand that color. So we decided a little gloss wasn't so bad! The trim will be painted a dark charcoal gray instead of the white sometime in the near future.
We rolled instead of sprayed this time (turns out spraying in your driveway will earn you a hefty fine... oops) and you can definitely tell how shitty my tape job was on the white base coat. We spent the time and effort to do it right this time, and we had the whole family out there rolling and brushing and I think it's a much sturdier coat than just spraying. We also added a can of Majik Enamel Hardener to each gallon, and it took about 1.25-1.5 gallons for two solid coats.
|
|
|
|
|
11-16-2019, 11:37 AM
|
#84
|
|
Bus Crazy
Join Date: Jun 2016
Location: N.C.
Posts: 1,136
Year: 1997
Coachwork: Bluebird
Engine: DT466E
Rated Cap: 34
|
Nice job.....I like that color. 
|
|
|
|
|
11-17-2019, 12:50 AM
|
#85
|
|
Bus Geek
Join Date: Sep 2015
Posts: 3,856
Year: 2002
Coachwork: Thomas Built Bus
Chassis: Freightliner FS65
Engine: Caterpillar 3126E Diesel
Rated Cap: 71 Passenger- 30,000 lbs.
|
The white stripes look good too. So at least it will look good for the timebwtween now and when you get the grey put on the rails.
|
|
|
|
|
11-17-2019, 08:38 AM
|
#86
|
|
Skoolie
Join Date: Mar 2018
Location: CA, USA
Posts: 147
Year: 1992
Coachwork: sturdivan
Chassis: E-350
Engine: 7.3l IDI
Rated Cap: 10,000lbs
|
nice job and thanks for the numbers, I'm about ready to start that project and was wondering what to plan for.
|
|
|
|
|
11-17-2019, 01:30 PM
|
#87
|
|
Bus Nut
Join Date: Dec 2018
Location: Mt Vernon, WA
Posts: 523
Year: 1996
Coachwork: Bluebird, Collins
Chassis: G30 Bluebird Microbird, E350 Shuttle Bus
Engine: 1995 Chevrolet 350, 1992 Ford 460
|
Good progress. I didnt know about Majik enamel hardener. I think Ill go with the same type of paint on my bus. Thanks.
|
|
|
|
|
11-23-2019, 12:27 PM
|
#88
|
|
Bus Nut
Join Date: Apr 2018
Posts: 421
|
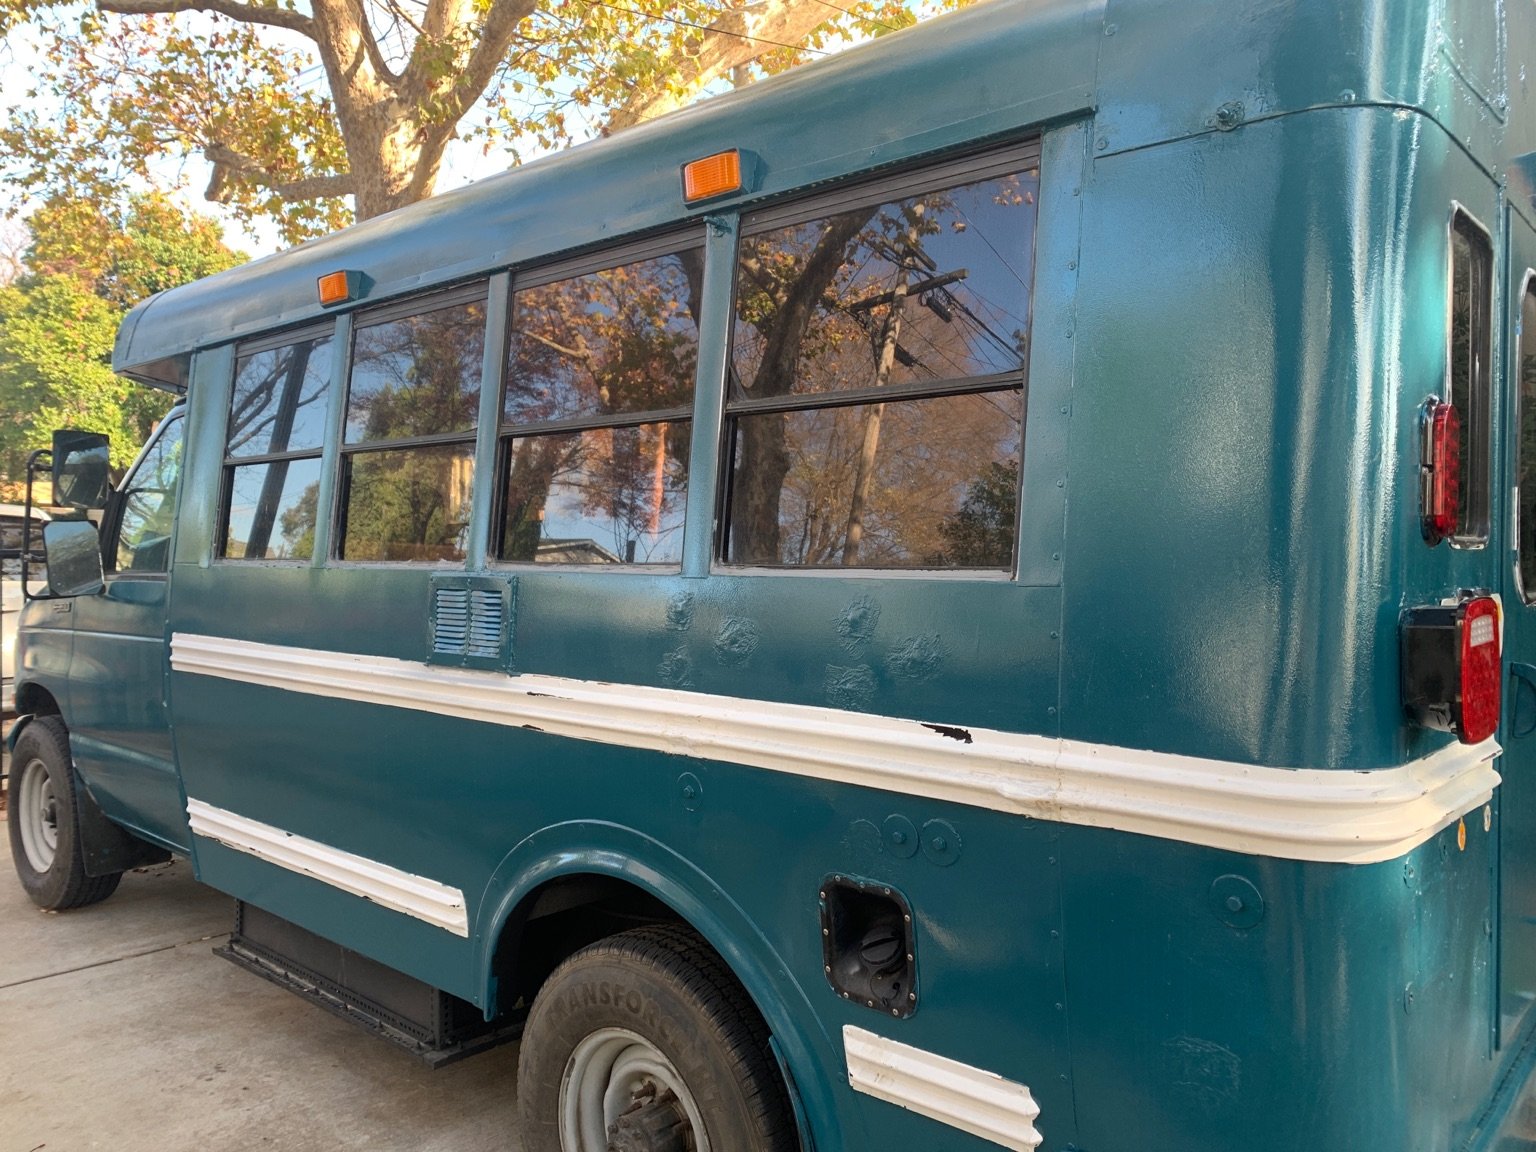
How to Paint a Skoolie Revisited
The formal write up for my second paint job:
How to Prepare a Skoolie for Painting
First, read my original post on painting a used school bus. Turns out, spraying paint in your driveway in a city is liable for a hefty fine. Whoops. For the second and final paint job, I opted to roll it on instead of spray (both to avoid the fine and to make a more solid coat). The prep is pretty simple:
- Wash the entire bus (I took Argo to a DIY car wash and scrubbed as best I could--the key part is to remove grease and grime, including old glue and tape residue)
- Sand the entire bus with 220 grit paper
- Wash the entire bus again (I used the Simple Clean biodegradable cleaner and my hose in my driveway)
- Wipe it down with Acetone
- Tape it up
- Paint it up
The key things here are to sand it well, and to wash all the sanding residue away so that the paint will really stick this time (my white coat started flaking in a few areas). It's also key to properly tape it up. I could really tell this time how shitty my tape job was for the white coat, so this time around I knew exactly where to put the tape vs where to put the plastic. Finally, for any areas that didn't have the white primer coat, I used the spray paint primer to get it ready (as well as a few new areas that were metal or fiberglass). The point is that anywhere the new paint was going was primed and ready.
What Paint to Use on a Skoolie
My opinion has changed since the last time I painted the bus. First, I realized you really can obtain Rustoleum Professional Enamel in California. It just isn't listed in the inventory at Home Depot and it says they can't ship to California. But it's there, usually under the spray paint. Second, I decided that gloss was okay, as the only color they had in matte/flat was Hunter Green. But we didn't want solid green or solid blue either. So I picked up three quarts of gloss royal blue, and one quart of gloss hunter green, and mixed them together to get one gallon of paint.
I then added the enamel hardener and mixed it thoroughly for about five minutes using the paint mixer attachment for my drill. The hardener says to wait thirty minutes before applying paint... so sure, wait thirty minutes.
I opted not to use any thinner this time around, mainly because I'm not spraying it on, but also because I put more effort into the prep with sanding and washing, giving the paint plenty to stick to.
How to Paint a Skoolie
The very first part I started with was the front end above the windshield, because I wouldn't be able to access that part once we applied paint to the hood. So I painted around the lights and my air conditioner, using brushes and the small roller, until I had one coat on. Then, I went to the back of the bus and used a ladder to get on top of the bus and rolled the roof. By the time I was done with that, the front was nearly dry (thanks to the hardener), so I went back and put the second coat on the front, then went back to the roof and gave it a second coat.
Boom. Now the front end and the roof were complete. We worked our way around the bus, starting at the driver's door and working backwards, such that by the time we finished the first coat, it was time to apply the second coat at the driver's door again.
In this way, we applied at least two coats to the entire bus, and in some areas it ended up being closer to three because of touch ups with the roller.
It is important to remove the tape and plastic before the paint dries, so that you don't pull up any paint with it.
Common Gotchas
- The key to a good paint job is the prep work. It took an entire day to prep the bus, and even then I could've been a bit more thorough, especially with the acetone wipe down
- Pick a painting strategy so you don't have to walk on wet paint (so paint the hood last if you need to be walking on the hood)
- Multiple thin coats are so much better than a few heavy coats
|
|
|
|
|
12-07-2019, 11:41 AM
|
#89
|
|
Bus Nut
Join Date: Apr 2018
Posts: 421
|
How to Install Seat Belts in a Skoolie
Do you need Seatbelts in a Skoolie?
If you value the safety of your passengers, then yes you do need seatbelts. But perhaps not legally. Rather than give you the bullshit "it depends on the state" answer most websites give you, here's a handy list I came up with. Disclaimer: you're an absolute idiot if you take what I'm saying here as any sort of legal advice or anything other than general information that some random dude on the internet pulled out of his ass.
States that require seatbelts in school buses:
- California (three-point seat belt required)
- Florida
- Louisiana
- New Jersey
- New York
- Texas (three-point seat belt required)
All other states do not require seatbelts in school buses. Now why the hell would a school bus, with dozens of children riding around in the back, not need a seat belt in almost 90% of states? The general argument is this: in the most common type of accident (a head on collision), the soft seat backs will prevent both injury and ejection from the vehicle. When the bus collides with either another vehicle or a brick wall, Young Thomas will fly forward out of his seat. But unlike a car, where Young Thomas would just continue flying forward over the dash and out the windshield, he would impact the high seat back in front of him, which is itself cushioned. That's partly why the very front seats of a school bus have a single padded barrier in front of them.
But there's another reason too: school buses are built like tanks on purpose. The ribs and the frame, generally made of steel, are built to protect and prevent the bus from collapsing if it rolls. This provides an added benefit of increasing the weight, or mass, of the bus, such that in a collision with another vehicle on the road, chances are you'll be bigger and receive less damage. In fact, of the 270 million vehicles on the road in 2016, 113 million were cars, ~1 million were buses, and 146 million were trucks--meaning that, in general, you are going to be heavier and larger than about half of the vehicles out there. And since we know truck and bus drivers have much more training and experience, the chances that you'll be in an accident with a vehicle larger than yours is even smaller. For example, in 2017, there were 34,247 fatal auto accidents, of which 4,880 large trucks and buses were involved--about 14%. If you were to run some shitty statistics on this (this is a generalization and the numbers/units are not valid), then one could say that if you're involved in a fatal auto accident, there's a 7% chance it will be with a vehicle larger than you. Let me remind you that this not an academic analysis, just me throwing out shitty numbers.
There's one more point: the bus body is designed to detach itself from the frame in a head on collision, giving the passengers a few extra moments to decelerate which decreases the severity of any injuries. See this in action in this video here. Remember this point later!
All of this is to say that converting a school bus to a camper is great from a safety point of view, particularly when compared to conventional fiberglass RVs one would find on Craigslist (The RV Consumer Group believes that 50% of Class A motorhomes (the really big ones) are so structurally unsound that 50% of them wouldn't survive a collision above 20 mph).
So from a safety point of view, a school bus with padded bus seats is generally safe--but what about after you remove the seats and title it as an RV? For some reason (probably a stupid, bureaucratic reason), RV Seatbelt laws are all over the place. Some states require nothing, some states require only the front seat occupants to buckle up, some base it on age. So I've reproduced the list here for a quick glance (and again, this isn't legal advice).
- Alaska - Front Seat Occupants
- Alaska - All Occupants
- Arizona - Front Seat Occupants and Children 5 15
- Arkansas- Front Seat Occupants
- California - All Occupants
- Colorado - All Occupants
- Connecticut - Front Seat Occupants and Children 4 16
- Delaware - All Occupants
- Florida- Front Seat Occupants and Children 6 17
- Georgia - All Occupants
- Hawaii - Front Seat Occupants and Children 4 17
- Idaho - All Occupants
- Illinois - Front Seat Occupants and Children 8 15
- Indiana - Front Seat Occupants and Children 4 11
- Iowa - All Occupants
- Kansas - Front Seat Occupants and Children 4 14
- Kentucky - All Occupants
- Louisiana - Front Seat Occupants and Children 6 12
- Maine - All Occupants
- Maryland - Front Seat Occupants
- Massachusetts - All Occupants
- Michigan - Front Seat Occupants and Children 4 15
- Minnesota - Front Seat Occupants and Children 4 10
- Mississippi - Front Seat Occupants and Children 4 10
- Missouri - Front Seat Occupants and Children 4 15
- Montana - All Occupants
- Nebraska - Front Seat Occupants and Children 4 18
- Nevada - All Occupants
- New Hampshire - All Occupants
- New Jersey - Front Seat Occupants and Children 8 17
- New Mexico - All Occupants
- New York - Front Seat Occupants Children 15 and Under
- North Carolina - Front Seat Occupants Children 15 and Under
- North Dakota - Front Seat Occupants and Children 7 17
- Ohio - Front Seat Occupants
- Oklahoma - Front Seat Occupants and Children 6 12
- Oregon - All Occupants
- Pennsylvania - Front Seat Occupants and Children 8 17
- Rhode Island - All Occupants
- South Carolina - All Occupants
- South Dakota - Front Seat Occupants and Children 18 and Under
- Tennessee - Front Seat Occupants and Children 16 and Under
- Texas - Front Seat Occupants and Children 17 and Under
- Utah - All Occupants
- Vermont - All Occupants
- Virginia - Front Seat Occupants and Children 16 and Under
- Washington - All Occupants
- West Virginia - Front Seat Occupants Children 17 and Under
- Wisconsin - Front Seat Occupants and Children 4 15
- Wyoming - All Occupants
Just under half the states require everyone to wear a seat belt in an RV, compared with just 10% for school buses. Yet school buses are safer than RVs, so that makes sense--but you probably removed the protective seats, along with a big part of the safety mechanism. You also probably added a few things to the bus, like solar panels (liable to fly off), hanging water tanks (liable to fall and blow your wheel), and you probably don't have as much large vehicle training as professional drivers. So in my humble and unprofessional opinion, all this means that everyone should be wearing a three-point seatbelt--even if it may not be legally required.
Seat Belt Requirements
Part of this is defined in 49 CFR § 571.209 "Seat Belt Assemblies" and is broken down here; however, I'm going to include only the big relevant items here. This assumes we're using the seat belt items I linked to above, and also assumes that you are not a commercial vehicle manufacturer.
Seat Belt Mounts / Mounting: a skoolie most likely does not have any usable seat belt mounts for your seats, so we have to install them directly to the body (not the bus chassis! see the bold text above about the bus body separating from the chassis!). We must use at least 7/16" diameter bolts and giant steel washers at least 1.7" in diameter for the lap belt mounts (it doesn't actually say for the shoulder strap mount washer size, but it can't hurt to use the same). The mounting kit I linked to has everything you need in the right sizes, unless you need longer bolts for your particular bus.
Width of the lap belt mounts: the regulation talks about 5th percentile female sizes compared to 95th percentile male sizes, and what I take away from this is plan for a heavy dude to be sitting here. So the lap belt mounts should be ~16.5" apart, and the belt itself should provide enough material to wrap around someone with a 47" waist. If you get the seatbelts I linked to, you need to be cautious about how far down you mount the lap belt from the seat, because you may run out of material.
Mounting strength: assuming we're using a Type 2 assembly (the standard three-point seat belt; type 1 is just a lap belt), the upper shoulder mount shall be able to withstand 6,672 Newtons of force, and the lower mount for the lapbelt portion of the shoulder mount shall withstand 13,345 Newtons of force, and the other mount (the buckle portion of the lap belt) shall withstand 11,120 Newtons of force. Long story short, this force shall be calculated to apply at a 45 degree angle away from the axis of the bolt.
So to recap:
- Seat belt bolts must be at least 7/16" in diameter, 20 threads per inch, Grade 5 or 8 (this would be annotated as 7/16-20)
- Lap belt bolts must be secured with a 1.7" diameter washer
- Lap belt mounts should be spaced 16.5" apart, depending on comfort and space for your seat
- The top shoulder mount must be strong enough to withstand 7kN of force
- The bottom shoulder mount must be strong enough to withstand 14kN of force
- The buckle mount must be strong enough to withstand 12kN of force
The biggest and most important thing here is that wherever you mount the seatbelts, make sure it's to something structural (but not the bus chassis!)
Where to Mount Seat Belts in a Skoolie?
1 Newton of force is approximately the force exerted by a 100g apple in your hand (an average size). 1000 Newtons is about the force a 220 pound person standing on your chest would exert on you. The way we define a Newton is simply mass multiplied by acceleration. In both these examples, the acceleration is simply the gravitational pull of Earth (9.8 meters per second per second).
For the seatbelts, however, it's a bit more complicated. The acceleration we're interested in is actually the deceleration of your skoolie in a crash. Using this calculator here, Let's use a worst-case scenario to think about this.
A 250 pound passenger, traveling at 65 miles per hour in Argo, crashes and comes to a complete stop instantly. Converted to the appropriate units, this would be a 113 kg person, traveling at 30 meters per second, but they wouldn't actually stop instantly. They would still travel forward at 30 meters per second until the seatbelt caught them and pulled them back. Let's say this distance is six inches, or .16 meters.
Using that linked to calculator, the average impact force would be 254,000 Newtons and 229 g's--divided between the three mounting points, that's still 85,000 newtons per point, or six times what it's designed to withstand. So even on a vehicle built to spec, if you are traveling at 65 miles per hour, hit a brick wall or cement truck and stop instantly, it's likely to be a fatal collision, even with your seatbelts.
The National Highway Traffic Safety Administration uses a maximum reference of 60 g for no more than 3 milliseconds, so let's see what we can come up with. Using our 250 pound passenger and the same seat belt stopping distance, we find that an instantaneous crash at 35 miles per hour gives us about 60g's of deceleration, albeit for 25 milliseconds, so this still could be devastating. It also gives us an average force of 69,000 Newtons, which when divided by three, gives us 23,000 Newtons per seatbelt mount--still far more than the mounting points are rated for.
To keep bringing it down to 14,000 Newtons per mounting point, we have a max speed of about 27 miles per hour. That's not very good. Keep in mind this is for an instant crash with a 250 pound passenger. If we have a 100 pound passenger, this number climbs up to about 43 miles per hour, which is definitely better.
But the point is that even if you build everything perfectly, there's still a significant chance that a car crash will be fatal, with or without seat belts. Perfect safety is impossible here. According to the DOT, of the 37,133 people killed in motor vehicle crashes in 2017, 47% were not wearing seat belts. That means over half the fatalities were wearing seat belts (don't misinterpret this though--an additional 7% of those fatalities could've been saved had they been wearing seatbelts).
All we can do is try and make our skoolies as safe as possible, knowing that it will never be 100% safe. So don't mount your seatbelt to the fiberglass skin, or the wooden subfloor, or with simple wood screws. Use the aforementioned requirements for bolt and washer size, and mount them to the strongest point possible.
For me, that was the interior skirt and the steel ribs.
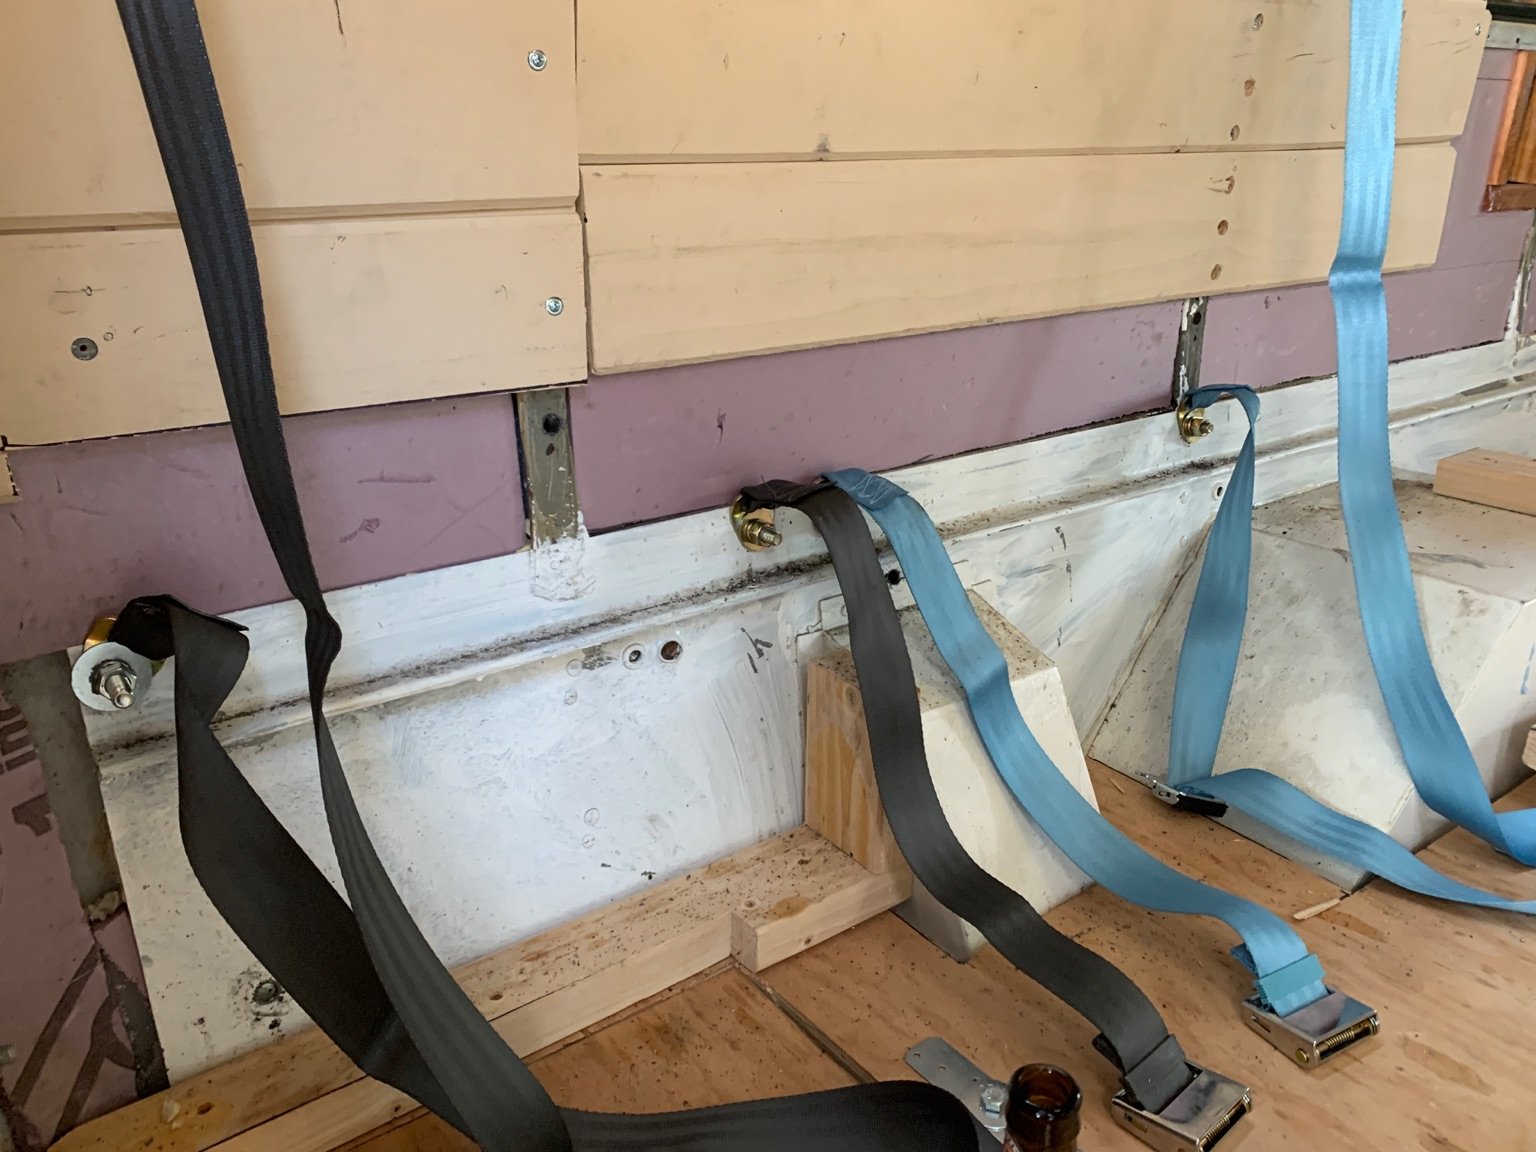
How to Mount a Seat Belt in a Skoolie
This was an awful process that took three weekends and multiple broken drill bits, even with the cutting oil. The shoulder mounts were pretty straight forward, as there was only one option--the forward most rib for the forward most seat, and then the aft most point on the horizontal rib above the windows for the aft most seat. I ended up needing longer bolts for these points, as not only did they have to go through the square steel tubing, but also the metal skin and the wooden wall. Fortunately for me, the shoulder mounts have a metal tube spacer on the inside, but instead of that I just used the wooden walls as the spacer. In hindsight, I wish I would've cut holes in the wood to use this metal spacer, because it's tough to adjust without it.

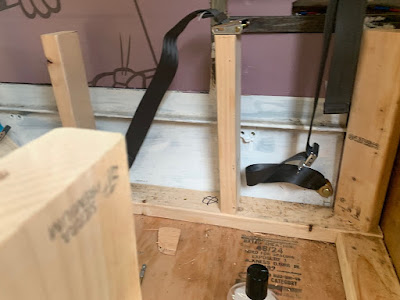
The lap belt mounts were much more difficult. First, I installed them on the bottom of the interior skirt. But then I installed one of the seats and quickly realized they were too low, because I couldn't buckle the seat belt. They were mounted too far away and they weren't long enough to come up the back of the seat and then forward to wrap around my fat belly.
So I uninstalled the seat and the seat belts, and tried a second position using angle iron mounted to the metal ribs just above the seat, but I quickly realized that this was flimsy and would do absolutely nothing for safety. So I uninstalled them again, and mounted them on the top edge of the skirt, with the lower mount of the shoulder strap also going through a rib.
To drill through the metal, I used new drill bits, started at 1/8", then 3/8", then the final 7/16" diameter bit. For each size, I used copious amounts of cutting oil to both lubricate and cool the metal. Pro tip: when cutting through steel, it's better to use lower speeds and push harder, because if you use the drill at full speed, the friction will heat up and melt the steel, making it too mushy to cut. So go slow, and use much more force than normal.
Then, on the outside, using copious amounts of seam sealer behind the washer, I tightened the nuts and locking washer until the seat belt wouldn't rotate on the inside. Perhaps the photos will help.
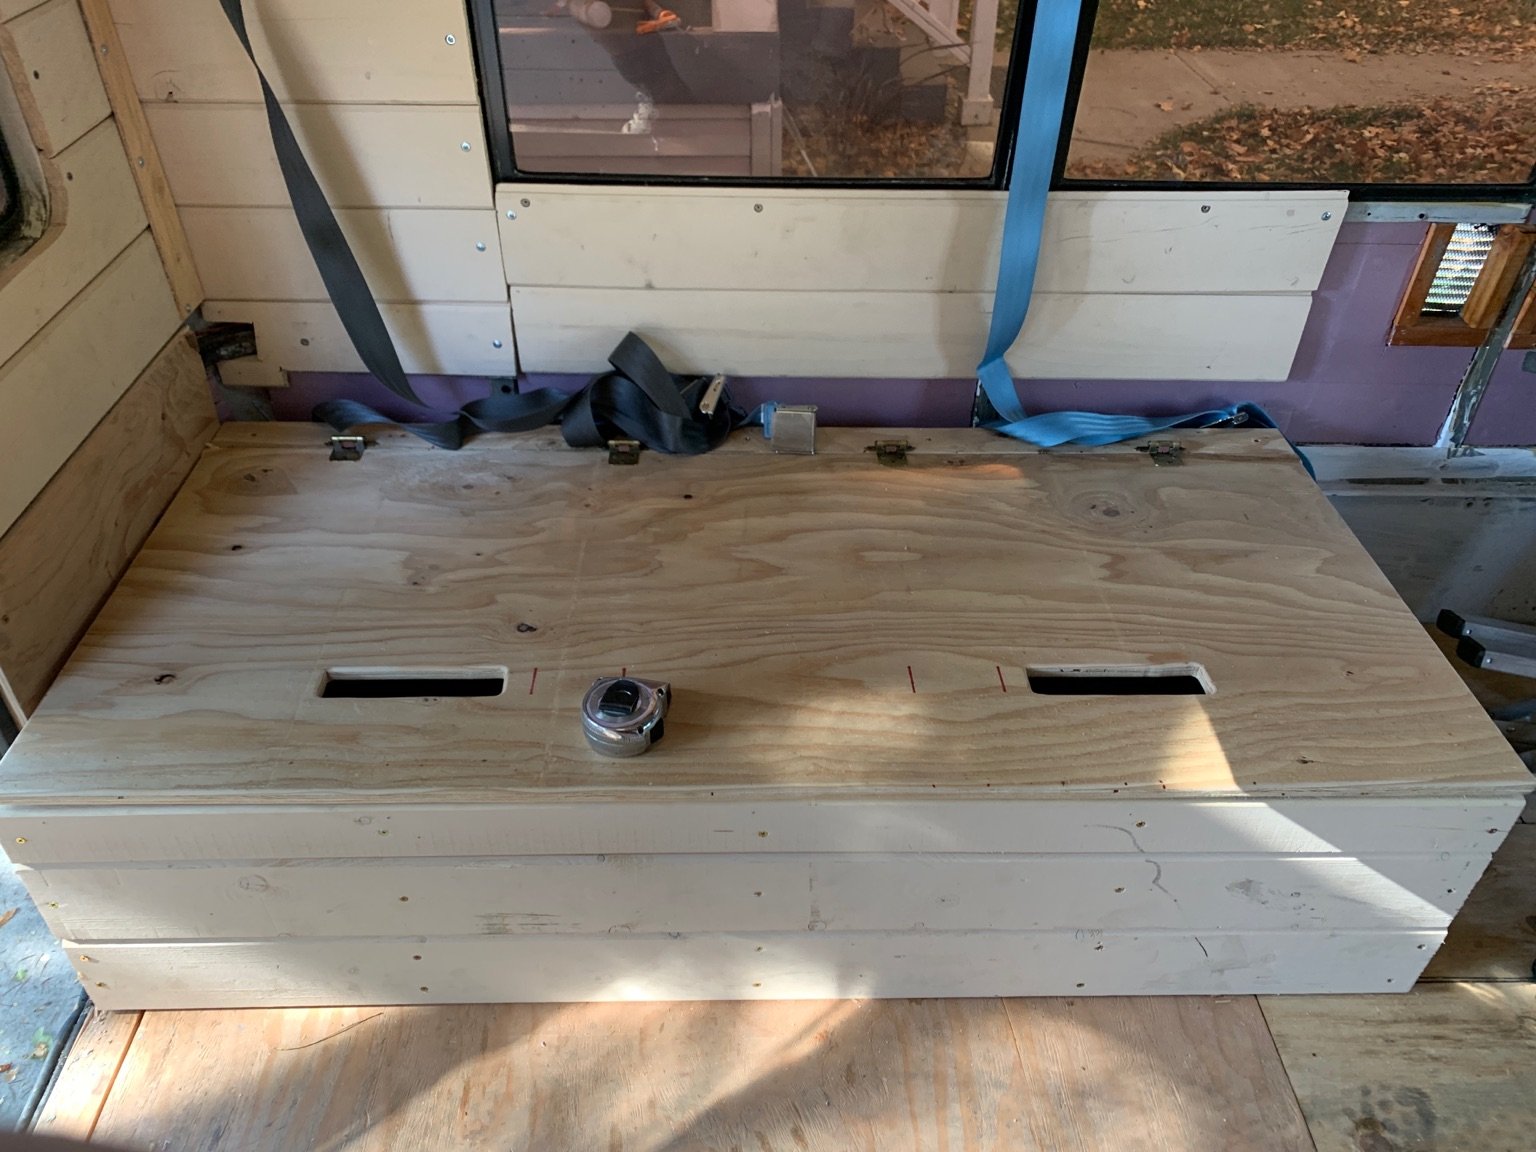
Bonus: Car Seat Latch System
Argo conveniently has a horizontal rib located a few inches above the seat along the back wall. I installed the 1/2" diameter eye bolts through this cross rib, and used 1/2" washers, locking washers, and nuts to secure them. Then, when you need to install the car seat, use the carabiner to connect the eye bolt to the fabric of the car seat latch hookups.
Common Gotchas
- 100% safety or perfection is impossible, but we can still maximize what we have by following the guidelines for seatbelts--it may not be possible to test how many Newtons your mounting hardware can withstand, but you can get the right size hardware as defined by the standards
- Don't forget to account for how long the straps are--my first install was too low, and there wasn't enough length to make it up to buckle
- Don't tighten the nuts too much--otherwise you won't be able to adjust the shoulder strap, or the outer skin might start to compress inward and crack
|
|
|
|
|
12-07-2019, 12:19 PM
|
#90
|
|
Bus Geek
Join Date: Dec 2017
Location: Dawsonville, Ga.
Posts: 10,482
Year: 1999
Coachwork: Genesis
Chassis: International
Engine: DT466/3060
Rated Cap: 77
|
Anyone have a pic of a Calif. bus with 3 point belts on every seat?
|
|
|
|
|
12-08-2019, 06:37 PM
|
#91
|
|
Bus Nut
Join Date: Jul 2019
Location: California, Bay Area
Posts: 896
|
Great build! I like your creativity and attention to technical detail, and I like your writing style. I'm excited to see what's next for your project. Keep up the good work!
I love these little Girardin shorties. Some of the best looking buses in my opinion. I'm surprised how few I see here, actually, I think yours is the only Girardin build i've come across here. I might be joining you soon, I've got my eye on an MB-II SRW shortie, and also considering an MB-IV DRW 5 window, both are the ~6ft interior height models. I prefer the look of the 5.5s like you have, but I really want to be able to stand up inside.
|
|
|
|
|
12-14-2019, 03:29 AM
|
#92
|
|
New Member
Join Date: Apr 2018
Location: Blaine MN
Posts: 4
Year: 1994
Chassis: Ford E350
Engine: 7.3 Diesel IDI
Rated Cap: 4 window Shorty
|
Quote:
Originally Posted by TheArgobus

When driving Argo uphill, I noticed the transmission would slip when shifting, and even downshift instead of up. The overdrive OFF light would start blinking on the handle, which I now know is the transmission's version of a check engine light.
In the past year, I've put maybe 1000 miles on it. When I brought it in for an oil change, they checked my transmission and said I was burning fluid real bad. So I had them service the transmission too.
The problem persisted, and thanks to this forum, I found out the meaning of the blinking OFF light so I brought it back in to check it out. It had been one month and maybe 150 miles since they serviced the transmission, and the fluid was real burned and plenty of metal shavings in the pan. They inspected the converter and found that it was shot. I'm not a mechanic, so I'm not sure what the right language is, but it explained why it was slipping and running hot.
Turns out it isn't the stock transmission and is an aftermarket job, and they couldn't find any of the right converters anywhere, so I am the lucky winner of getting the transmission rebuilt.
I'm okay with that, since I really want the mechanical side of things to be squared away when I'm out and about, and I decided to add in a heavy duty kit that'll be more reliable and also make towing much easier on the thing. It'll end up being about $3200, which is $1200 more than what I paid for the whole bus. That's a painful fix, but like I said... I'm okay with forking out cash for a reliable bus.
|
Too late to mention this. but I had the same thing happen. The The tach sensor and throttle position sensor being bad will cause the transmission to fail. Its because the computer tells the tranny what to do and it will kill it. I put a brand new transmission in mine for that very reason.
|
|
|
|
|
12-14-2019, 12:22 PM
|
#93
|
|
Bus Nut
Join Date: Dec 2018
Location: Mt Vernon, WA
Posts: 523
Year: 1996
Coachwork: Bluebird, Collins
Chassis: G30 Bluebird Microbird, E350 Shuttle Bus
Engine: 1995 Chevrolet 350, 1992 Ford 460
|
Someone should open a shop specializing in finding out whats really wrong with transmissions and saving the owners thousands. I may have a computer or speed sensor problem. My L80e trans drops out of overdrive into limp mode. Is there a sensor for my speedometer as well as a vehicle speed sensor (vss).
|
|
|
|
|
12-14-2019, 01:31 PM
|
#94
|
|
Bus Crazy
Join Date: Oct 2017
Posts: 1,222
Year: 1999
Coachwork: BlueBird
Chassis: TC1000 HandyBus
Engine: 5.9L 24V-L6 Cummins ISB
Rated Cap: 26 foot
|
My bus has lap-belts attached to the seat frames. They look like they are not factory, and are each different colors. The crappy weather last year caused mold to grow all over them. My driver's seat has a three-point system.
I can find replacements, but only in black.
Where did you find that blue flat 2" seatbelt webbing as shown in your pics? junk yard? the blue looks like new stuff.
I've been trying to find blue seatbelt webbing for a while now.
|
|
|
|
|
12-14-2019, 02:43 PM
|
#95
|
|
Bus Geek
Join Date: Dec 2017
Location: Dawsonville, Ga.
Posts: 10,482
Year: 1999
Coachwork: Genesis
Chassis: International
Engine: DT466/3060
Rated Cap: 77
|
Quote:
Originally Posted by Mountain Gnome
My bus has lap-belts attached to the seat frames. They look like they are not factory, and are each different colors. The crappy weather last year caused mold to grow all over them. My driver's seat has a three-point system.
I can find replacements, but only in black.
Where did you find that blue flat 2" seatbelt webbing as shown in your pics? junk yard? the blue looks like new stuff.
I've been trying to find blue seatbelt webbing for a while now.
|
I've got a pair of these 4 point harnesses. Bought for my street car that got totaled. LMK if they can help you.
http://www.skoolie.net/forums/images...lies/Thanx.gif
https://www.ebay.com/itm/New-2-NYLON...sAAOSwAYtWHdw2
__________________
I Thank God That He Gifted Me with Common Sense
|
|
|
|
|
12-15-2019, 10:28 AM
|
#96
|
|
Bus Nut
Join Date: Apr 2018
Posts: 421
|
Quote:
Originally Posted by Doktari
Someone should open a shop specializing in finding out what’s really wrong with transmissions and saving the owners thousands. I may have a computer or speed sensor problem. My L80e trans drops out of overdrive into limp mode. Is there a sensor for my speedometer as well as a vehicle speed sensor (vss).
|
My transmission actually wasn't the source of the problem. Like I said, my regular mechanic said I was burning it up and needed it rebuilt, so I took it to a transmission shop and they did the job. When they gave it a test drive, they discovered the rear differential needed to be rebuilt, as it was producing a loud grinding sound. So... I took it to get rebuilt, and the vehicle speed sensor was covered in a metal shavings, which was no doubt throwing erroneous speed drops to the instrument cluster in the dash, which then was unable to send reliable speed data to the transmission.
After the differential got rebuilt, it ran much better, but I actually still had the transmission drop out a few times. After talking with the transmission shop, I replaced both the vehicle speed sensor and the pigtail that connects to it (it looked frayed, which can throw the voltage off--for anyone who's considering doing that, you can't crimp the wires, you have to solder them). I also pulled out the instrument cluster, which was a huge pain, and took it to different shop to see if they could "fix" it. Well, they ended up replacing every capacitor and resister and a bunch of crap on it because most of it had corroded.
So with the new vehicle speed sensor and pigtail, and a cleaned up instrument cluster, it runs smoothly and quietly and everything's good to go.
|
|
|
|
|
12-15-2019, 10:32 AM
|
#97
|
|
Bus Nut
Join Date: Apr 2018
Posts: 421
|
Quote:
Originally Posted by Mountain Gnome
My bus has lap-belts attached to the seat frames. They look like they are not factory, and are each different colors. The crappy weather last year caused mold to grow all over them. My driver's seat has a three-point system.
I can find replacements, but only in black.
Where did you find that blue flat 2" seatbelt webbing as shown in your pics? junk yard? the blue looks like new stuff.
I've been trying to find blue seatbelt webbing for a while now.
|
I went with Seat Belts Plus here ( https://www.seatbeltsplus.com/catego...eat-Belts.html)
For links to every specific item I use, visit my blog here ( https://theargobus.blogspot.com/2019...n-skoolie.html)
Some of the links are amazon affiliate links, so I am unable to post them here.
I went with the simple airplane style belts, but I wish I would've ponied up the extra cash for the auto retracting regular type... because anytime someone new sits in the seat, they have to adjust the shoulder strap which is a pain in the ass.
|
|
|
|
|
12-15-2019, 10:44 AM
|
#98
|
|
Bus Nut
Join Date: Apr 2018
Posts: 421
|
Quote:
Originally Posted by dzl_
Great build! I like your creativity and attention to technical detail, and I like your writing style. I'm excited to see what's next for your project. Keep up the good work!
I love these little Girardin shorties. Some of the best looking buses in my opinion. I'm surprised how few I see here, actually, I think yours is the only Girardin build i've come across here. I might be joining you soon, I've got my eye on an MB-II SRW shortie, and also considering an MB-IV DRW 5 window, both are the ~6ft interior height models. I prefer the look of the 5.5s like you have, but I really want to be able to stand up inside.
|
I'm really glad we went with the shorter, smaller model, even though we had to sacrifice some of desires for the skoolie. I can't stand up in it, and we don't have enough room for an indoor shower, but the trade off is that it's super easy to drive around and it's just a bit more compact and efficient. For instance, we took it to downtown San Francisco and had no problems parallel parking and driving around.
We plan on doing multiple conversions, so we think having a smaller more efficient model for our first conversion is a good way to start. Eventually I'd love to do a full 40' Gillig conversion, and live full time on that but keep a shorty around for trips, but that won't be for a while.
|
|
|
|
|
12-16-2019, 05:27 PM
|
#99
|
|
Bus Crazy
Join Date: Oct 2017
Posts: 1,222
Year: 1999
Coachwork: BlueBird
Chassis: TC1000 HandyBus
Engine: 5.9L 24V-L6 Cummins ISB
Rated Cap: 26 foot
|
Quote:
Originally Posted by o1marc
I've got a pair of these 4 point harnesses. Bought for my street car that got totaled. LMK if they can help you.
|
Thanks, but I'm looking for the raw webbing; or a 3-point harness that will work with my driver's seat and/or five (5) 2-point adult lap-belts for the 2 factory skoolie seats that I'm keeping. One is a narrow seat (33" if memory serves) and seats 2 adults (or one comfortably with with a wide load), and the other is a big deluxe size that seats up to 3 adults with fold-out child-booster seats for seating 2 little kids. The 2 fold-out boosters also come with 4-point harnesses (like a child's seat legally has) but they are likely much smaller than yours. I'll look closer tomorrow, and if it looks like yours will work with them I'll let you know if you are saying you want to sell them? But that color (as my monitor shows it) is perfect.
Quote:
Originally Posted by TheArgobus
|
 I checked them out, and they look perfect!
I looked for hours last spring or summer.
Aloha!
|
|
|
|
|
12-16-2019, 06:11 PM
|
#100
|
|
Bus Geek
Join Date: Dec 2017
Location: Dawsonville, Ga.
Posts: 10,482
Year: 1999
Coachwork: Genesis
Chassis: International
Engine: DT466/3060
Rated Cap: 77
|
Quote:
Originally Posted by Mountain Gnome
Thanks, but I'm looking for the raw webbing; or a 3-point harness that will work with my driver's seat and/or five (5) 2-point adult lap-belts for the 2 factory skoolie seats that I'm keeping. One is a narrow seat (33" if memory serves) and seats 2 adults (or one comfortably with with a wide load), and the other is a big deluxe size that seats up to 3 adults with fold-out child-booster seats for seating 2 little kids. The 2 fold-out boosters also come with 4-point harnesses (like a child's seat legally has) but they are likely much smaller than yours. I'll look closer tomorrow, and if it looks like yours will work with them I'll let you know if you are saying you want to sell them? But that color (as my monitor shows it) is perfect.
I checked them out, and they look perfect!
I looked for hours last spring or summer.
Aloha! |
They sell in the $35-$40 range each, I'll let you have both for that plus shipping.
__________________
I Thank God That He Gifted Me with Common Sense
|
|
|
|
|
|
| Thread Tools |
|
|
| Display Modes |
 Linear Mode Linear Mode
|
 Posting Rules
|
You may not post new threads
You may not post replies
You may not post attachments
You may not edit your posts
HTML code is Off
|
|
|
|
 » Recent Threads
 |
|
|
|
|
|
|
|
|
|
|
|
|
|
|
|
|
|
|
|
|
|
|
|
|
|
|
|
|
|
|
|
|
|
|
|
|
|