|
|
 04-02-2021, 09:38 AM
|
#201
|
|
Almost There
Join Date: Dec 2019
Location: Upstate NY
Posts: 85
Year: 2001
Coachwork: Girardian Handicapped Commercial
Chassis: E-450
Engine: Ford 7.3L
Rated Cap: 9,000
|
Quote:
Originally Posted by TheArgobus

Whelp, I got pulled over for having multiple lights out. Apparently, there's quite a few regulations I was busting.
What Lights Does a Skoolie Need?
Check out this page. For vehicles wider than 2032mm or 80 inches or 6' 8", you must have a suite of identifying lights (for vehicles longer than 30 feet, there's additional lights, but I won't go into that here since I have a shortie). Long story short, a vehicle wider than 80 inches needs:
On the front end, in amber:
- Three lights at the highest point, centered and six inches apart
- A light at each side of the roof
- Reflector tape near the bumper on both sides
On the aft end, in red:
- Three lights at the highest point, centered and six inches apart
- A light at each side of the roof
- Reflector tape near the bumper on both sides
- Tail lights
- Turn Signals
- Brake lights (including the 3rd brake light, centered and at a higher level)
We're going to focus on the marker or running lights (called "clearance" and "identification" lamps on that page) first.
How to Replace Skoolie Running Lights
First, we need to remove the old shitty lights. Inside the bus, clip the wires going to all these lights so that they can be removed on the outside. Some of them may only have one wire leading to them, as the ground can be through the chassis.
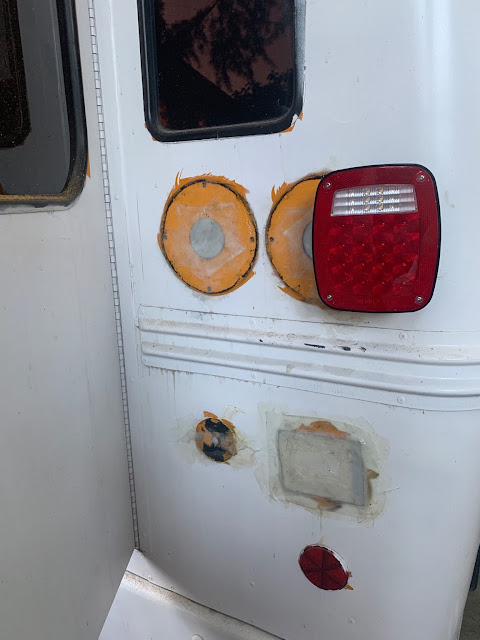
Remove the screws and pull the lights off. Some of the screws were too corroded or stripped to work, so I simply ripped them out or used a grinder to remove them. This will leave holes and tears in the body, which is fine as we'll patch them next.
How to Patch Holes in the Skoolie Body
See my previous post for a more detailed write up. Mix up your epoxy, and apply the fiberglass as necessary. It's okay if it looks rough--we're going to sand it down and all the blemishes will look better once the bus is painted. Let it cure for at least a few hours before proceeding.
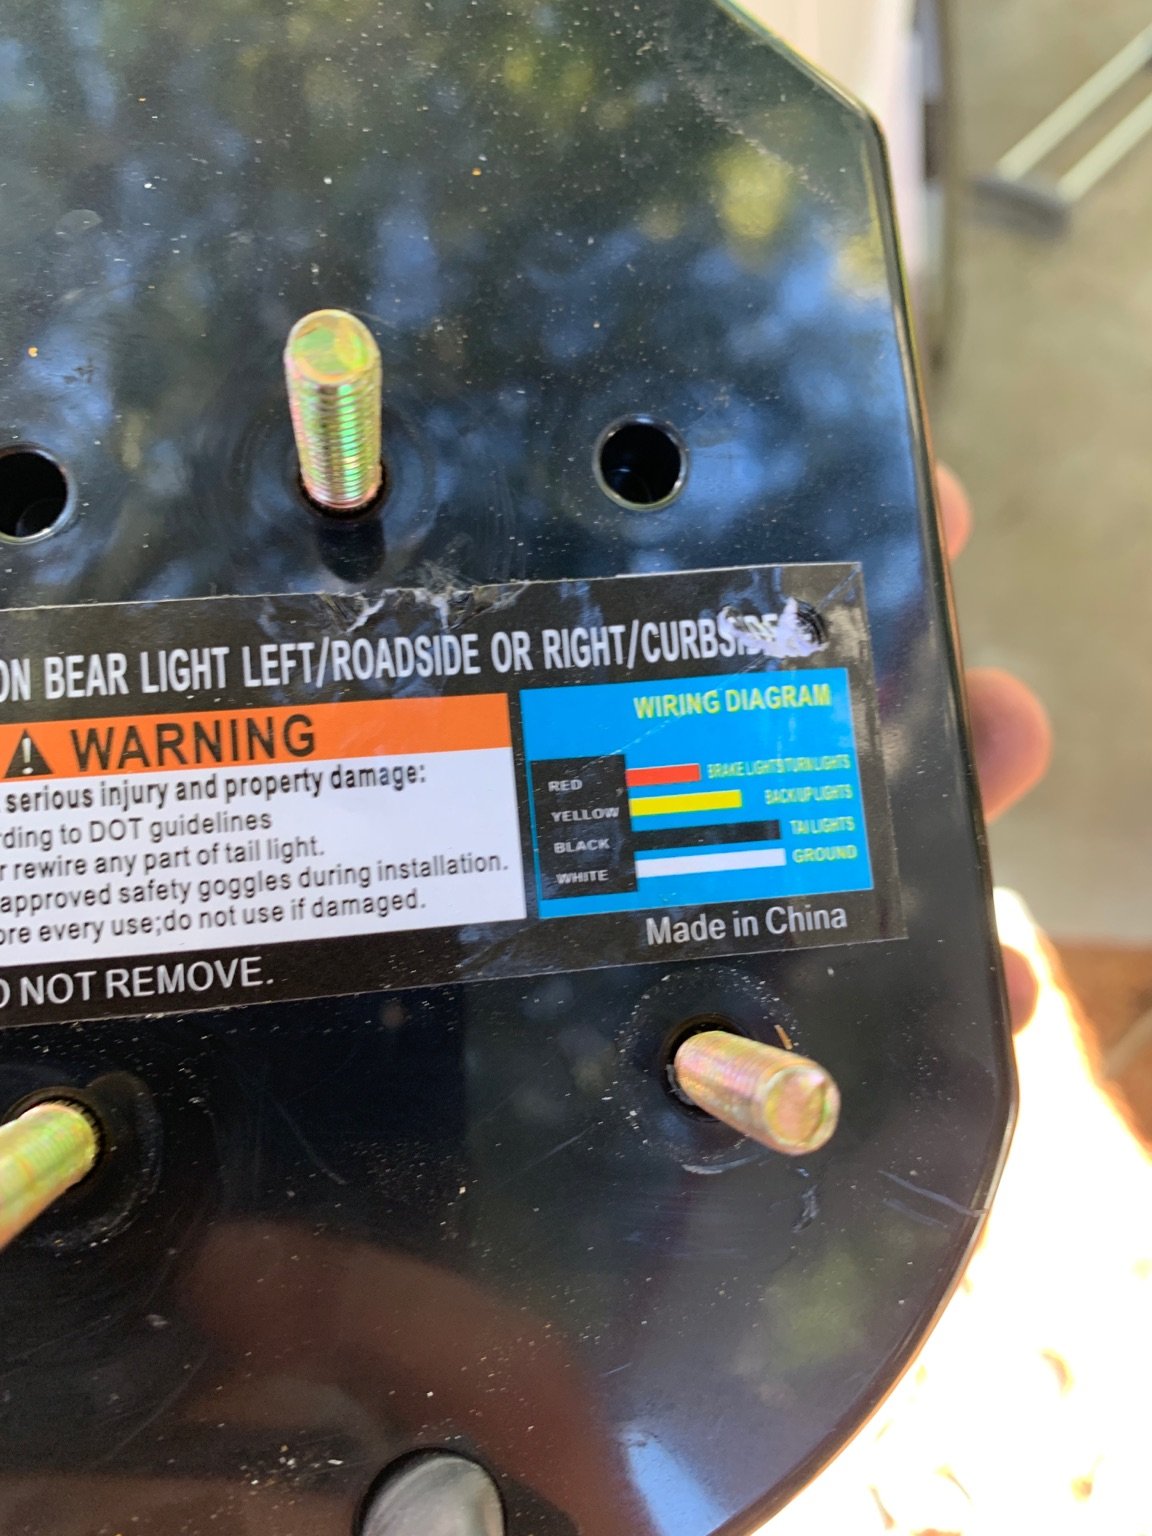
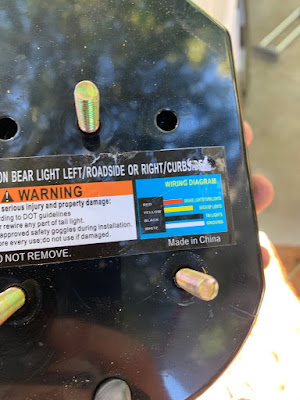
How to Install New LED Lights
The button LED lights I linked to are great, because you only need to drill a 3/4" hole to fit them. They're water-proof, and the included rubber seal certainly will resist water, but I decided to line the grommet with silicone sealant as well just to make sure.
Once you drill the hole, insert the light carefully. This may take a few tries, as it is a snug fit, but that's what we want. Oh, and it may be a good idea to strip a little extra off the end of the pigtail wires just to make it easier for the next step.
For these lights, the white wire is the ground, and the black wire is the positive end. That's kind of annoying. To complete the install, simply crimp the black wire to whatever wire you clipped earlier, and then connect the white wire to the ground (sometimes it's a wire, but usually it's just to the chassis). Turn your headlights on to see if you've done it correctly. If they work, hooray--if not, get out your voltmeter and double check your attached the correct wires where they need to go. LEDs have polarity, so it has to be correct.
How to Install New LED Brake Tail Reverse Turn Lights
Now we're getting more complicated. This is going to be different for every bus--for mine, the tail lights came on along with the brake lights, so I had to determine which wire going to the tail light was associated with turning the headlights on, and associated with pressing the brake light. I tried using a voltmeter, but found it was a lot easier to just loosely attach an extra LED button light from above to see which one came on. Once I identified the tail light wire, I labeled it and clipped it.
I then labeled all the other wires (turn signals, reverse light, brake light) before clipping them as well. Trust me, labeling before cutting is the most important step.
With the wires cut, I then unscrewed and removed the lights on the outside. I didn't care about being neat for this step, since I patched the ensuing holes with metal plates as outlined in my previous post (using fiberglass as well).
So now that the entire aft end of the bus was free and clear of lights, and patched over with fiberglass, I could install the new LED light fixtures. I went with the same vertical position, but spaced a little further out (also to fit my license plate lateral to one of the lights). The lights I linked to have a handy little guide for the wiring which makes it easy to wire them up.
I mounted them by drilling three holes for the bolts, and one for the wiring pigtails. I used some silicone sealant around the screws to make sure they were waterproof. Then I wrenched the lights into place on the inside, tightening the including nuts on the bolts.
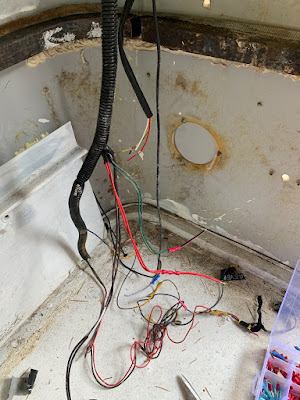
There was a lot of extra wiring that I removed. One needs to be careful here to make sure they remember which wires are which (please label them). The brake light is straight forward. So is the tail light, and the reverse light. Once you attach the ground, it should be up and running. Test it by turning the headlights on, shifting to reverse, and braking--but ensure that you haven't left any bare wires hanging around, because if they contact the chassis, they could spark.
It's worth mentioning here that you must add a wire from the brake light wire to the third brake light bar. I installed mine above the door, and the one I linked to also includes a low light mode for the headlights, which I then wired to the running lights on top of the bus.
About the turn signal lights. One cannot have both the turn signal and the brake lights wired to the same fixture, as if you brake with the turn light on, the brakes will keep the light on, thus removing your turn signal. Not cool. So we have to install a separate light for the turn signal.
This step is basically identical to the main LED light fixture, with one big difference--the hot wire for the turn signal also needs to be attached to the chassis ground through a 50W 6ohm resistor. This is because the relay for the turn signal is expecting a bulky incadescent bulb, and if you simply replace it with an LED one, it'll "hyper flash" or flash rapidly, and possibly burn out the relay. Thus we need to simulate an incandescent bulb using this resistor.
The turn signal wire must go to the new LED turn signal, as well as the resistor, which then connects to the chassis. Just an FYI, this resistor gets HOT, so make sure it's installed away from other wires or potentially flammable material. Then the LED turn signal has a ground wire that you must also attach to the chassis.
Once everything is installed, it is essential to test everything in each configuration (for instance, brakes with both headlights on and off, in reverse, etc...). It's also important to make sure you have the necessary reflector tapes installed where they need to be (reference the linked page in paragraph one).
The last step is to install the license plate lights if necessary. This one should be pretty easy by now, as you simply splice the tail light wire and lead it to the license plate light, and then ground it on the chassis too.
Common Gotchas
- Label everything before you cut. I cannot emphasize this enough
- Make sure the power is off when you work; I forgot this once and was promptly reminded when I cut through two wires
- Test everything before you go out on the road in each configuration--this will probably be a two person job
|
Couple questions. Third brake like I heard it is not needed? Bus is 2001 e450 shuttle
Edit. I reread and confirmed yes separate blinker lol. I just didn’t see yours. Just ordered the resistors!
|

|

|
|
04-02-2021, 10:18 AM
|
#202
|
|
Almost There
Join Date: Dec 2019
Location: Upstate NY
Posts: 85
Year: 2001
Coachwork: Girardian Handicapped Commercial
Chassis: E-450
Engine: Ford 7.3L
Rated Cap: 9,000
|
Quote:
Originally Posted by TheArgobus
(continued from previous post)
Anyway, back to the outside. Now I installed the top panel, which follows the same procedure as the previous ones, but this was on the outside now of the slotted angle, secured using the self tapping screws.
All that was left was to replace the marker lights that I had removed. This was quite simple, as I just used a 1/2" drill bit to "widen" some of the slots on the top-forward-most angle, inserted the lights and secured them with a just a small spot of gorilla glue.
The wiring was a little more difficult, only because I really wanted to make it waterproof. So I drilled a small hole in one of the sideboards, slid some 12v wire through, then stripped and crimped the ends appropriately. Then I heat shrunk the crimps with a piece of rubber long enough to give them plenty of protection from dripping water. Back inside, I simply crimped the other end of the wire to their appropriate connections.
Lastly, I turned the air conditioner on, and felt the glorious, freezing cold air flow.
Common Gotchas
- Power supply is key. Make sure you thoroughly budget your electricity appropriately so that you can actually run this. As I have yet to do the electrics, I may end up having to add more power supply options than just solar (generator or alternator)
- Air flow and tilt. These things will overheat if they don't have enough air flow, and if they're not tilted backward, the water will drain inside
- Safety. Don't just screw this to a piece of wood. Make sure it is secured in all axis such that if you roll the bus, you don't have a 30 pound projectile flying around.
|
Amazing. Im going to do this. But in the back. How come you made the hole big and put those vertical side wood in there?
|
|
|
|
|
04-06-2021, 09:01 PM
|
#203
|
|
Bus Nut
Join Date: Apr 2018
Posts: 421
|
Damn, I haven't logged in in a while. That's what having a baby will do I suppose.
The only update that I haven't posted is that we installed a 5 gallon orange bucket underneath a luxurious soft-closing black toilet seat. We were going to go with a composting toilet, but then we decided just to use cat litter with an auto-fan that triggers whenever the lid opens. It works AMAZING, there's absolutely no smell, but I did a very good job of ensuring the only space for airflow is outward. I'll post it soon once I find some time.
|
|
|
|
|
04-06-2021, 09:07 PM
|
#204
|
|
Bus Nut
Join Date: Apr 2018
Posts: 421
|
Quote:
Originally Posted by mc11237
Amazing. I’m going to do this. But in the back. How come you made the hole big and put those vertical side wood in there?
|
Let me tell you this and how I fucked it up. I put it in the front instead of the back because I wanted it to be nice and clean above the bed/seats, but in hindsight I wish I would've left the stock school bus AC in there, and just left the ceiling and walls.
I did not, big mistake, and so I put it in the front (ignoring the fact that the fan and wind would be going opposite, hence the wind blocking plate). I made the "hole" larger in every direction just to ensure sufficient air flow for cooling the coils.
Once I get some time, I will actually be moving the AC to the back centerline, and will be trying to get an alternator/charger so if there are some clouds blocking max solar it can still run.
|
|
|
|
|
04-06-2021, 09:10 PM
|
#205
|
|
Bus Nut
Join Date: Apr 2018
Posts: 421
|
Oh I also added some crown molding with LED light strips on the backside, and added a strip underneath the rain guard above the windows on the outside, so my lighting situation is AMAZING!
|
|
|
|
|
04-07-2022, 11:34 AM
|
#206
|
|
Bus Nut
Join Date: Apr 2018
Posts: 421
|
Well, I fucked up. We used our bus's battery system during a massive snowstorm and power outage in December, but we forgot to plug it back in and my little battery cells are dead. Completely dead. They expanded and pulled the screws out of their plywood case.
So I bought a 2 pack of Lion Energy lifepo4 batteries at Costco. Each one has its own internal BMS and temp sensor for charging/discharge, and they're 12V 100A giving me 2400W of power. This is all I need, really.
I'm also ripping out that shitty old AC in the front, installing a generator on the bumper rack, and putting in a proper RV air con on the roof. Lots of changes incoming.
|
|
|
|
|
07-05-2022, 01:33 PM
|
#207
|
|
Bus Nut
Join Date: Apr 2018
Posts: 421
|
2 years later...
We haven't taken the bus out in 2 years, primarily due to the whole baby thing but also we moved to the Sierra Nevada, which is where we take the bus most of the time. Now that we live there, it's just not as compelling to take it out, but we finally did this past weekend and I made a few upgrades.
First, my shitty DIY lithium pouch battery pack. I scored 40 pouches from a colleague who imported them from China, and thought this was the best way to go.
I was wrong. I had to create a battery case that could hold them together, connect the tabs as best I could with bolts/washers, and install a balancer and BMS (which rarely worked ever). This past winter, we got a record setting amount of snow, which knocked out power for two weeks. We ended up using the bus quite a bit, since the diesel heater worked like a champ and we were trying to conserve our home's propane/generator. Unfortunately, I didn't turn everything off when the power came back on, and since the bus was parked far enough away from the house that I couldn't hear the low voltage alarm going off, and my pouches died. Good riddance. Instead of having a crappy DIY system, I caved and bought two 12V 105 amp hour Lion Energy lithium batteries from Costco at a steep discount. They have the BMS and temp protection built in, so all I have to do is occassionally charge them individually with a simple battery charger (also from costco). So I swapped my 3600W system for a 2500W integrated system.
The old battery pack (note the expanded cells burst the wood case):

The new battery pack:

Also, my whole "solar powered air conditioner" idea was pure garbage. The last time we took it out in August 2020 was the hottest day of the year, breaking multiple records and spawning lightning that started the biggest wildfire in CA history. On our drive to the coast, my three 300W solar panels just couldn't produce enough juice to power my 550W air conditioner, because there were high cirrus clouds blocking the sunlight. Also, because my stupid ass decided to mount the air conditioner in the front of the bus, it couldn't get proper cooling and so we simply couldn't use it. It was miserable, especially with a 6-month-old in the back.
So I pulled out the old air conditioner in the front, replacing the whole with a simply cabinet, and installed a 15,000BTU Dometic rooftop RV air conditioner on the roof. I removed two of three solar panels to make room (leaving one 300W panel to passively charge the battery bank). This unit pulls about 2500W at max blast, so I also purchased a generator mounted on my bumper rack specifically to power the air conditioner. If we don't need the AC, then we don't need the generator and it stays home. This does mean that when we're driving and running the AC, the generator is also running, but that worked out great! The only time we needed to run it at the campground was for nap time in the middle of the day, but I think that's okay because few people are trying to sleep at 2pm so the noise wasn't that big of an issue (also we were in a parking lot, not our campsite).
The old AC setup:

What it looks like now:

The new AC:


|
|
|
|
|
07-06-2022, 11:43 AM
|
#208
|
|
Bus Crazy
Join Date: Apr 2020
Location: Northern California (Sacramento)
Posts: 1,430
Year: 1999
Coachwork: El Dorado Fiberglass
Chassis: Ford E450
Engine: V10 Gas
|
Great update.
Batteries: life is an experiment.
Solar: life is an experiment.
Whereabouts in the Sierras, if you don't mind my asking? I'm in Sacramento.
|
|
|
|
|
07-07-2022, 10:42 AM
|
#209
|
|
Bus Crazy
Join Date: Apr 2019
Location: SW USA
Posts: 2,064
Year: 2003
Coachwork: IC / Amtran
Chassis: CE300
Engine: International T444e
Rated Cap: 23
|
Quote:
Originally Posted by TheArgobus
First, my shitty DIY lithium pouch battery pack.
Also, my whole "solar powered air conditioner" idea was pure garbage.
|
You need to give yourself a break! Jeez... YOU'VE CONVERTED A SCHOOL BUS INTO AN RV! If you don't make mistakes (aka learning opportunities) on a project of this magnitude you're not human. How many people even try to make their own battery bank? You have so much to be proud of.
__________________
Go away. 'Baitin.
Our Build: Mr. Beefy
|
|
|
|
|
07-07-2022, 04:43 PM
|
#210
|
|
Bus Nut
Join Date: Dec 2017
Location: Sandpoint, ID
Posts: 539
Year: 2003
Coachwork: Girardin Microbird MB-IV
Chassis: Ford E450
Engine: 7.3 Diesel
Rated Cap: 25
|
Quote:
Originally Posted by TheHubbardBus
You need to give yourself a break! Jeez... YOU'VE CONVERTED A SCHOOL BUS INTO AN RV! If you don't make mistakes (aka learning opportunities) on a project of this magnitude you're not human. How many people even try to make their own battery bank? You have so much to be proud of.
|
This^^
I have so many redesigns I would do.
|
|
|
|
|
07-07-2022, 05:34 PM
|
#211
|
|
Bus Crazy
Join Date: Apr 2020
Location: Northern California (Sacramento)
Posts: 1,430
Year: 1999
Coachwork: El Dorado Fiberglass
Chassis: Ford E450
Engine: V10 Gas
|
Quote:
Originally Posted by peakbus
This^^
I have so many redesigns I would do.
|
I think there's even a thread on this.
|
|
|
|
|
07-07-2022, 06:19 PM
|
#212
|
|
Bus Nut
Join Date: Apr 2018
Posts: 421
|
Of course you're all right! I'm using flowery language to hopefully encourage lurkers and newbies doing their first conversion to avoid making the same mistakes I made!
It reminds me of when I used to live in a sailboat a decade ago, I came up with schematics to make LED strip lighting with resistors, wiring, everything. But then I found out you could just buy premade LED strips... and sometimes it's just better to pay money for someone else to assemble things for you.
In fact, I have those same LED strip lights on the outside of my bus now. We caught this sick pic this past weekend:

|
|
|
|
|
08-02-2022, 09:56 AM
|
#213
|
|
Bus Nut
Join Date: Apr 2018
Posts: 421
|
Lucky to be alive
I converted this bus for trips like these: a destination wedding on California's lost coast, up by the border with Oregon, and everyone was camping or RVing.
It was a 5 hour drive through 2 mountain ranges, so we decided to wait until we were closer to load up on water and groceries (thank God). It was 108F in Redding as we unloaded our groceries, trying to avoid touching the asphalt of the grocery store parking lot because it was hot enough to melt our skin off. This was our last stop--next, we would head up the highway into the coastal range of the beautiful Emerald Triangle region, famous for cannabis because the steep valleys and rocky terrain made it difficult for the authorities to find grows (back in the day, that is).
I'm a patient driver, and I like to take it easy on the engine, so I barely accelerated through the parking lot toward the stop sign that led into a 4-lane highway. As we approached, I applied the brakes, and the pedal went to the floor. I tried pumping the brakes (a technique I've used in several aircraft), but that did nothing, and we crept through the stop sign around 5 mph.
Fortunately, there was only one car in the highway, who was paying attention and swerved to avoid us, otherwise my left hip would've been crushed. I immediately thought the brakes had simply overheated due to the ambient temperature, and so I reversed back out of the road and into the lot and, using gear 1 and shifting into neutral to stop, parked in the back of the lot.
It was 4pm on a Friday, so the few auto shops that were open said the earliest they could get to it was Monday, so our bus was not going to the wedding. Rental cars ran about $130/day for what they had left, but then my wife had a great idea: what if we just rented a 10 foot Uhaul box truck?
They had exactly one box truck still available, so we rented it for $19/day, pulled our cushions out of the bus along with everything else we needed, and successfully made it out to the coast. We were pretty popular because the Uhaul stood out like a piece of trash on the beach, but everyone loved it because of our simple and creative solution.
On Monday, we towed it to a shop, and found out the master brake cylinder was busted. Had it failed just 5 minutes later, we would've been heading uphill into those mountains, and only would've discovered we had no brakes as we went careening over a 500 foot ledge into the river below.
I now know we could've used the parking brake, but I didn't know that at the time, so it could've ended in a terrible, awful way... but it didn't! And now I have half a mind to buy a used uhaul and convert that!
Even with a new master brake cylinder, the mechanic said we still need a new vacuum powered brake boost unit, and I'm gonna go ahead and get fresh brake pads too.
|
|
|
|
|
08-02-2022, 07:49 PM
|
#214
|
|
Bus Nut
Join Date: Dec 2017
Location: Sandpoint, ID
Posts: 539
Year: 2003
Coachwork: Girardin Microbird MB-IV
Chassis: Ford E450
Engine: 7.3 Diesel
Rated Cap: 25
|
So glad you had a safe outcome, and a logical backup plan to continue your trip! We've been stuck by a couple of mechanical issues before and quick thinking always helps!
|
|
|
|
|
08-03-2022, 08:36 AM
|
#215
|
|
Bus Geek
Join Date: Dec 2015
Location: pa
Posts: 2,500
Year: 98
Coachwork: 1. Corbeil & 2. Thomas
Chassis: 1 ford 1998 e350 4x4 7.3 2 mercedes 2004
Engine: 7.3 powerstroke & MBE906
|
Wow, that was fortunate.. sometimes someone seems to look out for us ordinary humans..
I just had this conversation about parking / emergency brakes.. in our e350 the parking brake can only be disengaged by stepping on it harder.. seems it would be impossible to modulate and use it as an emergency brake.. our cars with foot brake and release button. Would be doable but the normal lever between the seats is my favorite.
Nice recovery with the u haul.
Please update what went fatally wrong with the master cylinder that it failed complete and sudden??
I thought that was designed as to keep some braking performance.
Johan
|
|
|
|
|
08-04-2022, 09:56 PM
|
#216
|
|
Bus Nut
Join Date: Feb 2022
Location: Midwest
Posts: 267
|
Quote:
Originally Posted by joeblack5
seems it would be impossible to modulate and use it as an emergency brake.. our cars with foot brake and release button.
|
Last one of those I had I played with, if you engage it halfway, let off, then push in to release, you can modulate it. It won't reengage the lock until you let the pedal all the way out, then push it back in. Mind you, the make I played with may operate differently than others, so you'd need to go play with your emergency brake in a controlled area.
|
|
|
|
|
08-12-2022, 06:22 AM
|
#217
|
|
Almost There
Join Date: Apr 2021
Location: NJ
Posts: 91
Year: 2010
Coachwork: Collins
Chassis: Chevy Express
Engine: Duramax LMM
|
Wow the brakes going out then was super lucky as you pointed out. Having that pedal drop the to floor is one of the scariest things.
I had a fitting blow out on my work truck while I was slowing down for a red light. I was towing a 12' cargo trailer and the light turned yellow so I started to slow down, giving myself plenty of space before the intersection. Next thing I know my foot hits the floor and I'm heading right towards the newly established red light. Luckily there wasnt anyone in front of me and the intersection wasnt busy and the 2 cars sitting at the light saw me coming because I coasted through that thing without incident lol. I coasted up the street a bit and gently applied the parking break to come to a stop then called for a tow.
Great idea on the uhaul rental. That's brilliant.
|
|
|
|
|
|
| Thread Tools |
|
|
| Display Modes |
 Linear Mode Linear Mode
|
 Posting Rules
|
You may not post new threads
You may not post replies
You may not post attachments
You may not edit your posts
HTML code is Off
|
|
|
|
 » Recent Threads
 |
|
|
|
|
|
|
|
|
|
|
|
|
|
|
|
|
|
|
|
|
|
|
|
|
|
|
|
|
|
|
|
|
|
|
|
|
|