 |
|
 07-04-2020, 01:55 PM
|
#21
|
|
Bus Nut
Join Date: May 2019
Location: Lake Geneva, Wisconsin
Posts: 415
Year: 2008
Coachwork: Thomas
Chassis: Saf-T-Liner HDX
Engine: CAT C7 300hp w/retarder
Rated Cap: 46 + 1 36,200 lbs
|
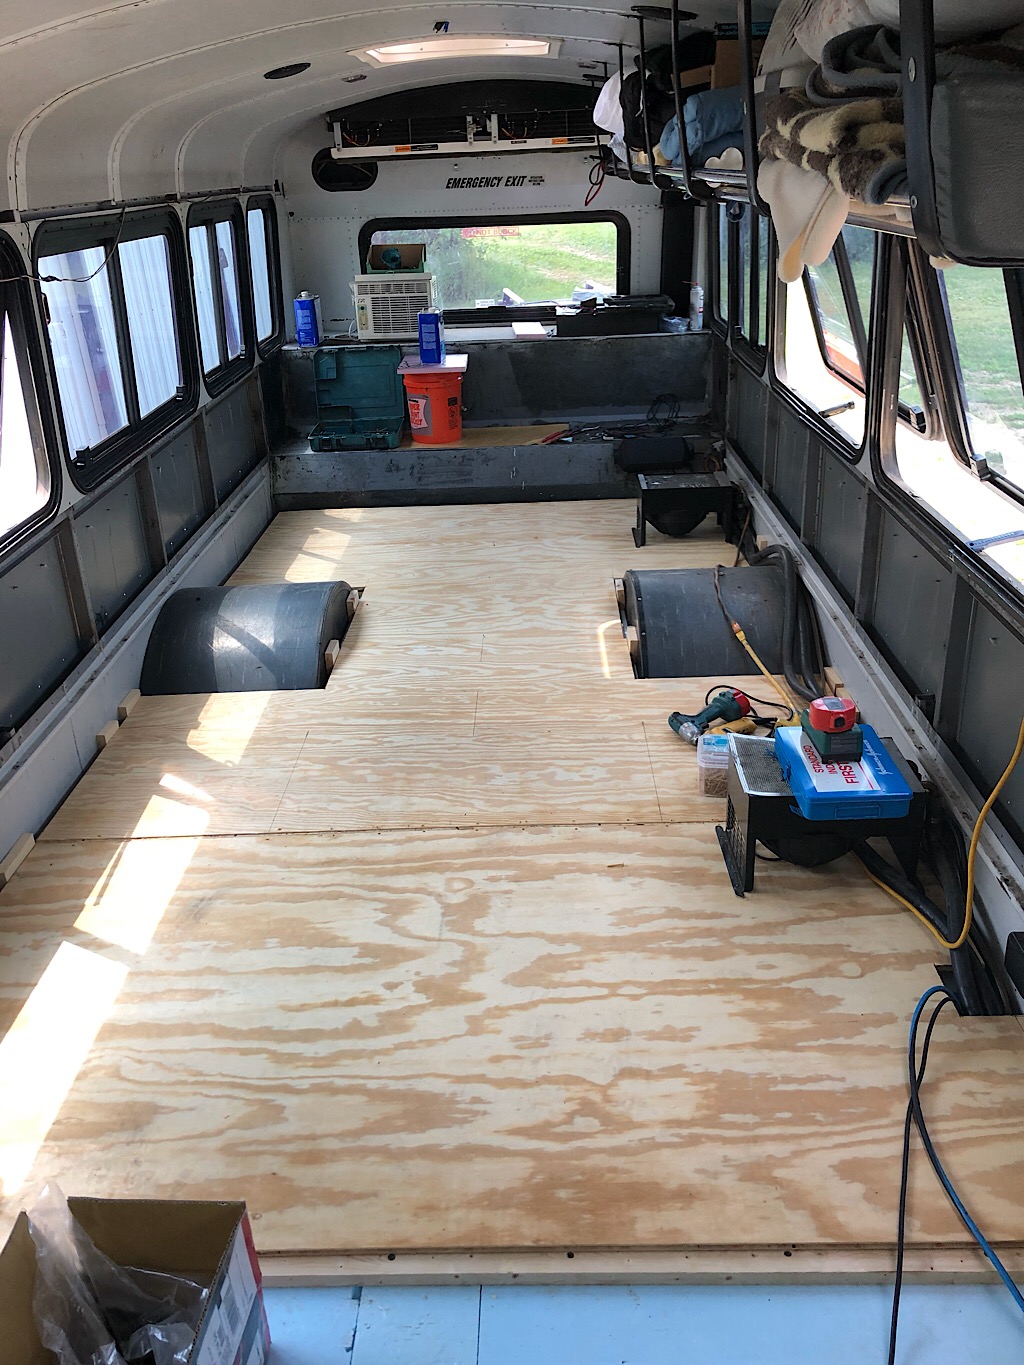
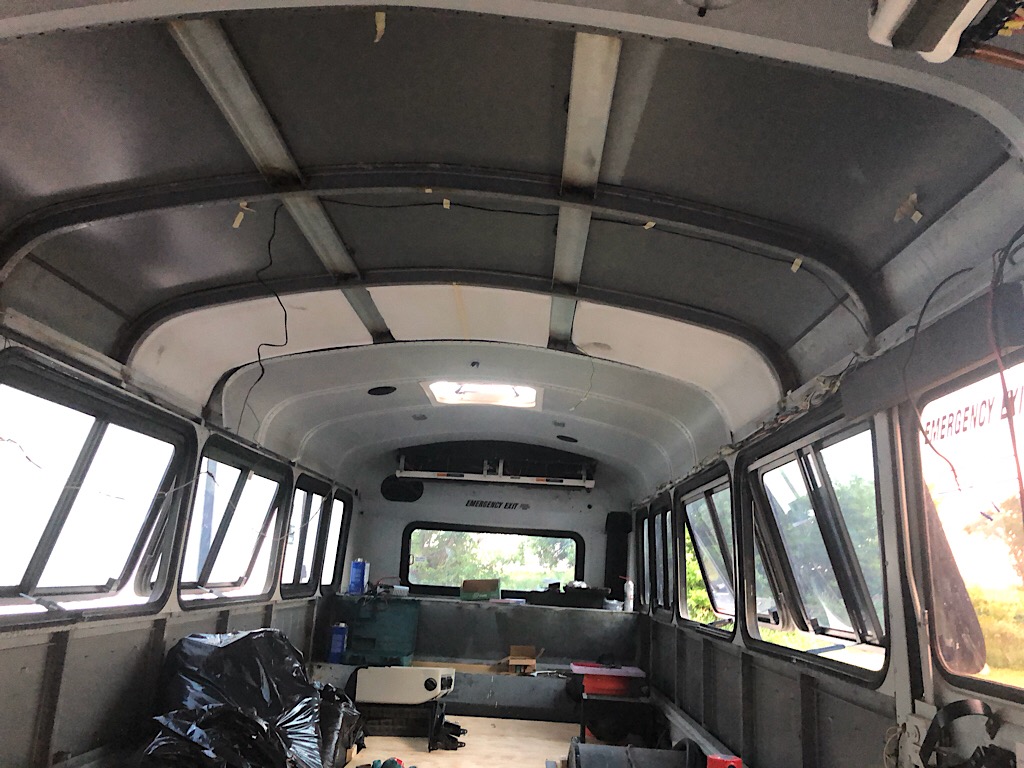
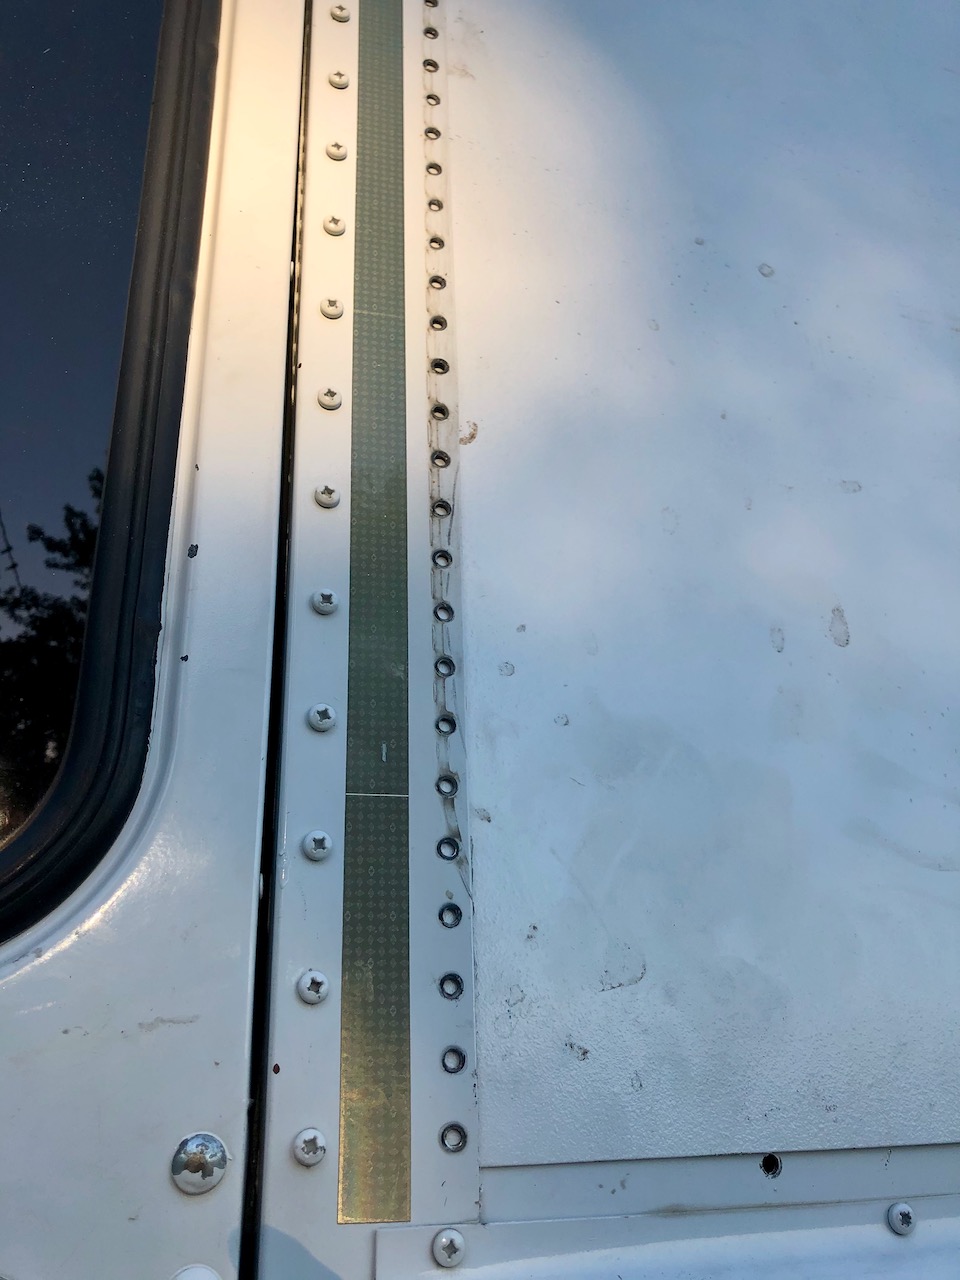
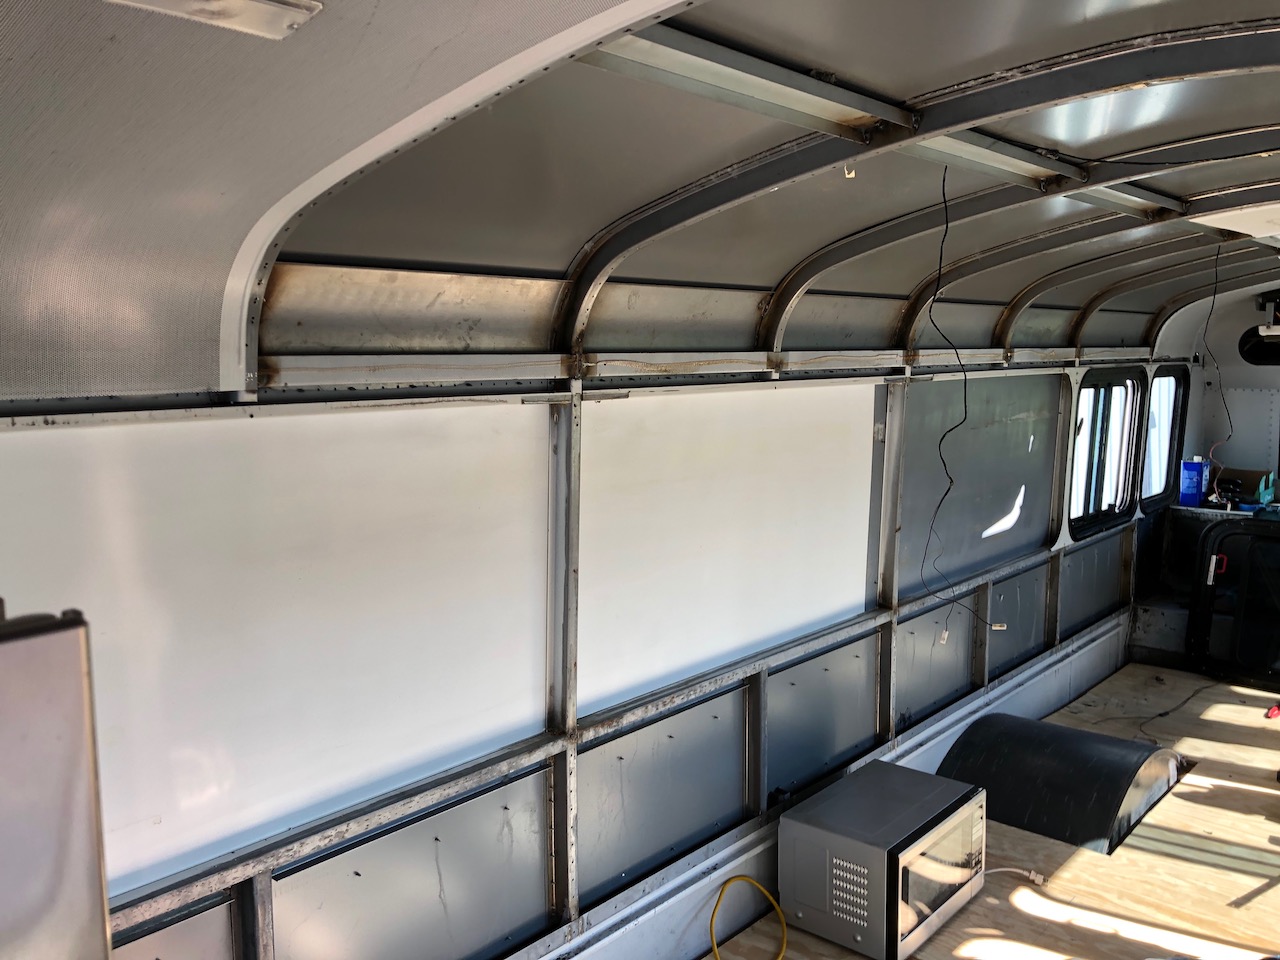
The rear half of the bus now has insulation and plywood on the floor. Next I took down the remaining overhead rack and began to take the celling panels off in preparation for spray foam insulation.
There is so much work to do, to do this right. I have to disconnect the rear A/C, which has about 20 wires that need to be labeled, photographed,and cataloged, refrigerant lines and condensate hoses that need to be disconnected, and then I have to recruit some helpers to physically take it down. After that I have to figure out how to insulate the last foot of the ceiling at he very back of the bus, which seems to be a kind of structural bulkhead. I hope I can find a way to inject foam into it without having to disassemble it, which looks like it would be quite a job.
|

|

|
|
07-04-2020, 02:37 PM
|
#22
|
|
Bus Crazy
Join Date: Jan 2020
Location: Fraser Valley British Columbia
Posts: 1,043
Year: 2007
Coachwork: Thomas
Chassis: Freightliner
Engine: C7 Cat
|
Great progress on a fantastic looking bus. 
|
|
|
|
|
07-04-2020, 03:54 PM
|
#23
|
|
Bus Nut
Join Date: May 2019
Location: Lake Geneva, Wisconsin
Posts: 415
Year: 2008
Coachwork: Thomas
Chassis: Saf-T-Liner HDX
Engine: CAT C7 300hp w/retarder
Rated Cap: 46 + 1 36,200 lbs
|
Quote:
Originally Posted by Oscar1

Great progress on a fantastic looking bus. |
Thank you.
|
|
|
|
|
07-04-2020, 04:00 PM
|
#24
|
|
Bus Crazy
Join Date: Jan 2020
Location: Fraser Valley British Columbia
Posts: 1,043
Year: 2007
Coachwork: Thomas
Chassis: Freightliner
Engine: C7 Cat
|
Quote:
Originally Posted by wrenchtech
Thank you.
|
Sorry, I meant coach on that one, that's definitely not a school bus 
|
|
|
|
|
08-14-2020, 07:47 AM
|
#25
|
|
Bus Nut
Join Date: May 2019
Location: Lake Geneva, Wisconsin
Posts: 415
Year: 2008
Coachwork: Thomas
Chassis: Saf-T-Liner HDX
Engine: CAT C7 300hp w/retarder
Rated Cap: 46 + 1 36,200 lbs
|
|
|
|
|
|
08-14-2020, 08:13 PM
|
#26
|
|
Bus Geek
Join Date: Sep 2015
Posts: 3,856
Year: 2002
Coachwork: Thomas Built Bus
Chassis: Freightliner FS65
Engine: Caterpillar 3126E Diesel
Rated Cap: 71 Passenger- 30,000 lbs.
|
That is another milestone passed. I bet you are getting a good feel for the space now that the windows are closed up.
|
|
|
|
|
08-15-2020, 01:11 AM
|
#27
|
|
Bus Nut
Join Date: May 2019
Location: Lake Geneva, Wisconsin
Posts: 415
Year: 2008
Coachwork: Thomas
Chassis: Saf-T-Liner HDX
Engine: CAT C7 300hp w/retarder
Rated Cap: 46 + 1 36,200 lbs
|
Quote:
Originally Posted by Native
That is another milestone passed. I bet you are getting a good feel for the space now that the windows are closed up.
|
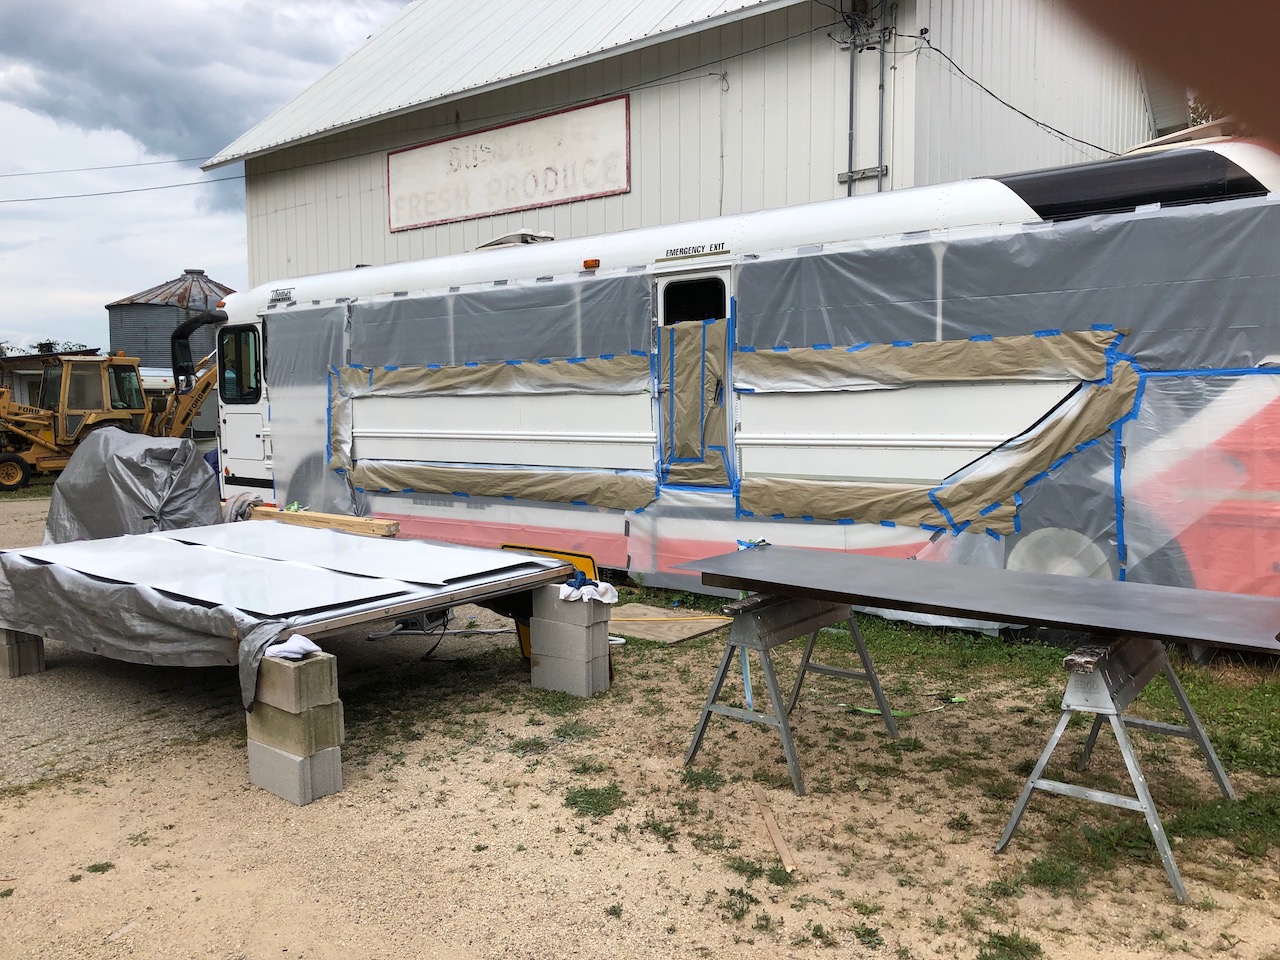
So far, so good, on that score. I am missing the light and the ventilation from the windows already though, but I think it is a trade-off that I have to make to be able to heat and cool the bus properly in all climates.
Also, I sprayed the primer with one of those little Harbor Freight HVLP turbine sprayers, a $120 rig. I had no experience with it before this job. For some reason yet to be determined, it did not atomize the primer very well. This resulted in a somewhat orange peel-like finish. The gun came with three sets of needle and spray tip orifice sets. If I remember correctly the tips are 1.8 mm, 1.4 mm and 1.0 mm. I was working with the middle set (1.4 mm). I got a really good test spraying initially, but once I started working I felt I needed to increase the paint volume so that I could work a little faster. There are pro level turbine spraying set ups on the market for around $1000. They have the advantage that they don't require a separate air compressor or special treatment to remove moisture from the air to prepare it for painting. I think I could've gotten a better finish if I had thinned the primer somewhat. In the final analysis though I think this set up is probably inadequate for painting a bus-sized object, but with a good amount of patience, perhaps a better result could be had.

|
|
|
|
|
08-15-2020, 01:25 AM
|
#28
|
|
Bus Geek
Join Date: Sep 2015
Posts: 3,856
Year: 2002
Coachwork: Thomas Built Bus
Chassis: Freightliner FS65
Engine: Caterpillar 3126E Diesel
Rated Cap: 71 Passenger- 30,000 lbs.
|
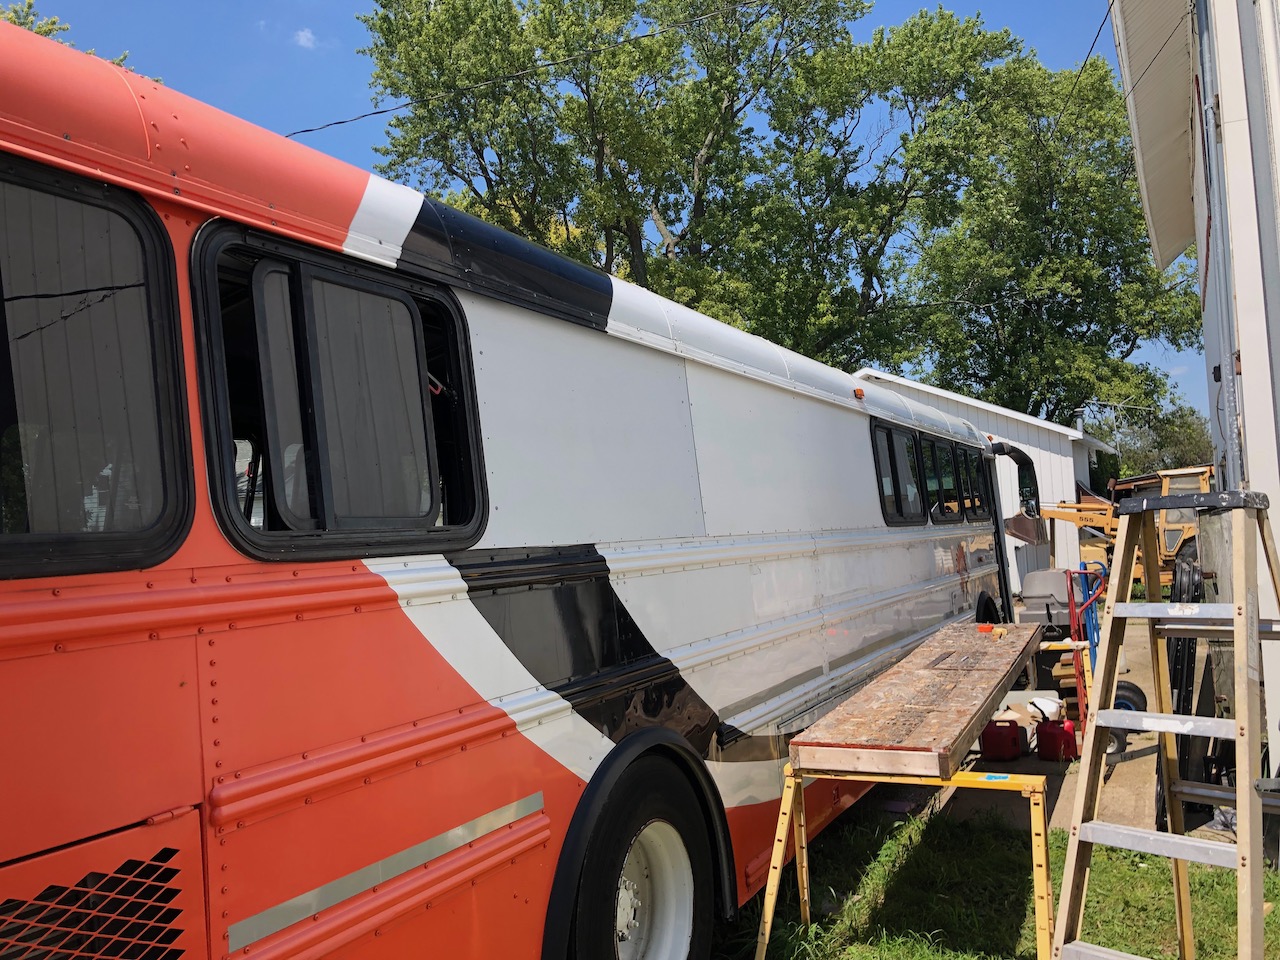
In the photos, you can not tell is has been repainted! Do you plan on reproducing the red and black along at the back?
|
|
|
|
|
08-15-2020, 01:51 AM
|
#29
|
|
Bus Nut
Join Date: May 2019
Location: Lake Geneva, Wisconsin
Posts: 415
Year: 2008
Coachwork: Thomas
Chassis: Saf-T-Liner HDX
Engine: CAT C7 300hp w/retarder
Rated Cap: 46 + 1 36,200 lbs
|
Quote:
Originally Posted by Native
In the photos, you can not tell is has been repainted! Do you plan on reproducing the red and black along at the back?
|
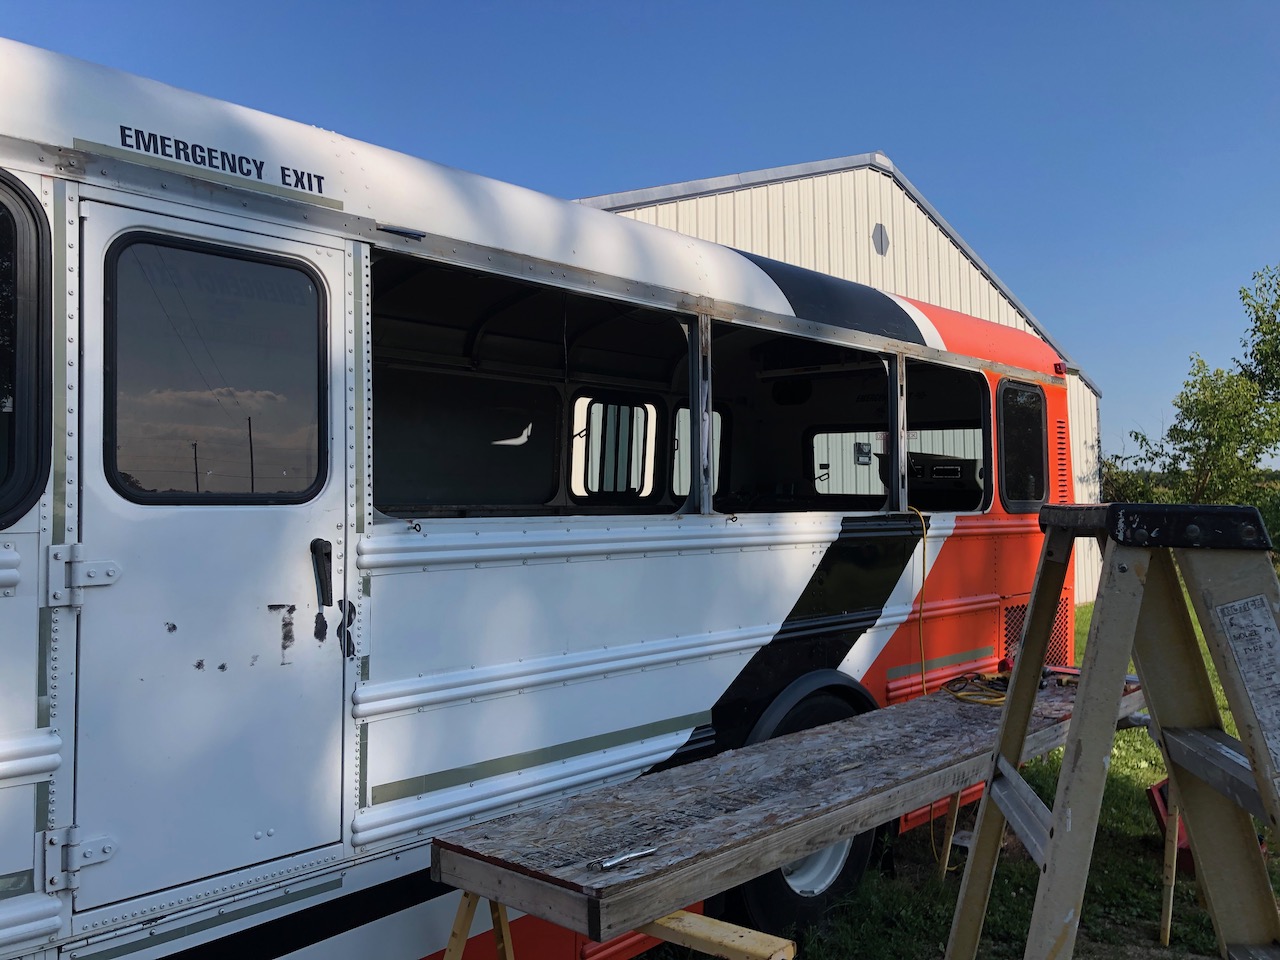
It is just in primer right now, but I am glad I chose white primer. That way I can let it sit for a little while without it looking like a mess.
It is just the black paint that needs to be completed to join the two sections above and below the new panel. I just have to make the proper curve so that it looks good. I am not sure if the two stripes were designed to be joined so it could be a challenge to get them to connect.
I am eager to get to spraying some insulating foam inside the bus .
|
|
|
|
|
08-26-2020, 02:38 PM
|
#30
|
|
Skoolie
Join Date: Dec 2015
Location: Mud Lake, Idaho
Posts: 136
|
https://youtu.be/hw1UpnSjLV0
Watch this video before you finish up your insulation plans.
|
|
|
|
|
09-03-2020, 01:12 PM
|
#31
|
|
Bus Nut
Join Date: May 2019
Location: Lake Geneva, Wisconsin
Posts: 415
Year: 2008
Coachwork: Thomas
Chassis: Saf-T-Liner HDX
Engine: CAT C7 300hp w/retarder
Rated Cap: 46 + 1 36,200 lbs
|
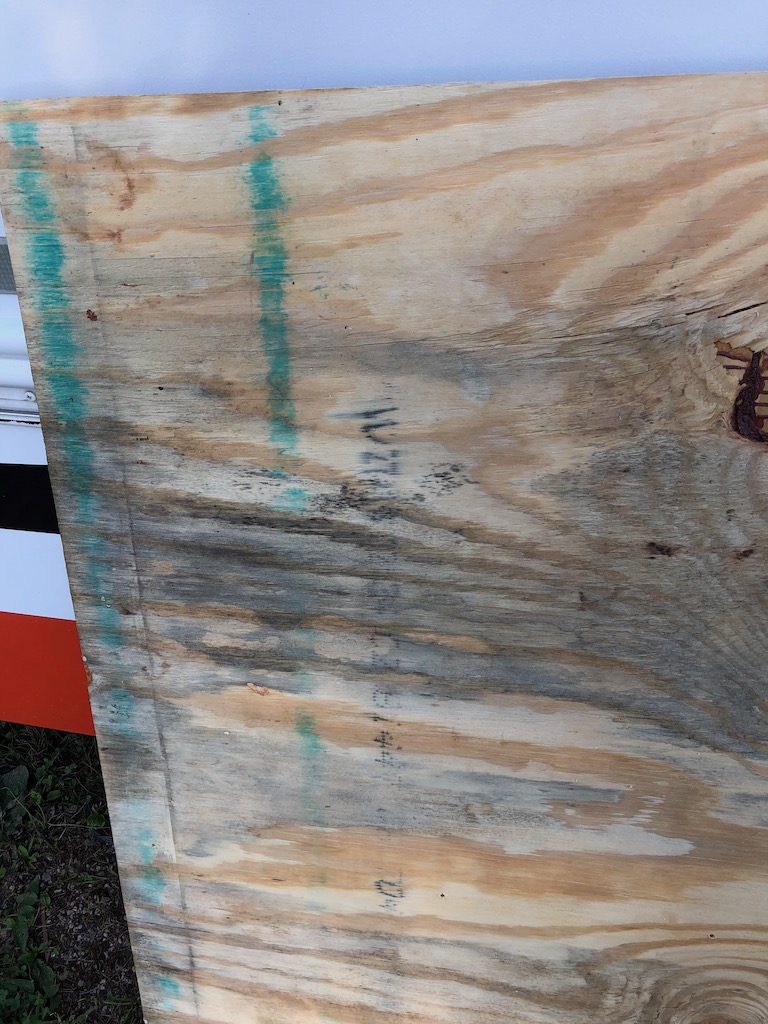
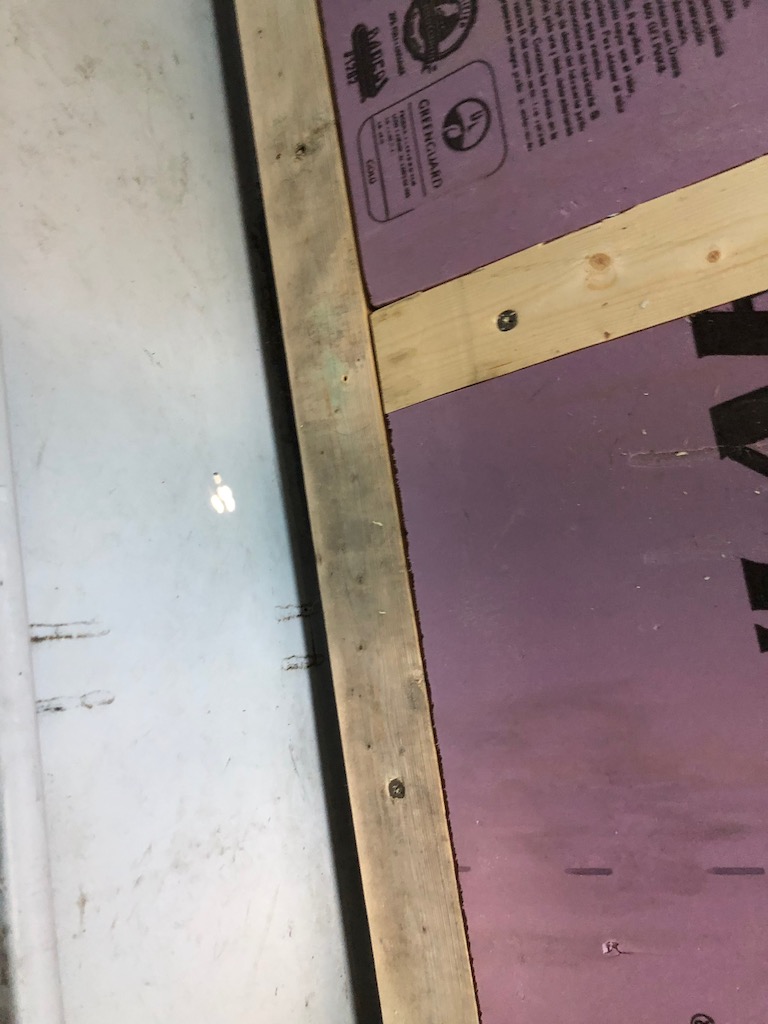
I encountered a setback today. During the process of removing and filling in five windows from the rear half of the bus, I had some rain water enter the bus and get on the floor. A couple of weeks later I started to notice some black staining on the plywood. Yesterday I got around to taking a closer look. I pulled off the sheet closest to the main leak, and sure enough, the side facing down had black mold growing on it. The strips of lumber that I had screwed down to act as nailers for the plywood, also has some black on it. Even the pink insulating board, where it was in direct contact with the plywood has black staining. Then, when I pulled up the one inch pink board, which lies on top of a one and a half inch blue insulating board, I found moisture trapped between the two sheets. And this is several weeks after the leak incident.
I am having to rethink my whole floor design at this point. It seems like what I’ve built is just too vulnerable. I fear that only perfect leak control will guarantee that I don’t have mold on any new material that I install . The problem is that there are always going to be leaks, especially with the windows that this bus is equipped with.
I wish I could eliminate wood products entirely. I have located a tongue and groove composite decking board that I would be happy to use in place of the plywood . It would be beneficial in that it doesn’t absorb water and is highly rot resistant. It would even save me the trouble of installing another layer of finish flooring. The problem is that enough of this material to finish my bus would cost about $3600. Plus this is a product that is usually used outdoors and so I would be concerned about it offgassing or emitting chemical contaminants.
This is the backside of the sheet I removed.
A shot of the lumber nailing strip that the plywood was attached to. You can see the stain on the pink insulation. That does not wipe off easily.
|
|
|
|
|
09-03-2020, 03:24 PM
|
#32
|
|
Bus Nut
Join Date: May 2019
Location: Lake Geneva, Wisconsin
Posts: 415
Year: 2008
Coachwork: Thomas
Chassis: Saf-T-Liner HDX
Engine: CAT C7 300hp w/retarder
Rated Cap: 46 + 1 36,200 lbs
|
Earlier I posted that I had put a layer of water in ice membrane down on the metal floor before I started installing the insulation. The upside of this is that it is protecting the metal from the water that is trapped in the insulation right now. Ideally, there needs to be a way for moisture to escape from the floor structure when it inevitably gets in there. It was never going to be escaping through the metal floor. That leaves only one direction for moisture to move out of the assembly, towards the interior. So maybe now I should be looking for a moisture permeable subfloor/finish floor solution and materials.
Or
I could try to seal everything up very well so that when water comes in from the windows it can not get into the floor. I think this is a very difficult problem to solve and if it fails, as this experience proves it very easily could, it would result in almost instant mold. Yet somehow even though this bus had leaky windows before I started working on it, there was no mold when I pulled up the original plywood subfloor. It is interesting to note that the original flooring was linoleum sheet material that was set in some adhesive that was quite gooey when I pulled it up, and that it had 100% coverage. It would be hard to imagine that moisture would be able to get between the linoleum sheet and the plywood with that stuff in place. This is something to look into. I would like to find out what they used for an adhesive, that, 12 years after it was installed, had not hardened. Most of the residential linoleum adhesives I have seen become hard as a rock short period of time. The fact that the adhesive that the bus builder used stays gooey may be the secret to keeping the floor glued down over the wide range of temperatures that a bus might experience.
I think this is probably the route I will go, at least in the short term. I will pull up the few sheets of plywood that I have down now, let everything dry out, replace the affected nailing strips and a couple pieces of the pink insulating board that are stained, and then install new plywood. Perhaps even giving the plywood and the lumber nailing strips a few coats of polyurethane sealer. I will follow that up with some nice, heavy duty, commercial grade linoleum sheet material, which I would glue down, fit tightly up to the walls, and seal at the edge with caulk.
|
|
|
|
|
09-03-2020, 06:33 PM
|
#33
|
|
Bus Nut
Join Date: Dec 2017
Location: Sandpoint, ID
Posts: 542
Year: 2003
Coachwork: Girardin Microbird MB-IV
Chassis: Ford E450
Engine: 7.3 Diesel
Rated Cap: 25
|
I sealed my plywood front and back and then used polyurethane caulk around the edges at the wall to keep out as much water as possible. Fingers crossed.
|
|
|
|
|
09-03-2020, 09:44 PM
|
#34
|
|
Bus Nut
Join Date: May 2019
Location: Lake Geneva, Wisconsin
Posts: 415
Year: 2008
Coachwork: Thomas
Chassis: Saf-T-Liner HDX
Engine: CAT C7 300hp w/retarder
Rated Cap: 46 + 1 36,200 lbs
|
Quote:
Originally Posted by peakbus
I sealed my plywood front and back and then used polyurethane caulk around the edges at the wall to keep out as much water as possible. Fingers crossed.
|
What did you use to seal your plywood? Im thinking of two-part polyester resin. At $35 a gallon, it is cheaper than polyurethane floor sealer, and probably better for waterproofing. Although it probably doesnt cover as much square footage, gallon for a gallon.
|
|
|
|
|
09-05-2020, 02:56 PM
|
#35
|
|
Bus Nut
Join Date: Dec 2017
Location: Sandpoint, ID
Posts: 542
Year: 2003
Coachwork: Girardin Microbird MB-IV
Chassis: Ford E450
Engine: 7.3 Diesel
Rated Cap: 25
|
Quote:
Originally Posted by wrenchtech
What did you use to seal your plywood? Im thinking of two-part polyester resin. At $35 a gallon, it is cheaper than polyurethane floor sealer, and probably better for waterproofing. Although it probably doesnt cover as much square footage, gallon for a gallon.
|
I just used up some left over poly and varnish finishes I had. Not as good as epoxy, but hopefully it will prevent the bulk of moisture from getting in.
|
|
|
|
|
09-09-2020, 04:54 AM
|
#36
|
|
New Member
Join Date: Sep 2020
Posts: 1
|
Hi guys, I have seen a similar situation with my hybrid trailer floor which sits outside year round and has a tarp underside plywood foam plywood vinyl floor sandwich. This spring I had to take some of the vinyl floor up and discovered the plywood was wet and black with mould, under the vinyl, except where there was portrusions through it (like for pipes and wires), in those areas the plywood layer was dry and no mould. It would appear to me that the moisture was being wicked up through the holes in the tarp and bottom plywood and open cell foam and got trapped under the vinyl, until summer perhaps when it began to be driven back out the bottom, if ever.
We are about to begin a coach to RV conversion and I am glad to hear this discussion. Under conventional wisdom it is good to always provide a way for moisture to escape, or a wall/floor assembly to dry out, keeping moisture at the warm side (more important in winter where the temp difference is much larger). That said I don't know what the best approach might be for moisture control and drying ability for RV wall assemblies. Should we leave a small air gap which can be vented for ceilings and walls? Surely windows will begin to leak at some point, perhaps flash from inside wall to interior finish or provide drain holes through basement? What shedding approach have you used for water entering coach?
Thanks,
Nathan
|
|
|
|
|
09-17-2020, 08:25 AM
|
#37
|
|
Skoolie
Join Date: Dec 2015
Location: Mud Lake, Idaho
Posts: 136
|
Watch this video, this guy has some really good ideas that might help you. Cheers
https://youtu.be/hw1UpnSjLV0
|
|
|
|
|
09-18-2020, 12:51 AM
|
#38
|
|
Bus Geek
Join Date: Sep 2015
Posts: 3,856
Year: 2002
Coachwork: Thomas Built Bus
Chassis: Freightliner FS65
Engine: Caterpillar 3126E Diesel
Rated Cap: 71 Passenger- 30,000 lbs.
|
I am considering using the felt/mat as a thermal break all over.
|
|
|
|
|
01-03-2021, 04:45 PM
|
#39
|
|
Mini-Skoolie
Join Date: Feb 2020
Location: USA
Posts: 12
|
Quote:
Originally Posted by wrenchtech
Here I am, milling 2 x 4 and 2 x 3 stock into actually 1" or 4/4 stock that Im using for strapping on my floor installation.
https://youtu.be/GB5GcQA1uNI |
That seems quite wasteful. Why not just cut them into 1 inch strips?
|
|
|
|
|
01-03-2021, 06:04 PM
|
#40
|
|
Bus Nut
Join Date: Jul 2019
Location: Suburbs of Winterset, OH
Posts: 802
Year: 2005
Coachwork: Thomas
Chassis: FS65
Engine: Mercedes 6.4L
Rated Cap: just the 2 of us
|
where can the 1/8 inch thick what ever it is be purchased?
|
|
|
|
|
|
 Posting Rules
|
You may not post new threads
You may not post replies
You may not post attachments
You may not edit your posts
HTML code is Off
|
|
|
|
 » Recent Threads
 |
|
|
|
|
|
|
|
|
|
|
|
|
|
|
|
|
|
|
|
|
|
|
|
|
|
|
|
|
|
|
|
|
|
|
|
|
|


 Linear Mode

