 |
|
 12-14-2019, 07:50 AM
|
#1
|
|
New Member
Join Date: Dec 2019
Posts: 8
Year: 2002
Coachwork: Internat'l
Chassis: T444 head start (tall) model
Engine: 7.3 TD
Rated Cap: 43
|
Condensation: Embracing it and showing it the exit vs nesting in a plugged drip pan
There are lots of old posts here on this topic, but no unified theory yet. Looking for time-tested insights. I have much res construction bg, and understand avoiding trapping moisture....
I'm completing the common stage of sanding down floor rust on peeled/demo'd bed and TSP and rust converting paint. Gonna use 1/2" pink Rigid with 1/2 ply on top (then pergo or something later on top when i can afford it). Plan to patch with sheet metal scrap the few holes in steel floor that a mouse could chew into (took out rear heater coil/blower), but thinking that the Rigid when sandwiched btwn plywood (screwed down) and steel will gasket/plug the screw/bolt holes. I believe that the pink Rigid is an adequate vapor barrier (I will silicone the Rigid seams before placing plywood, or maybe not if I obsess on capillary action much longer). In the demo I pulled up much but not all the butyl (I think) caulk bead along the edge (wall meets floor)... Planning to use a cheap sill barrier (1/8" foam roll 6"wide/tall, very compressible) tucked under the edge of the Rigid and sticking up a few inches around the perimeter to separate metal from wood (and I'll cut the ply a 1/2 inch short of touching metal), and to give something to tuck wall insulation behind when I get around to that. It will also theoretically help prevent any fumes from entering camper from under rig... (yes I am not able to redo walls and windows or ceiling any time soon for $ reasons, but I need a forever floor now to start building some shelving & partitioning etc on top of and bolting down seats). I know that moisture will accumulate/capillary/wick down there from inevitable condensation weep, so feeling good about treating the metal, and I know that the materials used down there will not absorb moisture. I can't afford to replace windows now, so I'm just gonna caulk the ext seams with silicone/vulkem/henry's. This is all preface and context to my questions:
1. What's going on where the walls meet the steel floor? I'm not going to drill out rivets just to investigate and learn what some of you ballsy customizers already know.... Do the ribs attach to the edges of the 'joists' (I know there's a better name than joists in the steel medium), or do they weld to the deck at the edge? Is there spun fiberglass like in the rear panels (which screw off vs rivets)? More important, is that an area that is totally sealed in terms of the steel envelope, or can accumulated condensation moisture theoretically weep out in a helpful way there? Could this be augmented by a tiny drill bit? Following in the valley of the seams along the welded seams above each joist, drilling outward but not far enough to penetrate outer plate? (I have had crazier ideas before that ended up working). This would create negative pressure at the low end of the capillary system and theoretically help protect plywood, even help if there's an occasional interior spill... tell me if this is crazier than keeping a shallow swimming pool where we have no idea where it spills out...
The build on all these busses seems to have ignored the problem of plywood in constant contact with steel (and condensation), particulary at edges which we are all trying to rehab, but I can't figure out if keeping theoretical road spray out is a bigger need than keeping unavoidable condensation from getting trapped. Their model was accurately, as evidenced by all us consumers of retired busses fixing rotten plywood and bed rust, designed to last until only until the bus is replaced by a newer one with fresh "rottables". I digress...
2. Along the lines of the above, is filling the screw holes really important if the Rigid is pressed down by screwed plywood? There won't be hardly any space for water to pool, but, again, I don't know if it's more important to keep water from coming into a place where there's scarcely room for it to pool up (but in which condensation will inevitably accumulate, aided by the sill wrap)? Or is it better to (after treating the metal with better chemicals than they had 20 years ago, and making sure no outside air or rodentia can vent/chew in) allow the moist capillary bed (if you will) to weep down & out to the outiside (which will be wet sometimes but also dry at times, and hopefully never underwater).
Does your bivvysac have rubber or Goretex on the bottom? Are we making the floor of a chicken coop? or are we making the floor of a comfy houseboat (with no bilge/airspace between the floor and hull)? I figure each will work for 18 to 25 years, just like the manufacturer's model, but I'd like to do better....
|

|

|
|
12-14-2019, 09:27 AM
|
#2
|
|
Bus Geek
Join Date: Jan 2019
Location: Philadelphia
Posts: 7,000
Year: 2003
Coachwork: International
Chassis: CE 300
Engine: DT466e
Rated Cap: 65C-43A
|
Quote:
Originally Posted by DIYLoFi

What's going on where the walls meet the steel floor? I'm not going to drill out rivets just to investigate and learn what some of you ballsy customizers already know.... Do the ribs attach to the edges of the 'joists' (I know there's a better name than joists in the steel medium), or do they weld to the deck at the edge? Is there spun fiberglass like in the rear panels (which screw off vs rivets)? More important, is that an area that is totally sealed in terms of the steel envelope, or can accumulated condensation moisture theoretically weep out in a helpful way there?
|
The ribs are not directly attached to the floor, but rather they are bolted (although the "bolts" are more like large sheet metal screws) to the chair rail, which in turn is bolted to the floor. The bolts that attach the chair rail to the floor are mainly to prevent any outward movement of the wall; the inward movement of the wall that would occur in a collision is prevented by the flange at the base of the chair rail that goes across the floor and down the outside edge. The area behind the chair rail is sealed off from the inside of the bus (by the shape of the flange) but water can still drain (a little bit) to the outside.
Here's a crude diagram showing how the ribs (green) are attached to the floor (blue) via the chair rail (red):

The little black things are the "bolts".
|
|
|
|
|
12-14-2019, 01:04 PM
|
#3
|
|
Bus Nut
Join Date: Jul 2016
Location: Western Oregon
Posts: 876
Year: 1995
Coachwork: Blue-Bird
Chassis: TC RE 3408
Engine: 5.9 Cummins 12V Mechanical/Allison MT643
Rated Cap: Blue-Bird says 72 pass.
|
Is this the standard way of doing this? Can I expect my BlueBird to be like this too?
I assume there must be some variations over time and between manufacturers..
|
|
|
|
|
12-14-2019, 01:40 PM
|
#4
|
|
Bus Geek
Join Date: Jan 2019
Location: Philadelphia
Posts: 7,000
Year: 2003
Coachwork: International
Chassis: CE 300
Engine: DT466e
Rated Cap: 65C-43A
|
Quote:
Originally Posted by gs1949
Is this the standard way of doing this? Can I expect my BlueBird to be like this too?
I assume there must be some variations over time and between manufacturers..
|
I think your Blue Bird is built the same way but I don't know for sure. I can only vouch for Internationals being built in this way, since I had to cut through the wall and floor to repair my back corner.
|
|
|
|
|
12-14-2019, 01:56 PM
|
#5
|
|
Bus Nut
Join Date: Jul 2016
Location: Western Oregon
Posts: 876
Year: 1995
Coachwork: Blue-Bird
Chassis: TC RE 3408
Engine: 5.9 Cummins 12V Mechanical/Allison MT643
Rated Cap: Blue-Bird says 72 pass.
|
Yeah, I figured there must be some cutting involved. I don't need any cutting. Thanks.
|
|
|
|
|
12-14-2019, 02:23 PM
|
#6
|
|
Bus Geek
Join Date: Dec 2017
Location: Dawsonville, Ga.
Posts: 10,482
Year: 1999
Coachwork: Genesis
Chassis: International
Engine: DT466/3060
Rated Cap: 77
|
Here's the rib/floor construction on an International.
__________________
I Thank God That He Gifted Me with Common Sense
|
|
|
|
|
12-14-2019, 02:37 PM
|
#7
|
|
Bus Nut
Join Date: Jul 2016
Location: Western Oregon
Posts: 876
Year: 1995
Coachwork: Blue-Bird
Chassis: TC RE 3408
Engine: 5.9 Cummins 12V Mechanical/Allison MT643
Rated Cap: Blue-Bird says 72 pass.
|
OK, thanks for the pic, that helps. What I am trying to figure out is what happens to any water that seeps around roof rivets.
The Tropicool I applied stopped my seepage, but I want to know where that water was going, so I will know where the water will end up if the seepage starts again. From the brown stuff in your picture I assume that must be close.
|
|
|
|
|
12-14-2019, 04:08 PM
|
#8
|
|
Bus Nut
Join Date: Sep 2017
Location: Colorado
Posts: 400
|
Quote:
Originally Posted by DIYLoFi
2. Along the lines of the above, is filling the screw holes really important if the Rigid is pressed down by screwed plywood? There won't be hardly any space for water to pool, but, again, I don't know if it's more important to keep water from coming into a place where there's scarcely room for it to pool up (but in which condensation will inevitably accumulate, aided by the sill wrap)? Or is it better to (after treating the metal with better chemicals than they had 20 years ago, and making sure no outside air or rodentia can vent/chew in) allow the moist capillary bed (if you will) to weep down & out to the outiside (which will be wet sometimes but also dry at times, and hopefully never underwater).
Does your bivvysac have rubber or Goretex on the bottom? Are we making the floor of a chicken coop? or are we making the floor of a comfy houseboat (with no bilge/airspace between the floor and hull)? I figure each will work for 18 to 25 years, just like the manufacturer's model, but I'd like to do better....
|
The problem with sealing the floor water tight is you will get water in it. If a window gets left open, pan of water spills, water jug leaks, if that just sits in a sealed envelope it could grow funky. Condensation as you mentioned is another factor, in home construction usually people try to put some kind of air exchange in structures like sub floors and attics. If structures don't breath a little they get funky and toxic.
I drilled a few drain holes in the corners of my metal floor. My flooring on top of the metal is 2x2s with 3/4 ply-board & 3/4 pink board. I figure if it gets some water it will drain and what won't drain will dry from a bit of air around the unsealed floor.
I live in Colorado where things dry quick, it is probably more of a challenge in wetter climates.
|
|
|
|
|
12-14-2019, 06:39 PM
|
#9
|
|
Bus Nut
Join Date: Jul 2016
Location: Western Oregon
Posts: 876
Year: 1995
Coachwork: Blue-Bird
Chassis: TC RE 3408
Engine: 5.9 Cummins 12V Mechanical/Allison MT643
Rated Cap: Blue-Bird says 72 pass.
|
I am working on my floor now. It's too late for me to change my plans, but I am curious about what you've done. I can't quite visualize though. Where is the foamboard in relation to the 2X2s? Is the foamboard on top of the 2X2s or next to them?
I am trying to make my floor waterproof. I patched all the holes in my floor with various-sized pieces of galvanized sheet metal that I etched with vinegar, primed with rustoleum rusty metal primer, added one coat of rustoleum enamel and then glued in place with epoxy. The floor had already been treated with ospho, and then primed and painted with rustoleum. After the primed patches were in place, I put a rustoleum topcoat on them and then painted the whole floor again.
Now I am attaching 2X4s to the metal floor with self-drilling screws and loctite subfloor adhesive. I am also glueing 1.5 inch xps foamboard in between the 2X4s. I was going to use thicker plywood, but I got a good deal on shop panels of good-one-side half-inch. It's a bit flexible though, so every panel will be supported all around the edges, down the center of the bus, and another place or two according to predicted traffic patterns. I am leaving a small space along the edges and then I intend to fill that with butyl rubber putty tape. I hope that will seal any spillage in the living area for long enough to be mopped up. Also the butyl putting will be removable so I can check for seepage if I want. And I have a felt underlayment that I intend to put over the 2X4s and foamboard before putting the plywood on top of the underlay. The point of the underlay is to provide a little more thermal isulation and also some sound reduction.
That's my floor plan. I am in Oregon now, but I intend to move to Nevada sometime next year after my brothers and I sell Dad's house. That should make the floor last longer too.
|
|
|
|
|
12-16-2019, 07:51 AM
|
#10
|
|
New Member
Join Date: Dec 2019
Posts: 8
Year: 2002
Coachwork: Internat'l
Chassis: T444 head start (tall) model
Engine: 7.3 TD
Rated Cap: 43
|
Thank you for the input. I am putting it together now. Have a thick coat of Rustoleum industrial rusty metal primer, and I let it seep into the cracks along the joists, which are still low-points. This sounds crazy, but after thinking about the capillary system/discussion on other threads here and how water travels along a wick, I ran a wick of paracord along each joist crack and ran each course out (down an inch or 2) the closest hole in the steel floor. Cost $8 and 45 minutes. taped over all holes, including those with cord running out them, with aluminum duct tape. Then put down foam insulation. This way the lowest points in the bed will have a simple way to expel the water. It will be interesting to see if wicks are wet after a cold night of sleeping onboard when weather is dry during day. I wager a dehumidifier will still be helpful often when there's power.
I also decided to do a basic radiant floor heat setup, so I added another layer of 1/2 inch insulation, same thickness as my PEX. Gotta map out where to NOT screw through floor, and gonna use some flat aluminum flashing under plywood seams to keep the edges from moving up/down independently.
|
|
|
|
|
12-16-2019, 11:23 AM
|
#11
|
|
Bus Nut
Join Date: Jul 2016
Location: Western Oregon
Posts: 876
Year: 1995
Coachwork: Blue-Bird
Chassis: TC RE 3408
Engine: 5.9 Cummins 12V Mechanical/Allison MT643
Rated Cap: Blue-Bird says 72 pass.
|
I gave some thought to trying to make some sort of drainage system or pathways, whatever, but I was concerned about such pathways becoming a 2 way street and letting water in, at least in the case of driving on wet pavement during a heavy rain, so I dropped that idea.
It doesn't sound like that will be a big problem with your capillary system, but I do see what may be something of an issue. I'm not sure how much it will matter, but I think that once your cords become wet, they will hold moisture indefinitely and basically never dry out.
|
|
|
|
|
12-16-2019, 06:17 PM
|
#12
|
|
Bus Nut
Join Date: Sep 2017
Location: Colorado
Posts: 400
|
Quote:
Originally Posted by gs1949
I am working on my floor now. It's too late for me to change my plans, but I am curious about what you've done. I can't quite visualize though. Where is the foamboard in relation to the 2X2s? Is the foamboard on top of the 2X2s or next to them?
|
I ran the 2x2s like floor joists and screwed them to the floor with self tapping screws, every 18"-24"(or something) then put the foamboard in between them. I used 3/4 cdx plywood on top of the 2x2s. I painted the plywood with a deck stain/paint.
It turned out well. It is solid to walk around on and the insulation is pretty good also. The deck paint works well it sheds water well and is easy to clean.
I thought a bit about water getting under the floor and how it would dry. I thought about cutting a air channel in the 2x2s and foam, but I live in Colorado and water is not a big issue for me. I feel like if I do get some minor flooding it would dry out in a decent amount of time in the dry climate here.
|
|
|
|
|
12-16-2019, 07:20 PM
|
#13
|
|
Bus Nut
Join Date: Jul 2016
Location: Western Oregon
Posts: 876
Year: 1995
Coachwork: Blue-Bird
Chassis: TC RE 3408
Engine: 5.9 Cummins 12V Mechanical/Allison MT643
Rated Cap: Blue-Bird says 72 pass.
|
That's basically what I am doing except I'm using 2X4s instead of 2X2s because they tend to be straighter. And I got a good deal on 2X4s, and was allowed to be choosy, but they were very fresh so I let them dry in the garage for a while.
Getting away from all the water that falls from the sky in Oregon is why I want to move to Nevada.
|
|
|
|
|
12-16-2019, 08:44 PM
|
#14
|
|
Bus Nut
Join Date: Sep 2017
Location: Colorado
Posts: 400
|
Quote:
Originally Posted by gs1949
That's basically what I am doing except I'm using 2X4s instead of 2X2s because they tend to be straighter. And I got a good deal on 2X4s, and was allowed to be choosy, but they were very fresh so I let them dry in the garage for a while.
|
2x4s should work nice. I put a couple of 2x4s pieces in the middle of the walkways to make the floor more stiff, I would of put a row of them down the middle for extra support but didn't want to spend the extra $.
|
|
|
|
|
12-16-2019, 10:23 PM
|
#15
|
|
Bus Nut
Join Date: May 2019
Location: Lake Geneva, Wisconsin
Posts: 415
Year: 2008
Coachwork: Thomas
Chassis: Saf-T-Liner HDX
Engine: CAT C7 300hp w/retarder
Rated Cap: 46 + 1 36,200 lbs
|
Anybody that has a residential construction background should be familiar with peel and stick membranes. Water and Ice by W.R. Grace is what most people would be familiar with. I posted a month or two ago about my intention to put the peel and stick membrane down on my steel floor before I install rigid insulating board. For those not familiar it comes in a 36 inch wide roll and it is basically a backing sheet with another thicker layer of modified bitumen, which is a kind of tar. You pull off a throw away plastic layer which exposes the gooey adhesive layerAnd stick it down, hoping that you did it right, because it is hell to pull back up. If it adheres to the floor as intended, might this not be a great solution? The only question I still have is one about the suitability of the bitumen with regard to offgassing and indoor air quality
Another thread that recently came up on this forum discusses heat recovery ventilator‘s as a means for controlling the indoor humidity. I think this is the wave of the future. Metal skin buses are difficult creatures to make habitable, especially in the kind of climate we have here in Wisconsin.
|
|
|
|
|
12-16-2019, 10:33 PM
|
#16
|
|
Bus Crazy
Join Date: Aug 2019
Location: Moved to Zealand!
Posts: 1,517
Year: 2002
Coachwork: Thomas
Chassis: Freightliner FS-65
Engine: 7.2L Cat 3126 turbo diesel
Rated Cap: 71 passenger 30,000 gvwr
|
Quote:
Originally Posted by wrenchtech
Anybody has a residential construction background should be familiar with peel and stick membranes. Water and ice by W.R. Grace is what most people would be familiar with. I posted a month or two ago about my intention to put the peel and stick membrane down on my steel floor before I install rigid insulating board. For those not familiar it comes in a 36 inch wide roll and it is basically a backing sheet with another thicker layer of modified bitumen, which is a kind of tar. You pull off a throw away plastic layer which exposes the gooey adhesive layerAnd stick it down, hoping that you did it right, because it is hell to pull back up. If it adheres to the floor as intended, might this not be a great solution? The only question I still have is one about the suitability of the bitumen with regard to offgassing and indoor air quality
Another thread that recently came up on this forum discusses heat recovery ventilators as a means for controlling the indoor humidity. I think this is the wave of the future. Metal skin buses are difficult creatures to make habitable, especially in the kind of climate we have here in Wisconsin.
|
I know a lot folks use the 'peel n' stick' as a poor mans sound deadening in 4x4's and p'ups. Very few reports of off-gassing there but old trucks are not as air tight as you folks are making your buses...
There is some concern of flammability -- it might be hard to get the stuff burning but seems it's really hard to get out once started...
If you have a painted metal floor with out a bunch of holes left in it, you already have a vapor barrier -- metal IS a vapor barrier.
|
|
|
|
|
12-16-2019, 10:40 PM
|
#17
|
|
Bus Nut
Join Date: May 2019
Location: Lake Geneva, Wisconsin
Posts: 415
Year: 2008
Coachwork: Thomas
Chassis: Saf-T-Liner HDX
Engine: CAT C7 300hp w/retarder
Rated Cap: 46 + 1 36,200 lbs
|
Quote:
Originally Posted by musigenesis
The ribs are not directly attached to the floor, but rather they are bolted (although the "bolts" are more like large sheet metal screws) to the chair rail, which in turn is bolted to the floor. The bolts that attach the chair rail to the floor are mainly to prevent any outward movement of the wall; the inward movement of the wall that would occur in a collision is prevented by the flange at the base of the chair rail that goes across the floor and down the outside edge. The area behind the chair rail is sealed off from the inside of the bus (by the shape of the flange) but water can still drain (a little bit) to the outside.
Here's a crude diagram showing how the ribs (green) are attached to the floor (blue) via the chair rail (red):
Attachment 39953
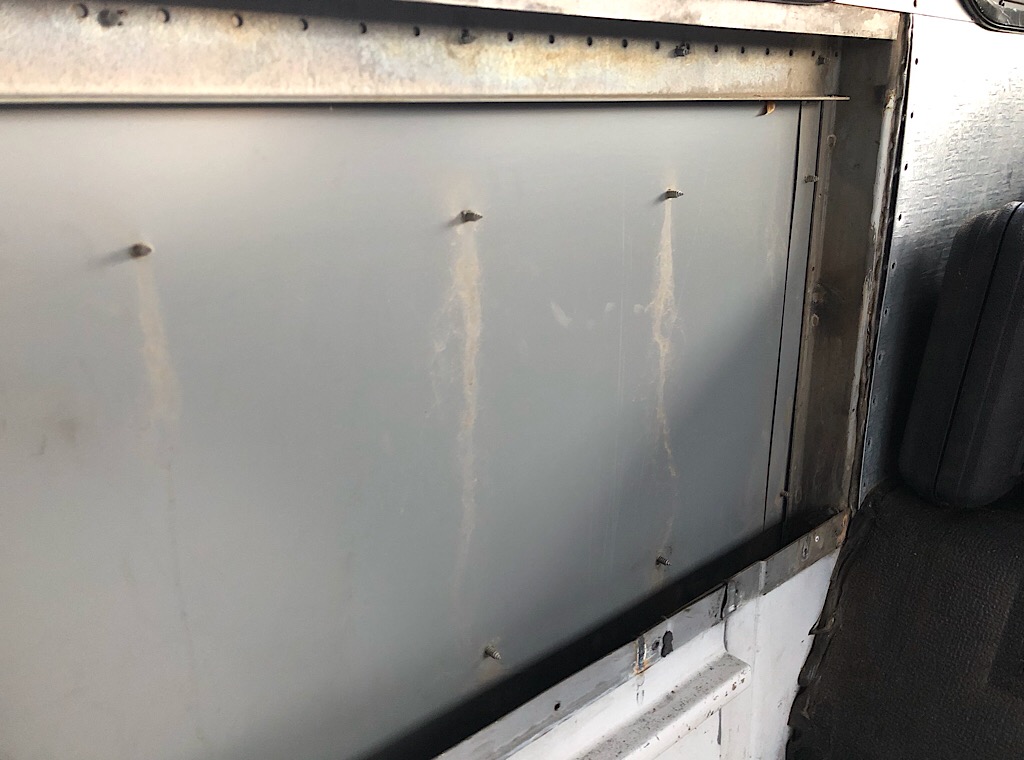
The little black things are the "bolts". |
Thanks for the excellent diagram. This is exactly how my structure is and now I understand it better. I hope the photo that I’m attaching below will be as useful. It is a shot of the wall cavity in my 2008 Thomas. Notice the weep weep marks tracking down from the screws. It’s not like the bus is from costal Oregon either. I just brought it to the Midwest from the deserts of Colorado. When I pulled out the factory installed insulation, it was damp. That chair rail detail is a real moisture trap.Add to that the fact that these buses have hundreds of similar penetrations and you can see that anyone trying to address this problem has their work cut out for them.
|
|
|
|
|
12-16-2019, 10:47 PM
|
#18
|
|
Bus Nut
Join Date: Jul 2016
Location: Western Oregon
Posts: 876
Year: 1995
Coachwork: Blue-Bird
Chassis: TC RE 3408
Engine: 5.9 Cummins 12V Mechanical/Allison MT643
Rated Cap: Blue-Bird says 72 pass.
|
Well, I will look tomorrow when it's daylight but I don't remember my Auburn WA bus having weep marks like that, and it's older too. That's interesting. What were the screws for?
|
|
|
|
|
12-16-2019, 10:48 PM
|
#19
|
|
Bus Geek
Join Date: Sep 2014
Location: Eustis FLORIDA
Posts: 23,764
Year: 1999
Coachwork: Thomas
Chassis: Freighliner FS65
Engine: Cat 3126
Rated Cap: 15
|
Rub rails.
|
|
|
|
|
12-16-2019, 11:19 PM
|
#20
|
|
Bus Nut
Join Date: May 2019
Location: Lake Geneva, Wisconsin
Posts: 415
Year: 2008
Coachwork: Thomas
Chassis: Saf-T-Liner HDX
Engine: CAT C7 300hp w/retarder
Rated Cap: 46 + 1 36,200 lbs
|
In the example I gave, I was not thinking of the membrane as a vapor barrier, but as a layer to protect the metal floor from moisture. My thinking is influenced by my long experience living in the rust belt. And also by my desire to live in my bus. Although I live in the southern part of the state Wisconsin we still get A lot of nighttime temperatures in the single digits during the winter months, and it’s not unusual to get down to the negative teens at least once every year, last year‘s deep dive to -30° F not withstanding. These factors call for a different approach than one might take in another part of the country.
|
|
|
|
|
|
 Posting Rules
|
You may not post new threads
You may not post replies
You may not post attachments
You may not edit your posts
HTML code is Off
|
|
|
|
 » Recent Threads
 |
|
|
|
|
|
|
|
|
|
|
|
|
|
|
|
|
|
|
|
|
|
|
|
|
|
|
|
|
|
|
|
|
|
|
|
|
|


 Linear Mode

